

I covered the idea of why I am doing this in some detail when I wrote about Rain Garden No1, basically it is so I could divert water that would usually go via the stormwater system into the sea, taking with it all sorts of pollution. I wanted to return it to the western Sydney aquifer instead.
Most of our downpipes go directly into water tanks, but once the tank is full the water will sometimes be directed into the original stormwater drain, and I had two areas that I wanted to take stormwater and redirect it into a rain garden – this is number two!
Where
This rain garden is in the front yard, around the middle of the yard in an area enclosed by the path, the park area under the mulberry tree, the raised garden/wicking bed and the herb spiral. It seemed to provide a great area to hold the rainwater while it sank into the ground (hopefully). The water source for it is the rainwater runoff from the northern end of the house roof. The rain goes through a downspout filter, then a first flush system and then into the northern 5500 litre tank. When the tank is full, the rainwater is overflows into the original drain leading to the stormwater system.

Testing the drainage
First thing I had to do in my chosen locations was to test the soil to see whether it was free draining enough. To do a percolation test I picked a spot in the middle of where I wanted to put the rain garden in, then using my post hole digger to dig a hole down 150mm to 200mm, which I filled with water. The idea was that a good rain garden site would allow the water to seep away within 24 hours. If not, then you can still have a rain garden, but the soil will need to be amended first. In the event, the water was gone in around five minutes! I concluded that drainage would not be an issue.
How - Water
I needed to work out how to get the rainwater from the stormwater drain to the rain garden, a distance of roughly eight metres and slightly uphill. Before I committed to installing the rain garden I had to assure myself that the water would be able to reach it!
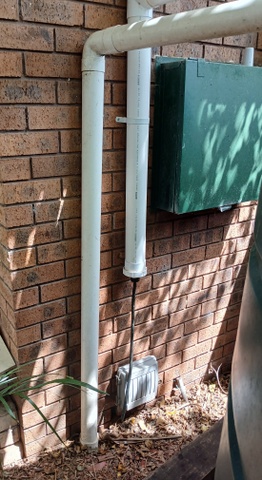
Prior to modification Valve setup in place
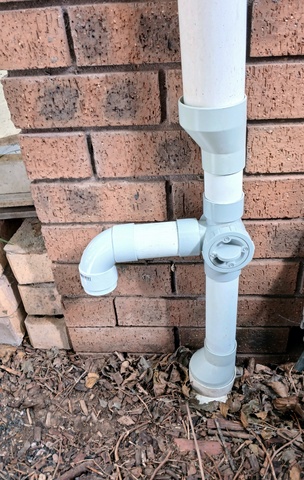
I installed a three way rainwater diverting valve in the drain so I could direct the water into either the rain garden or the stormwater drain, just in case. The thing was, how high up the drainpipe should the valve be so that the water would travel uphill enough to get to the rain garden, so I set up a stringline between the drainpipe and the rain garden, angling it so the valve would be above the area of the rain garden where the outflow would be.
I worked out that by mounting the valve 250mm above where the stormwater pipe went into the ground, there should be enough elevation for the water to flow up to the rain garden. The drainpipe is 80mm in diameter but the ports in the valve are only 50mm so I got a couple of 90mm to 50mm greywater hose adaptors along with some 50mm pipe allowing me to mount the valve where I wanted on the drainpipe. On the outlet facing towards the rain garden I fitted some pipe and a 50mm diameter 90° elbow to direct the water down into whatever I could get to carry it to the raingarden.

The next trick was how to get the water from the valve up to the rain garden. What I found at the hardware shop, after lots of fooling around with stuff I already had, was an 8 metre length of 50mm pool vacuum hose. Unfortunately the fitting on the end was only 40mm so I had to put a 50mm to 40mm reducer in the outlet from the valve, but that was easily obtainable and fitted well.
Running the test
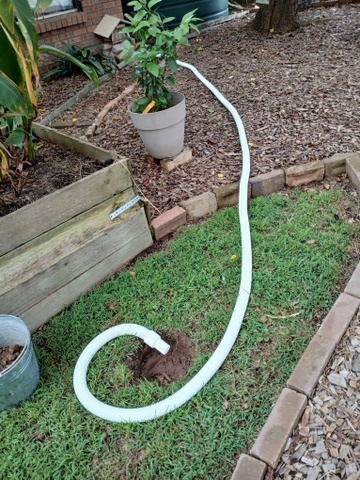
Rather than get too complicated I just fitted in the hose into the 90° fitting coming out of the valve and ran it along the ground up into the rain garden area, and waited for rain. In the end it did rain and the rain did make it all the way up to the raingarden and I was able to see it coming out of the end of the hose. We had a goer!

Tube now buried
I was now committed so I dug a shallow trench up to the edge of the rain garden and laid the 50mm hose in it, then covered it over and ran the hose under the perimeter of bricks that I had set up. In the end you couldn’t see where the hose was buried, only where it went down into the ground and then where it emerged from under the brick. There was about a metre of hose running into the rain garden area.
It was time to start constructing the rain garden!
The Garden Itself
There was no real difficulty in working out the footprint of the garden, it was already bounded on almost all sides, just a few bricks needed adding to go between the side of the wicking bed and the herb spiral.
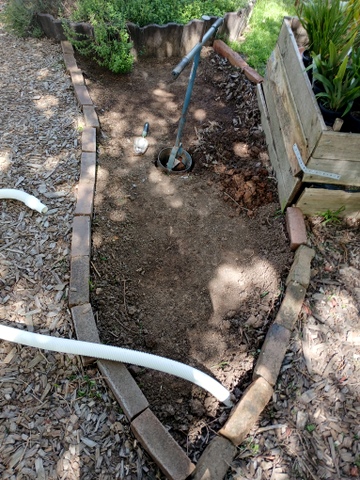
I removed the grass and top layer of soil over the whole area of the rain garden using my peasant hoe. With that done it was time to do a bit further research to work out what plants I wanted in this raingarden as previously the plants for the rain garden I wanted to be natives, and I needed them to be hardy and drought tolerant, because sometimes it can be a long time between drinks around here! The plants in the original rain garden are doing well so I decided that they were a good place to start.

I came up with two varieties of Dianella: Dianella Caerulia ‘Breeze’ (edible blue berries) and Dianella Tasmanica ‘Tasred’ (non-edible purple berries), and again, Lomandra Longifolia ‘Verday’, also known as ‘basket grass’ which was used by first peoples to make baskets (strangely enough!). I also decided to put in an Elderberry, Sambucus Nigra ‘Black Lace’ which is attractive and produces elderberries but is not self-fertile so I will need to get a compatible pollinator in the near future.
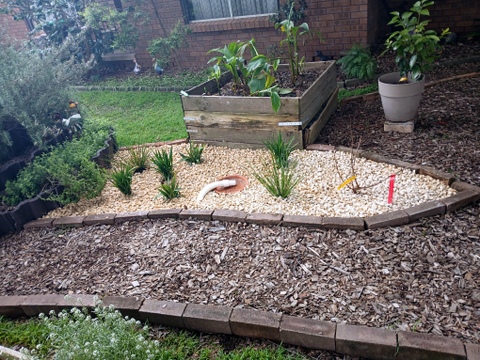
With all the plants bought and installed, I then got hold of some white stone mulch (white to reflect light back onto the plants) and put it in place.
Results
As luck would have it, a couple of days after I finished the rain garden we had a wet day, with a substantial downpour that night. I went out and checked and the pipe had lots of water flowing out into the rain garden to the effect that there was a pool of water was about 100mm deep in the centre of the rain garden. Once the rain stopped, I gave it about 10 minutes then went out to check the rain garden again and there was almost no standing water, it had all drained away. I am very happy with the look and performance of our latest rain garden.
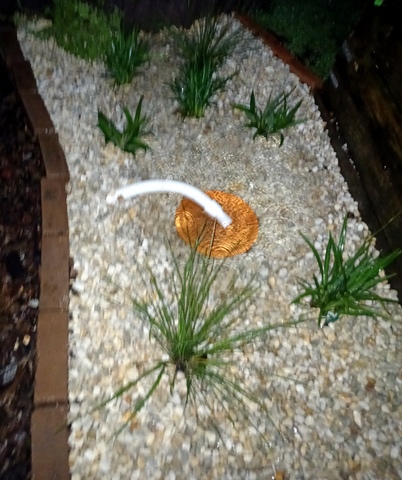
Just after the downpour (photo is a bit crappy, but that's what I got!)
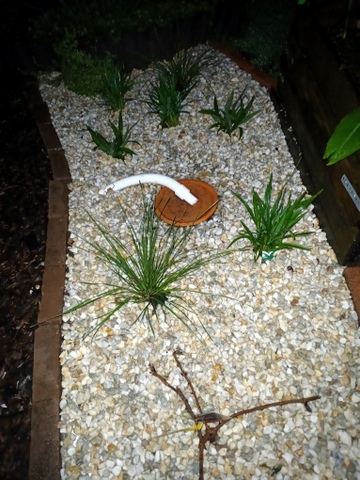
Ten minutes later!
