


Fixing the problems
At the end of the last article, I recorded that I had come to the conclusion that my yields were not good because –
1. There was not enough ventilation in the fruiting chamber allowing an accumulation of carbon dioxide, and/or
2. There was a lack of humidity in the fruiting chamber, spraying water with the hand sprayer every so often just wasn’t enough.
So I did some research to see what I could do to rectify these problems and it turns out that there is a comparatively easy fix for both.
- For the lack of ventilation, I used a 12mm hole punch to make a series of holes in the top and sides of the fruiting chamber (ie small plastic greenhouse) to allow more ventilation/gas exchange. Then to restrict the entry of unwanted fungal spores I covered the holes with micropore tape, thus letting the air in but keeping the spores out.

- For the lack of humidity issue I got hold of fogger/mist maker of the type used in small indoor water features. I bought it off Ebay for the vast sum of $20 including postage. You plug it in and immerse it in a water supply and it uses ultrasonic waves to create a mist which raises the humidity in the fruiting chamber. I set mine up on the top shelf of the chamber in a cat litter tray which I fill with water as the reservoir. My idea was the water vapour would be generated and then flow down over the mushroom fruiting containers and it does seem to operate like that.


So did it work? Well, therein hangs a tale –
Changing the paradigm
One of the problems I have had conceptually with setting up a system to grow mushrooms has been that I thought I needed to treat them like veggies. In other words, buy the seed (spawn) sow and raise seedling and pot them on (make, sterilise and inoculate the substrate) plant them out and grow them on (fill the fruiting containers and place them in the fruiting chamber) then look after them until they fruited. Maybe get two or three flushes then tip the spent containers out into the compost or veggie patch. This approach means buying more grain spawn each time I want to grow mushrooms and that gets expensive. (I don’t have the gear, knowledge or skill to make my own grain spawn).
But mushrooms are not veggies, in fact they are not plants at all!
So, is there a way I can use so that I don’t have to buy new spawn every time I want to grow mushrooms? It turns out there several, and this is my experience with the one I came up with.
After attending an online mushroom talk run by a friend of mine with Permaculture Sydney West it dawned on me that spawn is a way of distributing fresh mushroom mycelium evenly throughout the substrate to allow it to run and colonise the substrate. But what if you got mycelium from another source, mixed it through the substrate and allowed it colonise it in a similar manner to the grain spawn?
My thought was could I take the mycelium from a bucket which had already produced mushrooms and then use it in a similar manner to grain spawn? From some limited online research and reading through my books I didn’t find any details about how to do it or even that you could. However, I also saw nothing that suggested it wouldn’t work, so I figured the easiest thing would be to give it a go!


I made up and pasteurised some substrate as I had for the original three buckets then once I had this new substrate laid out on the table I took the mycelium/substrate mix from one of the original buckets, broke it all up with my hands then distributed it throughout the warm, freshly pasteurised new substrate. The other two buckets I emptied into the garden and then washed out the buckets.
I packed the new substrate/mycelium mix into all three of the now cleaned out original buckets and applied fresh micropore tape to each of the fruiting holes, closed them up and then placed them under the dining room table (as I did with the originals) for the mycelium to run through the substrate in a relatively temperature stable area.

I kept an eye on the buckets, opening them up once a week or so to see how they were tracking and indeed the mycelium was running through the substrate pretty well. The problem was that after about 6 weeks and a really good mycelium run they were showing absolutely no inclination to fruit. Clearly it was time to get serious!
I soaked one bucket in cold water overnight, then placed it in the ‘new and improved’ fruiting chamber (which I had installed in the garage) and a week later soaked the second one overnight and added it to the fruiting chamber. I kept an eye on them for another five or six weeks and not much happened. There was also no change in the remaining bucket under the dining room table.
When I say not much happened, one hole on one bucket did start to produce some oyster mushrooms, but in accordance with Murphy’s Law, the reservoir (cat litter tray) ran out of water just as that was happening, allowing the fruiting chamber to dry out and the mushrooms never came to much. I had a another talk with a friend who is a mushroom expert and after much consideration we decided that while I had been doing the right things, the original spawn I used was for a winter strain and maybe that was why I wasn’t getting any fruit. It was summer after all, even if it had been a comparatively cool and damp summer.
I kind of lost interest at this point and transferred the last remaining bucket from under the dining room table into the fruiting chamber without bothering to soak it overnight. I did keep the fogger reservoir topped up just in case SOMETHING happened. And sure enough it did!

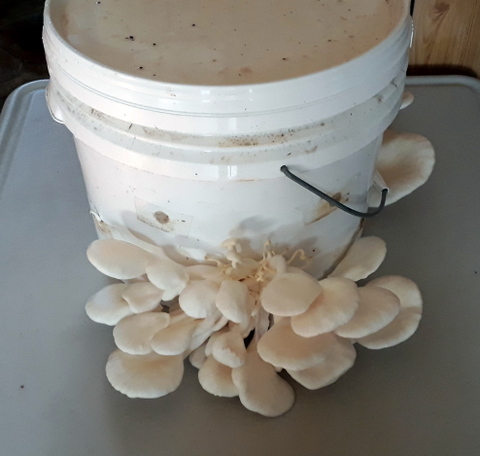
Some weeks later I was searching around the garage for some stuff to make Zoes’ Playboard and noticed some large, white protuberances emerging from the side of the third bucket! Low and behold, we have oyster mushrooms! I quickly removed the bucket, harvested the mushrooms and transferred them to a container in the fridge and returned the bucket to the fruiting chamber. This process continued for a number of weeks with small flushes from, in the end, all three of the buckets.
From my playing around it does seem that the idea works, at least for one more generation. How long it will continue for I have no idea, because in my continuing research I have found out about the concept of strain senescence.
Strain Senescence
The term strain senescence when applied to mushrooms means that, over time as the cultures divide and age, genetic errors can creep in, changing their original vigour and vitality. This results in less mushrooms and smaller mushrooms even on the first flush of the next run. When that happens it is time to get rid the mycelium currently in use and buy more spawn, but I have no idea how long that takes, but from what I have read maybe five to six generations out. I will just have to see!
Either way it is a means of getting more mushrooms from your original investment in mushroom spawn so it seems to me it is worth considering.
The adventure continues!
Part 2: Mixing, Pasteurising and Inoculating the Substrate
