A Bean,/Pea Teepee (Or should that be TeePea?)
One of the delightful things about climbing beans and peas (apart from enriching your soil by fixing nitrogen from the air) is that they can allow you to have a vertical harvest if you provide then something to climb up. The classic thing to do is to build a trellis up a fence or the side of a building but it is possible to provide climbing areas for peas and beans in the middle of your growing area too.
Growing vertically has a lot to recommend it –
- You maximise the use of horizontal space
- Create shady areas – here in western Sydney the summers are wicked and some shady areas where the hot sun is broken down a bit can give the plants a chance to grow.
- The area under a tepee can be a great place for the kids to play when the vines are grown, and they can even harvest their own healthy snacks as they play.
- It increases the amount of light and air getting to the leaves, great in winter of for those with a light deficit.
- Ease of monitoring for pests and diseases because you can see the leaves and produce more easily.
- Access to your beans and peas is improved; you can even harvest some while standing up.
-
Your harvest is not trailing on the ground so it is cleaner and less likely to fall prey to crawling pests like slugs and snails or pick up disease organisms from the soil.
Making Your Tee Pea
We are talking about a tee pea here because that is what I made due to it being winter here, but it will work equally well for climbing beans or indeed many other climbing vegetables. You can use just about anything to make your tee pea from but, as always, recycled or home produced is best. You could use straight bits of recycled wood like tomato stakes, bamboo canes or as we did, the prunings from our exceptionally vigorous mulberry tree but any long and straight but still flexible prunings would work.
Step 1 – prepare your veggie planting bed in the usual way, including putting on the mulch. For me it was much easier to construct the tee pea through the mulch than to make the tea pee first and then spread the mulch over later.
Step 2 – Select your prunings to be all around the same length, this is not critical but will make things easier, and then put them next to the area where you plan to build your tee pea. 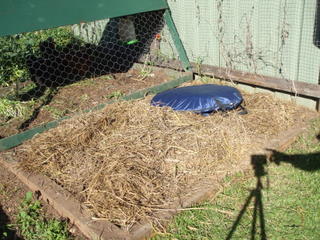
Step 3 – To see how the tee pea would fit into our 1.2m x 2 metre beds I could have made up a circular form the size I wanted but when I liked around the garage I found that the folded up portable toilet/shower tent was 70cm in diameter and made a perfect form. I laid the form on the back of the bed and to one side so that the tee peas would be off set and the front one not totally shade the back one. Plus it gave the bed an arty look. (who said I don’t have an artistic bone in my body?)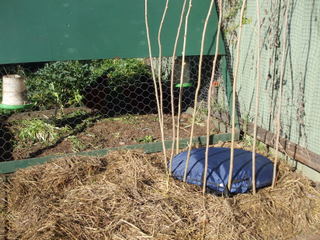
Step 4 – with the form in place I regularly spaced around it at roughly 10cm intervals and pushed the thick end of a mulberry pruning in to a depth of 150mm to 200mm so that they were more or less standing straight up. They were not perfectly straight so there was some leaning, but that only contributed to the rustic charm (or something like that).
Step 5 – with the prunings pushed into the ground securely, gather the top whippy bits in together and then tie them with string or twine (I used the blue bailer twine salvaged from our hay bales) and use secateurs to cut off any bits sticking too far up to give it a neater appearance (unless you are going for super-rustic).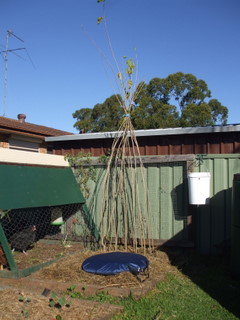
Step 6 – I then got hold of some of the shorter, thinner, whippier prunings and wove them in between the uprights, both to give the tee pea some extra strength and to give the peas something to grip and they grow up along the tea pee.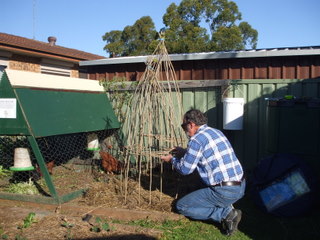
Step 7 – I cleared the mulch in a circle around where the prunings dug into the veggie bed and planted some pre-grown pea seedlings around the perimeter of the tea pea and watered them in. They are now growing nicely and eventually we will have a nice pea harvest. 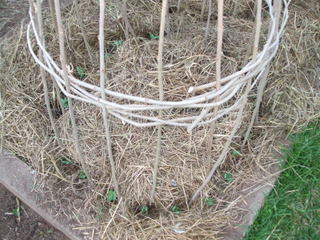
Step 8 – repeat steps 1 to 7 and make a smaller tee pea in front (to the north) of the original. 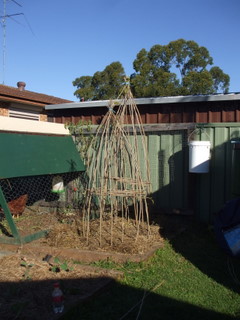
Things to consider
- When constructing a tea pea be aware of what is to the south of it so you don’t cause problems with shading of other garden inhabitants, especially in the colder months (like when you grow peas!)
- Don’t use treated timber. There may be problems with leaching of the copper chrome arsenic compounds into your well grown veggies.
- You could put a pond in the middle of a big one to modify the microclimate and keep things warmer.
-
You could leave the centre accessible for use as a play area although if you have constructed your tee pea in amongst your other veggies and/or in a veggie bed, playing kids can cause a serious dose of soil compaction.
2012 Update
Last year the teepea did so well and produced so bountifully, I am doing the same thing this year with a few minor changes. I have included an extra line of weaving to increase strength because the weight of the vines caused some deformation of last years teepea, and the front (northerly) one produced best so I am putting them at either end of a 3 metre bed so that there will be less shading, and I am putting them in earlier this year. I have had to harvest some sticks directly from the mulberry tree but this makes them more supple and easier to weave, but I have also been able to use some of the sticks from last year. Here's to a great harvest!