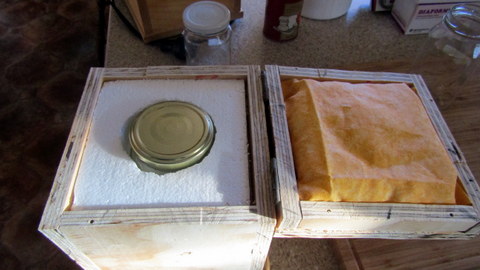
As previously mentioned in the article about how I constructed our yoghurt maker, we have been applying Greek yoghurt to various items of food (bean burritos, mixed bean chilli, veggie soup etc.) instead of sour cream. Rather than buy two products, and so we could make our own, we went over to using Greek yoghurt exclusively. Before making our own, there were two considerations I needed to take into account –
- We don’t go through a lot, maybe one of those 200g tubs in a week, and most of the commercial yoghurt makers start at one litre, and
- We use powdered skim milk to reduce packaging and save money.
Hence the development of an apparatus to make small amounts of yoghurt, based on our own stored skim milk, and with it now in place it I could press it into service.
To make the Greek yoghurt using our set up I needed somewhere to start, being unable to conjure the required bacteria directly out of the air, so I had a look to see what commercial Greek yoghurt is out there for use as a starter. Sadly, some are adulterated with all sorts of colours, flavours, sugar and other crap, and some are pasteurised, so that the beneficial bacteria are killed and it is rendered useless as a starter for homemade yogurt.
If you can get hold of some commercial yoghurt which is listed as ‘pot set’ (and lacks all the other rubbish) it is a broad hint that the bacteria will still be living, better for you to eat and better to make yoghurt with. We found that ‘Jalna’ brand pot set Greek yoghurt in 200g tubs worked out very well for us and was an excellent starter.
Our process is as follows -
- Sterilise jar and lid – We will be keeping easily metabolised bacteria food at the exact temperature that bacteria like to be at, so to minimise the likelihood of the whole thing being commandeered by ‘unauthorised’ bacteria, we sterilised the jar and lid we were to be using first. We did this by boiling both for 10 minutes, although we could have had the same effect by putting them in the oven at 120°C for 10 to 15 minutes. If I am boiling up preserving bottles I throw in a spare jar for yoghurt making at the same time.
- Put one jar full of skim milk in milk saucepan, and add one dessert spoon of skim milk powder and stir to dissolve. We make up skim milk from the powder as we need it, usually on a ratio of a cup of powder, made up to one litre of water. The completed milk gets measure out into the milk saucepan and then it is just a case of adding in an extra dessert spoon of the powdered milk for extra viscosity in the finished yoghurt. (We like our yoghurt pretty thick around here pardner!)
- Heat to 92°C while stirring – This is to sterilise the milk, again, to prevent the build-up of unauthorised bacteria. I do this over the gas on medium, stirring with a lab thermometer I bought in my younger days. Stirring with any type of thermometer would work, just so the milk doesn’t catch on the bottom of the pot.
- Cool to 45°C – I take the milk saucepan and then place the bottom of it into a pyrex jug full of cold water to cool the milk down. I stir continually until the temperature hits the 45°C mark or thereabouts.
- Add in starter (1 dessert spoon of commercial yoghurt) and stir to disperse. The idea is to have the milk around 40°C for the yoghurt bacteria to be able to thrive, but the starter we use is cold from the fridge and so adding while the milk is a bit warmer, allows it to take the mix down the last few degrees and get the temperature spot on.
- Pour the milk mixture into the sterilised jar, screw on sterilised lid and place it in insulated box (yoghurt maker).

I leave the milk/yoghurt mix in the yoghurt maker overnight and in the morning we have nice, thick, Greek Yoghurt. The result has been a bit variable for me and I am not 100% sure why. Mostly I get thick yoghurt but on the odd occasion it will come out thinner. Anyway, if this is the case, pour the yoghurt into some cheesecloth and suspend it for a short time, until enough water has drained out and you have the thickness of yoghurt you like.


