


My introduction to yoghurt was as a teenager (yup, THAT long ago) in the form of commercial “SKI” brand yoghurt. It had loooots of sugar and who knows what else in it, but that was what I thought yoghurt was. We bought an electric yoghurt maker after we got married and I tried to reproduce the only yoghurt I was familiar with, and failed dismally! We gave the yoghurt maker away to a friend and that was it.
Until now!
Just recently my sweetie has been applying Greek yoghurt to various items of food (bean burritos, mixed bean chilli, veggie soup etc.) instead of sour cream. Me, I lurve sour cream but it has a limited shelf life, we were coming up to No-buy July and even if I could make it (which I can’t) the main raw material is cream, which is a bit sparse in our neck of the woods if you can’t buy it. So I started using her Greek yoghurt instead, and while it is a bit different to the sour cream it is still quite palatable. It was time to have a go at yoghurt making again, but this time for savoury, rather than sweet purposes.
But there were still two considerations –
- We don’t go through a lot, maybe one of those 200g tubs in a week, and most of the commercial yoghurt makers start at one litre, and
- We have gone across to using powdered skim milk to reduce packaging and save money. In fact, before we started “No-buy July” we bought a 25kg bag of the stuff. If we can make yoghurt from it as well, that would be a great thing!
My first trick was to construct a yoghurt maker from stuff we had floating about which could make the small batches of yoghurt which would suit our needs. Hence this article.
Making the Maker!
The Box
After some casting around I decided to build the maker around a 350ml glass jar, of which we have plenty around here since we use them for preserving all the time. To maintain the correct “yoghurting” temperature I decided to put in 25 to 30mm of insulation around the glass jar, with a wooden box around that.
The material of construction of the box would be plywood, mainly because the neighbours across the road were throwing some sheets of plywood out and I souvenired them. We had polystyrene sheet (from packaging) and polystyrene beans (from previous projects) and I was able to find a couple of mild steel hinges in the garage so I was right to go!

Using 14mm thick plywood I made a box 155mm x 155mm x 205mm high. I cut out 2 pieces 180mm x 130mm, 2 pieces 180 x 155 and 2 pieces 155mmx 155mm. Using a couple of mitre 90° angle clamps to line up the first two sides, then drilled and screwed them using three equally spaced 8 gauge x 30mm chipboard screws. I attached the next side using the same process and then added in the fourth side by anchoring it to the box on one side with the angle clamps, making sure it lined up with the other side, then screwing it into place. It was then a simple matter to secure the fourth corner the same way. I then put the top and bottom on the box using two screws drilled and screwed in on each side of the top and bottom.

The box was sort of completed, but there was no way to get into it! So I measured down 32mm from what I designated to be the top (ie the best looking end), drew a line around and cut what became the top away from the rest of the box using a circular saw. It could just as easily have been done with a hand saw.


I used the couple of 35mm long by 25mm wide mild steel hinges I found and drilled and screwed those in to complete the box.
The insulation
As previously mentioned, the insulation would be polystyrene foam waste which is light, efficient as an insulator and free! You don’t have to have a hot wire polystyrene cutter but it sure makes things easier. I measured up the inside of the box and using a the hot wire cutter resting against a metal rule to give me a nice straight edge, cut the first 32mm thick slab to use as the bottom and placed it into the box. With that in place, I cut three more, then using a pencil I sketched a circle on the centre of each of them, the same diameter as the glass jar. I didn’t have a template for the hole so when I cut them out they were not as round as I would have liked, but would do the job. To finish off I cut a square of 18mm thick foam and then cut the central hole in it. With all the layers assembled in place the fit of the jar wasn’t absolutely perfect, but it fit well enough to do the job.

To provide insulation for the lid but still have a bit of flexibility so it could conform to the lid of the glass jar I elected to use a small “cushion” filled with polystyrene beads. Linda was helping me with that, she cut out a rectangle of cotton material 140mm x 290mm, doubled it over and sewed around the three edges to make a bag. She left 25 – 30mm of the final seam unsewn to fill the bag through, then turned it inside out. I filled the bag loosely to about three quarters full with polystyrene beads. To achieve this I used a plastic funnel and due to static the little polystyrene balls got EVERWHERE! Hint: use a metal funnel if you have one!
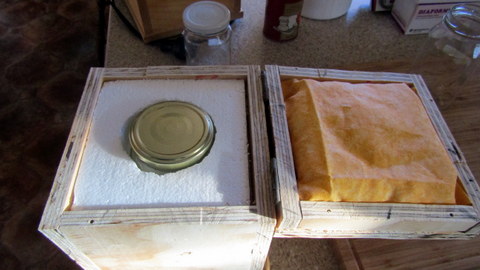
With the little pillow now full, she sewed the hole shut and it was ready to go. It fits very neatly into the inside of the lid and doesn’t fall out when you open the box. The yoghurt maker was now complete. I didn’t spend a lot of time finessing the exterior of the box, because I was unsure of how well it would work, but how well it did work is the subject of the next article: part 2 – the process.
