Introduction and Safety
Okay, now we can get into using the dangerous chemicals and have more fun, but a word to the wise before we go further –
Caustic soda (or Sodium Hydroxide) is nasty stuff so when working with it ALWAYS make sure the kids are a safe distance away and always use eye protection (goggles or a face shield is preferred, safety glasses do not provide enough protection) and PVC or nitrile gloves. You should also wash your hands after working with this stuff and before you eat, drink, smoke or use the toilet. (If any ladies have made is this far, please go elsewhere now – embarrassing story alert!)
Back *mumble* years ago when I was a young chemist working in the chemical industry I was doing a lot of work with sulphuric acid. After a while my hands got used to it and I took it pretty much for granted, until the day I forgot to wash my hands before peeing. I got a neat 5mm diameter chemical burn each side of my, umm sensitive area and that was a lesson leaned for me. It took two weeks to heal! So, gentlemen, when I say to wash your hands after working with caustic soda and before eating, drinking, smoking or using the toilet…….I MEAN IT!
The process of saponification – the chemical word for making soap – is based on adding a solution of alkali (in our case, caustic soda) to animal fats, vegetable oils or any combination of the two. There are many vegetable oils used in making soap and they each add different properties to the finished soap and they all require different amounts of alkali to fully saponify them. In this article I will be concentrating on showing you how to make a shampoo soap bar that I have been using successfully for years, but you can design a soap to your own specifications. At this point I must recommend the book “Soap Naturally” by Patrizia Garzena and Marina Tadiello, their website is in the Links section of the site. It gives you more than enough information to design your own soaps.
Ingredients
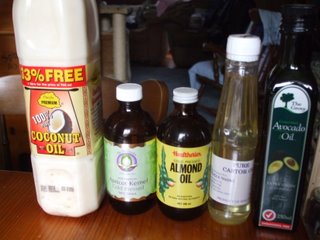
As mentioned earlier, soap is made using a water solution of an alkali and a fat/ oil or mixture of fats/oils. What I want to do here is list the oils in my soap and show what each oil is in there to do –
• Olive oil – the base of the soap, olive oil soaps last a long time but are not high lathering soaps, they clean well and are not rough on the skin. If you can, get “pomace” grade olive oil which is best for soapmaking.
• Coconut oil – available as “copha” in the supermarket (remember chocolate crackles?), coconut oil gives a wonderful lather but in high percentages can be hard on the skin. Coconut oil soaps, while quite hard, tend to wear away quickly.
• Rice bran oil – used for hair care soaps, it contains natural antioxidants and sun block.
• Castor oil – used in small amounts, castor oil gives a rich lather that is valuable in hair shampoo soaps.
• Avocado oil – again, used in small quantities, avocado oil provides a mildness to the soap so that it not too hard on the skin and hair.
• Apricot kernel oil – is used as a superfatting oil that gives the soap nourishing and soothing properties.
• Rosemary oil – this essential oil does not take part in the saponification process but is good for the hair and adds a pleasant fragrance, although in my experience the fragrance is preferred by men rather then the ladies of the household. (well this is soapmaking for blokes!)
Most of these oils are available at the supermarket but you may need to try a chemist or health food shop for apricot kernel oil. You can also find coconut oil in Asian food shops.
The Formula

The formula for my shampoo soap is –
Olive oil 680 grams
Coconut oil 445 grams
Rice bran oil 150 grams
Castor oil 75 grams
Avocado oil 75 grams
Apricot kernel oil (added at trace) 75 grams
Sodium hydroxide 217.5 grams
Water 450 grams
Rosemary essential oil 10 mls
The amounts need to be reasonably accurate so it is worth investing in a digital scale with a tare feature so you can tare off the container and add in the exact amount of ingredient. These amounts are designed so that a batch just fills the soap mould in the previous article. Obviously you can scale the batch up or down but you must keep the ratios the same. After the first batch of soap was such a success I needed to scale it up a bit to completely fill the mould but I wound up increasing all the ingredients but the sodium hydroxide, the result was a major “what have I done wrong?” panic and a waste of a soap batch. My suggestion is if you do alter the size of the batch, get someone else to check your maths, it can save you considerable angst and loss of raw materials.
The Process
By and large there are two types of soap making processes, the hot process and the cold process. I use the cold process and that will be the way I describe how to make my shampoo soap, but if you want to know more about the various types of hot process for making soap, get hold of “Soap Naturally”.
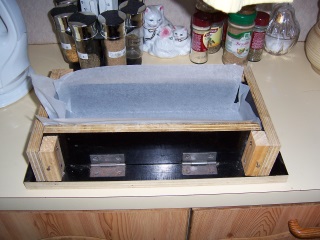
1. Prepare the mould, I have tried all sorts of things to make the soap release cleanly from the mould but the only thing I have found to date that works is siliconised baking paper, so prepare the mould by lining the mould with the baking paper.

2. Prepare the oils in the main batch ie olive, rice bran, coconut, castor and avocado oils. If the weather is cold you may have to stand the coconut oil in hot water to melt it down. Weigh them all into a stainless steel pot that is large enough to take the whole batch, I use a 2 litre pot.
Warning: Don’t use anything in the way of aluminium cookware for soapmaking, the high alkalinity of the caustic soda and raw soap will react with it, causing all sorts of problems – glass and stainless steel are OK.
3. Apply heat to the oils and get them to about 45°C, check with a good thermometer, a laboratory one is good, or one used for sweetmaking.

4. Put the required amount of COLD water into a heatproof receptacle, I use a Pyrex measuring jug, add the caustic soda to the water slowly with stirring, this is one of those reactions where a considerable amount of heat is released as is some fairly unpleasant, choking fumes, so I do it outside.
5. When the lye (caustic solution) is clear and all the sodium hydroxide is dissolved allow the temperature to drop to no more than 40°C, it will start out considerably hotter than this so it may take some time to cool. Keep track of the temperature with the thermometer.

6. Once the temperatures are right (you will probably have to fiddle with the oil temperature a bit to keep it where you want it) get out your stick mixer, put it in the oil, turn it on and slowly add the lye solution. The soap will go from very liquid to a think creamy consistency as the saponification continues, keep mixing until you hit “trace”.
7. Trace is a soapmaking term and refers to the point in mixing where soap falling back onto the surface of the batch does not sink straight in but sits on the surface for a few seconds ie it leaves a trace….. The saponification reaction doesn’t take very long just a minute or three, so pull the stick mixer out regularly and let some drops fall off it to check for trace.
8. Once you have hit trace, add the apricot kernel oil, this can be done best weighing by difference. Place the bottle of oil on the scales and hit tare so that the scales read zero, then add in the oil slowly, reweighing regularly until the scales read minus 75 grams. Then stir the oil in by hand. Add in the roemary oil and stir by hand again.
9. The soap is now ready to pour into your pre-prepared mould.
With the soap now safely in the mould, place a top on the mould (I use more of the plywood) and wrap the whole thing in a blanket to retain the heat and place the assembly in an out-of-the-way area for 12 to 18 hours.
The End Product
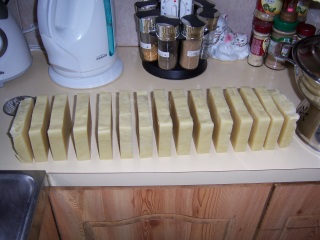
When you open up the blanket and then open up the mould, the soap should look…….soapy! An obvious thing to say but at least once it looked pretty blecchy for me and if this is the case for you too then something has gone wrong. Assuming it looks soapy, cut the big bar into a whole stack of smaller bars, I use a cheese cutting wire to accomplish this. The way the cold process works, the raw soap will still be too alkaline to use at the moment, so sit it aside to dry and continue reacting for at least one months. After that all bets are off and the soap is ready for use.

While this is officially a shampoo bar I have found it quite good for most uses such as hand and body wash as well as to provide lather as a shaving soap, and of course it washes hair really well.
The way I designed this soap is that it is 4% superfatted, that is to say there is 4% more oil in there than the amount of lye added in can saponify so after the reaction is complete 4% free oil remains, not that you can tell this when using the soap. The effect of the unsaponified oil is to act as a conditioner for your hair. So as well as being able to throw out that evil petrochemical based shampoo, you can also do away with your conditioner and I don’t need to tell you how much money that is going to save you.
So, I’ve done all the hard stuff, designing for you the best soap ever don’t upset me by not making it……go for it!


