


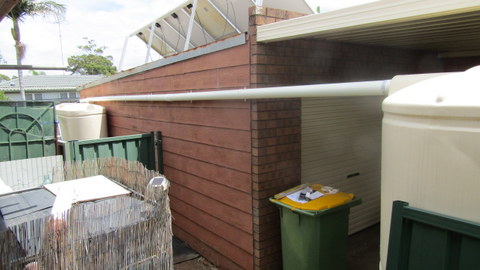
I wanted as much rain water storage as we could manage and was working towards 20,000 litres but the amount of free space we have is extremely limited. When I looked around to where we might be able to fit a new tank in, the best I could come up with was to put a long skinny tank beside the garage. There were a few problems with the area but none that were insoluble. One of the not negotiables was that the gas man had to be able to wheel his trolley down beside the garage to deliver a 45kg LPG tank. This is a rare occurrence, less than once per year, but it still had to be allowed for and it worked out OK in the end.
We had a current rainwater storage capacity of 16,000 litres (round figures) but after considerable research it seems the best I could do was to fit in a 3,000 litre slim line tank which was only 720mm wide (and 2790mm long and 1960mm high) So that’s what I ordered – let the fun begin!

The area beside the garage had a small, 740mm wide concrete pad where I wanted to put the tank but it was only half as long as the tank and had a composter and storage drum on it, which both had to be relocated. The pole supporting the (no longer functional) wind generator also took up space pushing the tank 60mm away from the wall of the garage, so that had to go too. Once that was done I measured up the space and found I could fit in the tank and still provide access down the side of the garage with no problems.

The area between the side fence and the garage has a covering of 20mm river pebbles which had to be cleared away first. To frame the tank base area I had a 150mm wide x 28mm thick x 4000mm long CCA board left over from the previous tank installation. It would provide an edge on two sides of the area next to the pad and by cutting the board in two to form a 1600mm and an 800mm length, this became the side and end of the base respectively. I was able to dig them in so that they were level with the top of the pad. I put whatever pebbles I had inside the form, then put in a 75mm layer of coarse sand over the top to support the base of the tank.
It seems the tank weighs 125kg, so shifting it around by myself had me sweating, cursing and swearing remarkably quickly, and even though I only had to lift it up 75mm - 100mm to sit it on the base, I was wishing I had the Force with me so I could just levitate it into place like Yoda could. However, no Force, so I used my shovel to lever it up and across such that it was mostly on the base and then shouldered it across the rest of the way into place. Once I worked out how to do it, it actually went remarkably quickly and easily!

With the new tank it place, I needed to plumb it in. I was going to use the outlet from the 5000 litre tank next to the carport (difficult at this point because it didn’t exist!) to supply the water and then run piping from it to the inlet of the new tank. One advantage of running the piping from the outlet of the older 5000 litre tank was that it had a first flush diverter already in place and so would only provide clean water to the new tank.
The inlet of the new tank was in the centre of the top of the tank and about 7 metres away from the 5000litre tank. I used 90mm stormwater piping running from the outlet of the first tank to the inlet of the new one. I didn’t have a 90mm hole saw to drill the outlet hole in the 5000 litre tank but I did have a 65mm one and figured that would do the trick (which in fact it did!).

Both tanks came with an outlet, 4 screws and a mesh fitting to go in it to keep the mozzies out. I drilled out a 65mm hole at the end of the 5000 litre tank closest to the new tank and fitted the outlet and the mesh, using silicone sealant (silicone is my friend!) to stop any leaks. I then ran 2 x 3 metre lengths of 90mm pipe plus a 1 metre length using joiners bought for the purpose, secured with more silicone. I used 90mm saddles every metre or so to fix the pipe to the side of the garage, ensuring there was a slight downward angle from the 5000litre tank to the new one so that the water flowed properly. I added a 90° angle piece to the end and then a short section to take the 90mm pipe over the inlet of the new tank.
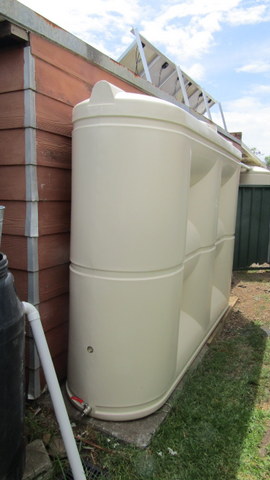
The only things left to do were to drill out and fit the valve in the bottom of the tank and install the overflow to the 3000 litre tank, which I did.

It was a fair bit of hassle to push through and finish it by myself, but the weather report said that we were due a dump of rain and I had barely finished off the tank when it started. We got 9mm of rain in 10 minutes at one stage and now all of our tanks are filled to overflowing, including the new one!

