


Asparagus is a perennial, and thus does not need to be replanted every year. If you buy the plants as 2 year old crowns it means less time to wait until a harvest, because it can take five years from sowing the seed to getting stalks to edible size (at least the thickness of your little finger). Having said that, it can be immensely satisfying to grow asparagus plants from scratch, which you can then use to increase your own production, give away to friends and relatives or sell them off.
Allow your asparagus plants to do their thing ie grow in spring, be harvested, then grow up, flower and die back in autumn. Asparagus is dioecious (ie the male and female flowers are borne on different plants) and hopefully you will have a mix of plants in your production area, the proof of which will be ripe red berries on them in the late autumn to winter.

The first part of the process is to pick the berries off the asparagus fronds after the fronts have died off and gone brown. I find it easiest just to sit down in a quiet, sunny corner and pick them off and place them into a container. With your berries collected you will need to process them so that the seed can be stored for later use, and if stored correctly (cool, dark and dry) they will remain viable for two to four years.
Processing
This is a three stage process but it is still fairly quick and easy to carry out.
Stage 1
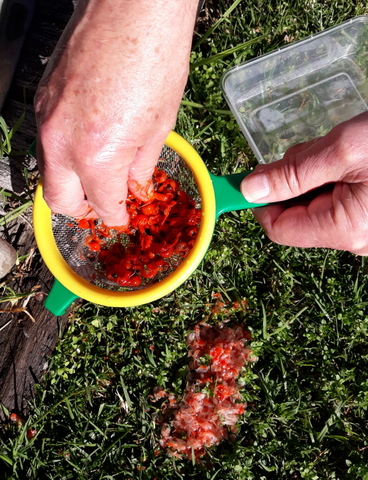
Place some of your berries in the bottom of a small kitchen sieve and smoosh (technical term) them together with your fingers to separate the seeds from the flesh of the berry, the outer red berry skin and the inner clear/translucent seed coating. Running the sieve under running water leaves the seeds, berry skin and seed coating behind but washes through the gelatinous and sticky berry flesh, making the next stage much easier.


Stage 2
Pour the contents of the sieve into a high sided bowl, (I use a plastic noodle bowl from the local takeaway) and run some water into it, say to about half full. Then swirl the contents of the bowl with your fingers and then gently pour out the water. The water being poured out will take the light berry skin and seed coating with it while leaving the heavier seeds in the bottom of the bowl. The first rinse will show if there are any un-smooshed berries (so smoosh them!) and after about three or four rinses almost all of the light stuff will be gone with only the heavier seeds remaining.

Stage 3
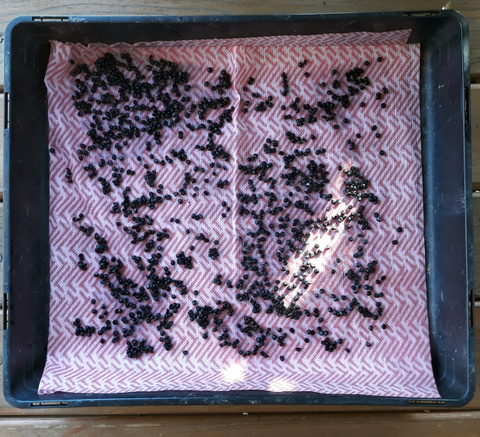
This is the easiest one! Place the washed seeds onto a fabric or paper sheet (I use chux wipes because they are reusable) in a seedling tray and set it out of the sun to dry out, after which the dry seeds and packed off and labelled.
I was surprised just how easy it was to do and it took me less than two hours to process the seed from this year’s asparagus crop. Lots of fun and you get seeds at the end!
