I have had variable results when using commercial mushroom boxes/kits over the years, trying to coerce a crop out of something which does not want to be forthcoming. Certainly part of the problem has been my lack of understanding of the process of mushroom fruiting and this has prevented me from providing the correct environment for fruiting to occur.
That, and some of the boxes have just been utter crap!
But, growing mushrooms with a kit can be easy, fun and productive once you know how to do it and has little in the way of up-front costs, just the kit itself and a few small one-off purchases to help along the way. The requirement for growing each mushroom type will vary and details for two types are provided below: the common and very popular button mushroom and the less well known but easy to grow oyster mushroom.
- Button mushroom (Agaricus bisporus)
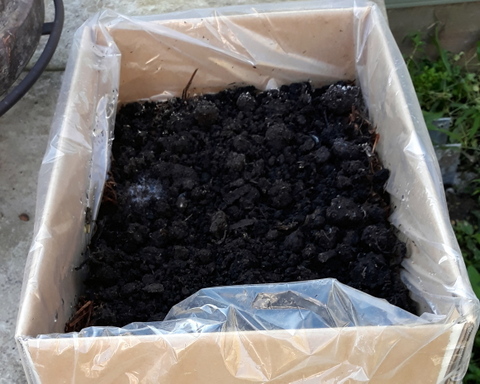
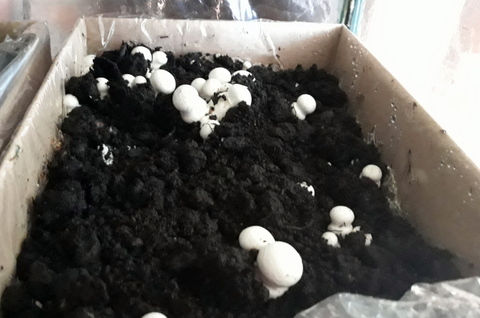
Button mushrooms will fruit and grow at the open top of the kit.
The kit will usually come as a corrugated cardboard box with a plastic bag inside containing the substrate and mycelium, there will also be a smaller plastic bag within the main one containing the casing material. Open the box, and the inner plastic bag, remove the smaller bag of casing material and inspect the substrate, it should be covered in white thread like material called mycelia or mycelium. If the compost substrate looks brown the mycelium run has not been completed, reclose the plastic bag, shut up the box and leave it for a week. Upon re-opening the box, the mycelium run should be showing up as white thread-like material, if not close up and wait another week.

Once the mycelium has run and it ready for the casing material, fold the opening of the box down onto the sides and then run the inner plastic bag down so that it keeps the cardboard flaps down against the side of the box. Then fluff up the mycelium containing substrate and even out the top, so it is level, then open the bag of cocopeat ‘casing’ and spread it evenly over the top of the substrate and mycelium. Give the casing a fine spray with water to ensure it is damp. The kit is now ready to go.
Place the kit in a low light area (not necessarily dark) that will maintain a temperature of 20 to 25° C and a high humidity. Humidity can be maintained by regularly misting the top of the casing a few times a day, but the best way is to put together a fruiting chamber. The fruiting chamber (construction details here) will ensure the mushroom kit stays in a moist but well ventilated environment.

Fruiting should occur in three weeks or so, although this could take longer at colder temperatures. Fruiting starts with pinning, or the appearance of small white dots or ‘pinheads’ coming through the casing. Each pin head will develop into a mushroom.
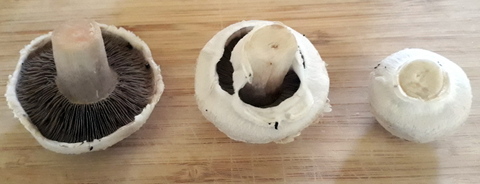
Mushrooms should be harvested by twisting them out of the substrate/casing. They can be harvested at the ‘button’ stage, where the cap is still attached to the stem, the ‘cup’ stage where the cap has detached from the stem but has not flattened out and the fully mature ‘flat’ stage where the cap has flattened out. The flavour of the mushroom becomes stronger and more ‘meaty’ the later the stage at which they are picked.

Once the first ‘flush’ of mushrooms has been harvested, leave the kit in the fruiting chamber and it may produce several more flushes. The kit will continue to produce mushroom flushes until all of the nutrients are used up, after which the contents of the kit can be added to a compost pile or placed directly onto the garden.
- Oyster mushroom (Pleurotus ostreatus)
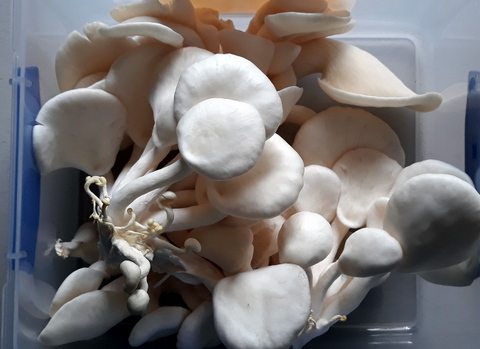
Oyster mushrooms may fruit and grow from the side of the kit or the top. Depending on the maker of the kit, you may be required to set up using the outer box and the inner plastic bag, or just using the inner plastic bag. Before starting, ensure the mycelium has run through the substrate block to the point where it is predominantly white. If the block is not predominantly white leave it and check in a week.
Once the mycelium run is complete, open the box and remove the inner plastic bag full of substrate and mycelia. Cut a slit in the top of the bag or remove the top just below where it is sealed, fill the bag with cold clean water and allow it to soak for 24 hours. Once the 24 hours has elapsed, empty the bag. This is done to stimulate the mycelium to fruit, producing mushrooms.
If there appears to be a ‘skin’ on the surface, scratch it to expose the mycelium underneath. Either leave the top of the bag open or cut a flap in the long side with a sharp knife, but don’t remove it. Some kits may require to cut out a 50mm x 50mm hole in the side of the box, replacing the bag in the box and then cutting an X in the plastic bag through the hole in the box, to expose the mycelium. The kit is now set up.

Keep the kit in an area which gets at least 6 hrs of light (either artificial or indirect sunlight) per day, within its preferred temperature range of 7°C and 25°C and preferably in an environment of 70% humidity. This can be facilitated by misting with a hand sprayer with cool boiled of filtered water 2 – 3 times per day or placing the block in fruiting chamber as mentioned above.
Check the block regularly. Mushrooms may start to appear within 7 to 10 days. Harvest then when they reach 7 to 10cm in diameter cut them from the base with a clean sharp knife and they will be ready to eat. Rest the block for a week, then recommence misting and more flushes of the mushrooms will occur.
Mushroom kit troubleshooting
No mushrooms –
- Too dry or too wet – The substrate in the kit needs to be kept moist but not soaking wet, it should release a few drops of water when squeezed between the fingers. Checking on the kit regularly and misting as required should keep the moisture in the ideal range, but it is easier with a fruiting chamber.
- No air exchange – ensure the kit is stored in an area where there is adequate ventilation to allow carbon dioxide out and oxygen in.
- Wrong temperature – A temperature lower than the optimum range for the mushroom can slow the growing process down and too high a temperature can stop the process entirely and even killing the mycelium. Ensure the area where your mushrooms are growing is maintained within the optimum range for that type of mushroom.
- Impatience – these thing take time so be patient when things are not happening as quickly as you would like.
- A dud kit – occasionally kits can be stored wrongly by the retailer or be too old when they were bought resulting in zero mushrooms. Buying fresh kits from a reputable supplier will prevent this happening again.
Oher issues
- Fine powdery material around the kit when the mushrooms have fruited – these are mushroom spores and can just be wiped off with a damp cloth.
- Flies around the kit – they are attracted by the compost, spread olive oil around the lip of the kit, the flies will get stuck to it and dry out.
- Stunted spindly mushrooms that are all stalk and no cap – build-up of carbon dioxide due to poor ventilation, improve the ventilation.

Setting up and using a commercial kit is a great way to get into mushroom growing. Fun and educational for the whole family it is worth the small investment in money and time – and in the end you get mushrooms!


