


.JPG)
I recently attended a ‘permablitz’ at a friend of mine’s place, and due to my previous experience with wicking beds, she asked me to oversee the construction of three of them being constructed from IBCs (Intermediate Bulk Containers). So of course I said yes!
Her proposed design was as follows:
The plastic cube of the IBCs had already been cut in half, as was the surrounding cage to allow a support for the sides. Into the bottom of the cut off IBC we were to place a number of ‘Water Ups’ with the wicking area filled with vermiculite or perlite, and then a layer of shade cloth placed over the top. The growing medium would then be shovelled in on top of the shade cloth. She had already installed a small pipe in the side of the wicking bed at the level of where the top of the ‘water up’ would be, to be used as a fill, and overflow point.
I had some concerns over the design, though:
1. The size of the ‘water ups’ would allow four to sit in well and then a further 2 or 3 needed to be cut up and arranged somehow to provide a continuous base for the growing medium. This seemed to me to be difficult, time consuming and wasteful as at least part of some of the ‘water ups’ would not be able to be used and have to be thrown away or recycled.

2. The ‘water ups’ would only allow for a water reservoir in the bottom of the wicking bed to be only 11cm deep, compared to the 50cm depth of the half IBC giving space for 40cm of growing medium. To my mind the reservoir needed to be deeper and the water will only wick up 30cm against gravity anyway.
3. I was concerned the vermiculite/perlite would not wick the water well and with the addition of the shade cloth would form a barrier, preventing the water wicking up into the growing medium, thus kind of negating the whole deal.
This precipitated a conference on what a better design might look like.
.jpg)
What we agreed was to only use four ‘water ups, one in each corner, and then put some bricks into the bottom of the IBC and place the water ups on top of them, thus adding roughly ten more centimetres of depth to the reservoir in the bottom. To form the rest of the barrier between the growing medium and the water, we found some Perspex document holders (previously liberated from a dump pile outside someone’s house) and cut them up using an angle grinder to form a number of flat sheets.
.jpg "Assistance courtesy of Andrew!")
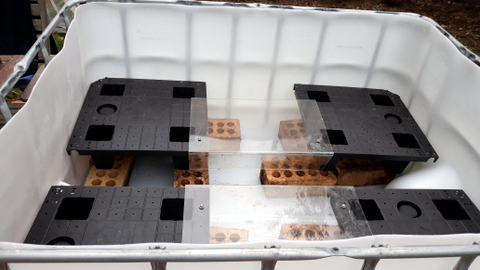
We screwed the pieces of Perspex onto the top of the ‘water ups’ to form a shelf on each side of the IBC, leaving a trough in the middle, there was no vermiculate placed in the wicking area of the ‘water ups’. To get the wicking bed to…..wick, we put the shade cloth over the shelves inside the IBC then folded it down into the trough between the two shelves, so that the growing medium would be always in contact with the water in the reservoir, right down to the bottom. We then filled the wicking beds/IBCs with the growing medium and the job was finished!
.jpg)
-001.jpg)
Almost….
The filler nozzle/drain hole was still at the original level. The idea is it should be about the level of the growing medium bottom/top of the water level in the reservoir so that if there was excess rain, the growing medium would not get flooded, but could still stay moist. The answer was to install a 90° elbow fitting and some tubing to form a riser up to the level where the drain should be. That way the water would stay in the reservoir, but still be able to overflow if the level got too high.
Job done!
-001.jpg)
