


We never seem to have enough time these days, to do all the things we want to do. We understand all the benefits that accrue by growing our own food, but who has the time? Food growing can be a time consuming (if wonderful and productive) pastime, but it doesn’t have to be. Here are some tips on growing your own food that won’t leave you starved for time.
Soaks
The idea behind ‘soaks’ is that you take a nut or seed and soak them for a few hours so that they swell and start to germinate. The process is a quick one and you can eat some, such as pumpkin, in as little as 4 hours. Nuts and sunflower seeds are usually soaked overnight.
To grow your soaks, measure out 4 cups of raw, unsalted, nuts/seeds into a medium sized bowl and cover with filtered water so that nuts are fully submerged and have at least an inch of water above them. Allow to stand covered on the counter for about 7-8 hours, or overnight (check below for more specific times), rinse nuts to remove the enzyme inhibitor residue, enjoy!
Soaking Times
Almonds – 12 hrs; cashews – 2 hrs; chia seeds – 2hrs; flax (linseed) seeds 2hrs; hazelnuts – 8hrs; macadamia nuts – 2hrs; Peanuts – 12 hrs; pecan nuts – 8hrs; pine nuts – 2hrs; pumpkin seeds – 6hrs; sesame seeds- 6hrs; sunflower seeds – 4 hrs
Sprouts
Sprouting seeds is still a very quick process that can produce a harvest of fresh vegetables in less than a week, requiring only minutes a day. It can accomplish this miracle with little more than water, seeds and a sprouter of some description, such as a recycled glass jar with a mesh top. There are also a whole stack of commercial sprouters out there if you don’t want to bother throwing together one of your own (even though it is easy and cheap).

Sprouts using the jar method
The process is simple; place the seeds you wish to sprout in your sprouter of choice, soak them for a few hours to overnight, drain the water out through the mesh top, and leave it sitting on its side, top down, to continue draining. Then rinse twice a day, morning and night until they reach your desired state of maturity. Then eat them cooked or raw, they are full of vitamins and minerals; a quick, easy nutritious feed! They will generally be ready in a few days to a week. If you like mung bean sprouts, there is a process just as quick and easy, but uses a kid’s lunchbox.
Seeds that fit well with the sprouting methods - alfalfa (lucerne); adzuki beans; barley; chick peas; wheat; millet; buckwheat; lentils; sunflower; fenugreek; sesame; cannellini beans; kidney beans; soy beans; most brassica seeds (cabbage, broccoli, cauliflower).
For more details on sprouting (and microgreens - see below), check out here.
Microgreens
Microgreens are sort of the next process along from sprouting in terms of timing. They require some seeds and soil in a tray, access to light and of course, water. More details about several ways of growing your microgreens are available here and here. In general terms you get some seed raising mix, press it into a container, sow seed quite thickly on top, cover with more mix and press down. Water and watch! When the microgreens get their first lot of true leaves (ie at the four leaf stage), harvest them with a pair of scissors and eat! They will mostly be ready in a week to 10 days.

Seeds which work with microgreen methods - Herbs such as – rocket, basil, coriander, mustard, fenugreek; Vegetables such as – Asian greens (mizuna, mibuna, tatsoi, pack choi) Beets, brassicas (broccoli, cabbage, kale), celery, garden cress, endive, lettuce, peas, radish; Grains such as – barley, oats, wheat, linseed, buckwheat and sunflower.
Soil Sprouts
This is kind of a cross between sprouts and microgreens. Seeds are soaked and used to cover a soil filled container (without drain holes) and left in the dark for 4 days. The container and the sprouted seed is then transferred to a windowsill to green up for a few days. The windowsill does not need to get full sun. The soil sprouts are then harvested by cutting just above the seed with scissors and used in salads etc.

The Veggie Patch
While it can take a bit of time and preparation if you grow the right types of veg, you can still have a feed with the minimum of fuss and effort if you use one (or more) of the techniques listed below.
Fast growing veg
A fast game is a good game and fast growing veg need attention over a shorter time before you get the payoff, ie you get a feed. Green leafy veg are generally quick growing, giving you a yield between 30 and 60 days depending on the variety, but radish is the poster child for quick yields, giving you an edible harvest within a month.
If you can leave things for two months before you need to harvest you get a much better range including dwarf beans, beetroot, cucumber (just!), kale, some lettuces and more leafy Japanese greens, spinach, turnips and even zucchini.
Cut & come again
Use cut-and-come-again veggies – If you grow a cauliflower, as nice as it will be to eat, once you have harvested it the growing space will be non-productive, require replanting and it will take some time before it is harvestable again. If you plant vegetables which can provide an extended harvest period by re-growing after partial harvest this will increase your overall productivity. Cut and come again veggies include Asian greens (mizuna, mibuna, tatsoi) non-heading lettuce eg oakleaf, celery, silver beet and spinach will allow multiple harvest if you only cut side shoots and leave the growing head intact. Sprouting broccoli will also produce side shoots after the main head is harvested.

Perennials
Consider perennial vegetable beds – Perennial veggies are the parts of plants which are harvested and eaten like vegetables but where the parent plant lives for more than two years eg asparagus, Jerusalem artichokes, chokoes, Malabar spinach and taro. Generally we tend to eat rather more annual vegetables than perennials and so annual vegetables are the type that make up the bulk of our veggie patches but it is worth growing and trying perennials for an easy feed and to broaden our tastes. While some perennials like asparagus and artichokes are available only for a short season, others like shallots and rhubarb crop for extended periods.
There should be a place in everyone’s veggie growing efforts for perennials, if for no other reason than they are easy to care for. They do not require much time other than to apply a bit of organic fertiliser every so often, and the occasional bit of water, not to forget the harvest (yum) but they are generally resistant to the attacks of pests and diseases and content to sit there and grow, requiring little beyond the minimum intervention from the gardener.

Start Small
It may sound stupid to say, but if you don’t have a lot of time to commit to food growing, start small. A one metre by one metre patch is a great start. Your enthusiasm can get the better of you, and cause you to start a patch you can’t maintain which will only result in burnout, disillusionment and tossing the whole thing in. So start small and then when you are confident you can handle your initial veg patch with the time you have available, only then consider expanding your veggie growing enterprise.
Mulch
Mulch works in a number of ways to help the time poor gardener. It provides nutrients as it rots down, reduces evaporation so you need to water less, when it does rain, rather than the rain compacting the soil and running off, the energy is expended by hitting the mulch and the water infiltrates into the soil. One down side is the need to get water under the mulch, but the time saving watering techniques below will accomplish that once in place.
Watering
If you are time poor, then the last thing you will be able to do is spend hours watering your precious veggies to ensure a good crop, and you also don’t want to waste water. Following are a couple of ideas which, although they may take a bit of time to set up, will save you lots of time once they are in place.
– Wicking bed – These are generally raised beds, although they can be constructed as in-ground beds as well, the idea being that there is a reservoir of water constructed below the growing medium. This keeps the plants hydrated, means less frequent watering and more efficient watering because the water is not going onto the surface so none is lost to runoff or evaporation. More detail is here and here.

- Self watering pots – in a similar way these pots/growing containers are constructed with an open space under the growing medium to hold water. There is a central tube/pot extending down into the water to allow the water in the reservoir to keep the growing medium damp by capillary action. Commercial types are available but most have very small reservoirs and so are a gimmick more than anything, Details on how to construct your own are available here.
- buried pipe – while this is designed for in-ground/raised bed applications it can be used in large (OK very large) containers. The basic idea is to wrap some drain matting (non-woven fabric) around slotted pipe (referred to as agricultural or ag pipe) and then bury it 50mm to 100mm below the soil surface. Water is fed into a filler pipe and moves around the pipe, slowly making its way into the soil. There are limits to the size of the system and a series of filler pipes along the buried pipe may be required. More details are available here.

- leaky pipe – this is made from recycled rubber and is buried in much the same way as the above buried pipe but needs more pressure to operate. A series of smaller runs is better than one long one, because in a long pipe the pressure drop would be too fast to keep the furthest parts of the area watered. More details are available here.
Fertility
There are also a few techniques you can use to help maintain fertility that don’t take too long to implement, but it is easiest if you set up your growing area to be fertile and organic first using such techniques as sheet mulching or no-dig gardening. It takes some time but it is worth it in the end.
- Worm tower – the idea behind a worm tower is that you install one (or a number, depending on the size of your beds) centrally, install worms and then on a regular basis top it up with organic materials like veggie scraps and such. You’re going to need to toss your veggies scraps anyway, so why not toss them into a worm tower? More details here. (note: the worm tower in the article was put together for fruit trees, but I have used them in a number of veggie beds and the principles still apply).
- Fertiliser sausages – these were originally designed as a slow release feed for fruit trees, but could also be adapted to veggies by running them down the centre of a bed. The idea is to get some fabric, hessian bags (free from coffee roasters) and then put manures, wood ash, blood and bone, rock dust, seaweed or whatever in them, roll them up, tie them and put them in place. They will slowly break down over time, keeping those veggies fertilised.
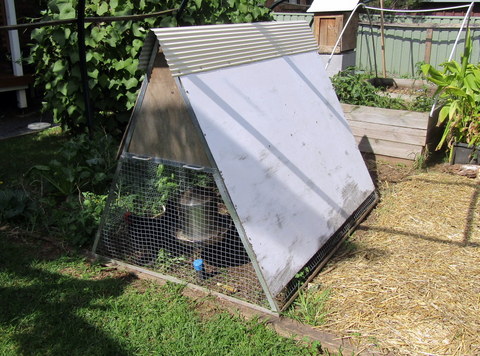
- chook tractor – the idea of a chook tractor is that it is a chook hutch with no bottom that sits over your veggie patch(es). The chooks dig up and manure your veggie growing area while providing you with tasty eggs. We have operated this system for over 12 years and it works a treat. More information on how we made and use our chook tractors is available here.
Got a few minutes?
If you find some time during the day, be it only a few minutes, you might want to invest it in one or more of the calming and rewarding activities listed below, so that you can make the most of your time in your garden -
Harvest vegetables, herbs and fruit, whatever you have available that is ripe.
Check the health of the plants (ie look for pests and diseases).
Monitor weed growth – and pull a few out.
Check soil moisture (ie stick your finger under the mulch and see if your beds need water).
Enjoy the fresh air, sunshine, the hum of insects and the songs of birds!
