


This article was first published in January 1983 as “Survival Push Bike Pt3” in the magazine Australasian Survivor and was written as part of a three part series by the then editor, Mr Bill Tarplee. Bill is a wizard with things mechanical and his advice and insights are still relevant today for those who wish to live more sustainably by using their bike.
This is the final part to our series on survival push bikes, so we will get off to a good start by looking at that one source of inflation that is dear to all cyclists’ hearts.
Tyres
Tyres are one of those things that just go around. At present they are cheap, readily available and don’t last very long. Most cyclists I know replace their tyres about once a year. This is not because they are worn out, but because they suffer from biodegradable breakdown – which is a nice way of saying that they are just not made to last any more. I recently noticed on my cycle that the rubber (actually neoprene, a coal or oil derivative) seems to have shrunk. It has cracked into blocks and in places can be peeled away from the canvas backing.
This presents a problem, to the point that stocking away a supply of tyres against a future emergency would not necessarily help a great deal. In all probability you could find that your emergency reserve had deteriorated after just a couple of years. However, tyres are cheap, so you wouldn’t be losing much if they were useless when you got them out of storage.
My suggestion would be to buy several and dust them well with talcum powder both inside and out. (Use a cheap baby powder sold by supermarkets). Put each into a large plastic bag and press out as much air as possible and seal the top with a strip of packaging tape. Then put the bags away under the house in as dark and cool a spot as you can find. Then cross your fingers and hope!
If, on some future occasion you are forced to use perished tyres, there are alternative available to you –
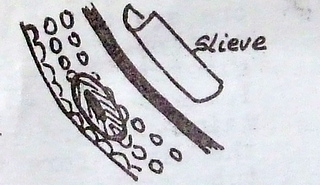
Assuming that the tyre has only a few bald spots where the “rubber” has worn away you can take another worn tyre and cut off a section about twice as long as the worn spot. Using a sharp knife, well lubricated with soapy water, cut away most of the side walls and just keep the tread section. This piece – called a slieve - is placed inside the worn tyre so that it is under the worn spot. When the tyre is inflated again the slieve will be pushed up to support the worn area.
This works fairly well and was a tried and proven method in the “good old days”. If times are desperate and the whole tyre is just about “gone” then you would only have a couple of choices. Firstly you could slieve the entire wheel. you would need another tyre and have to remove the sidewalls, in addition you would have to cut out a short section so that the slieve would fit inside the tyre without forming a fold. Alternatively , you could seek out some thick car or truck tube and cut a ribbon form the outer middle of the tube, this would then form a slieve.
Either way you would find in necessary to glue the slieve in place with some rubber cement/contact adhesive. This is because the inflated pressure of the tube would cause the tyre to split around its circumference. This would be rather deflating, to say the least! If the slieve was well glued it might help prevent your being let down.
The last alternative would be to seek out a tyre with reasonable tread but sidewall damage. In that case I would cut around the side where the sidewall merges into the tread. If you then sanded the tread smooth on the worn case, you could then glue the “retread” over the worn case. With the bead removed the outer case should expand sufficiently when the tyre was inflated. While these are “last ditch” remedies, in desperate times.......
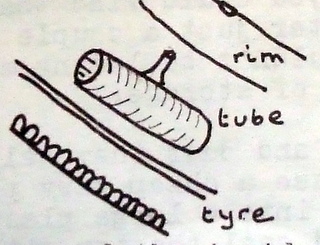
Tubes
Unlike tyres, tubes do not seem to perish nearly as quickly. A prudent person would stock away several along with a couple of tins of vulcanising patches and a patch clamp. (store the tubes in the same manner as tryes – plenty of talcum powder and a cool place). When selecting tubes always choose the ones with car valves, that way you will always have the option of pirating replacement valves from cars.
Assuming the worst, you can make a pushbike “tubeless”. If the tube is unpatchable, clip it about 100mm either side of the valve stem and assemble in the normal way. It is necessary to use a sound tyre and then run some glue around the tube where it contacts the rim and case. Also a bead of glue must be run around the inside of the rim, to seal the tyre. The whole trick lies in being able to get sufficient air into the tyre to push the case out to the rim. While this is not difficult if you use compressed air at a service station, it would not be possible if you only had a bike pump. For this reason I would look to the following alternative.
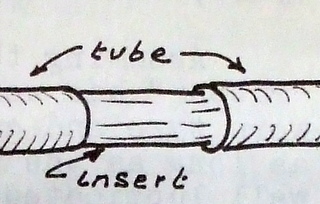
Rather than make a tyre tubeless I would suggest you try and join two tubes to make a sound one. In other words, cut out the section that is perished or punctured and substitute with another that was about 100mm longer. Poke the ends of the replacement into the ends of the main tube and run some glue around the joints. Fit the tyre onto the rim before the glue has dried, and inflate immediately. The tube would expand to the required length and the air pressure would seal the joints. Again, this is a case of desperate times .......
I have heard of tyres being stuffed with cloth, grass, rope etc I’d try other methods first. Unless you get a firm tyre the bike will slide about too much. In fact, I think it would be uncontrollable at all but the lowest speeds. You just must have reasonable pressure for it to work properly. So if it came to a point where you tried slieving and gluing and even patching with glue and still couldn’t stop small leaks I’d look to the very last resort. This would be to use a thick liquid – maybe gearbox oil – and pump that in instead of air. It would have to be as practical as stuffing leaves and grass into the case.
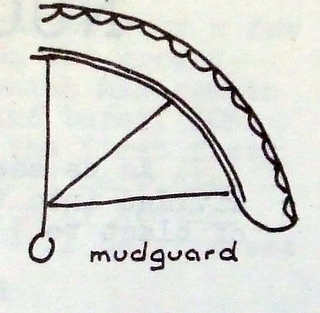
Lastly, when tyres are completely worn out they can still be used to make mudguards. Clip off a piece the necessary length, and support it with several stays bent up from fencing wire. Such mudguards work quite well and don’t rattle like the metal ones. Besides, they will flex if you pick up a stick between the spokes.
Lights
Lights can be considered under two headings – generated current and stored current. Generated current comes from a small generator that is rotated through contact with a tyre. I have found generators to be dependable and almost everlasting. The only problems I have ever had is when a generator works loose and goes thought the spokes, or when it gets smashed in a prang. Reasonable maintenance will prevent the former, and luck the latter.
While generators rarely give problems, they can cause bulbs to burn out. Usually this only happens on a downhill run, when the bikes speed generates excessive current. If the generator is mounted on the front forks, the shorter wire to the front light usually means that the front light will blow first. The rear will then follow because of the overload. If you mount the generator at the rear the sequence will be reversed, either way you can suddenly be in the dark, as it were.
Unless you are prepared to buy the more expensive compensating generators, which monitor the current through zenner diodes, you only have one course of action available to you. Mount the generator to the rear, fir the normal 6 volt headlight bulb, but instead of fixing a 6 volt tail light bulb, replace it with a low amperage 12 volt bulb from a car instrument panel. This will then help to prevent bulbs from burning out.
Instead of turning a generator you could wire a motorcycle battery into the circuit. This would give a bit more weight, but less resistance when pedalling. The battery could be recharged on a wind generator (or solar panel). It would not be necessary to fit a rear light if you were running off a battery. In fact it would extend the life of the battery if you didn’t use a rear light.
The only point that you would have to watch when using a battery would be that you didn’t lay the bike down on its side as this would cause the battery acid to spill out. The way around this would be to hang the battery below the cross bar in a bag.
