


We have been talking about putting in a path on the front yard, from the concrete path that was put in when the house was built, over to our park area, curving beside the herb spiral. As it turned out there was already, what I learned later to be a ‘desire path’, covering the usual access which we had worn through the grass. So that seemed to be the obvious route to build a more permanent structure.


Our 'desire path'
Also, the area which had already been worn down and compressed, may suffer some erosion during heavy rain (our soil is clay), plus the fact that we want that heavy rain to be soaking in wherever it hits our yard and not running off. This means that an impervious path, like concrete, was out, otherwise what’s the point? The other thing with just leaving the path as it is, that is to say uncovered, means that when we do get heavy rain the path could become so muddy as to be unusable.
I did not want a gravel path either because it will reflect heat and light and as we are due for what is shaping up to the a hot dry summer a gravel path would not make things better only worse. Other things to consider are that it can act as thermal mass and once you have a gravel path, it is there to stay because it is almost impossible to remove all that gravel once trodden into the soil.
After some thought (and reading) I came to the conclusion that a wood chip path was the way to go. Wood chips will allow rainwater to percolate through into the soil rather than run off, will absorb light and heat as well as not act as a thermal mass, being much less dense (ie less weight per unit volume) than gravel. Wood chip paths are also nice and springy to walk on.


Using the pavers to rough out where the path will run
Rather than using plastic underneath the wood chip to discourage weeds (which also defeats the purpose somewhat), I put down a layer of cardboard. It was free, being sourced from deliver boxes provided to us by friends and family, plus if I needed extra a quick trip to the hardware would provide all I need. The cardboard will absorb water and break down over time so that if we decide we don’t want the path there any more, the soil in the area is enhanced not destroyed.


Inserting the cardboard jigsaw puzzle

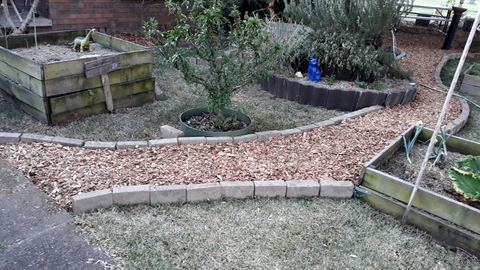
Blending the end of the path into the park area
What I also wanted was an edging of some description. I had been toing and froing about it for some weeks, when bingo! I woke up one morning and our neighbour across the road was digging up their paver driveway so they could replace it and extend it in with concrete. After a quick check that it was OK I ran over with my wheel barrow and grabbed as many as I thought I would need. They were the size of standard bricks, exactly what I needed, and FREE!
So that was it, after collecting all the bricks, I set them out around where I thought the path would go. It took a while, modifying the width and curves in various areas and partially using existing structures as well. Eventually I got it to the point where we were both happy, and then left it for a couple of days.
After a couple of days of observation confirmed that the path was where it should be, I took some time and cut up our cardboard box collection and played jigsaw puzzle to get them to fit. I alternated cutting them down with a large pair of scissors and a Stanley knife and found both tools useful in different circumstances: Stanley knife for long straight cuts and the scissors for more intricate curves. Once the path was covered I ordered in a cubic metre of hardwood chips and all that was left then was to wheelbarrow the wood chips into the path.
I has now been a few weeks and we have been using the path a lot, it has a lovely springy feel, and tempts us into the front yard park area every day!

Done!
For more about delawning your front yard, check out here
