A Street Library for the Choko Tree
Created: 2017-06-08 03:43:54
I was tooling around on the internet one evening when I came across the concept of the street library and I must admit the idea fascinated me. You can find the official Australian Street Library website here. The concept is to provide a place on your property which protects books you no longer need or want from the weather, but leaves them accessible to passers-by. This is so that they can take what they are interested in and then keep things going by bringing back their unwanted books and putting them into the street library for the benefit of others.
While it possible to buy completed street libraries, it seems to me that it is best if you can build your own, and where possible build it out of salvaged, recycled and repurposed materials. So having decided that is what I wanted, and having gained approval for my project from the Domestic Director of the Choko Tree, I set to, to design it.
The Design
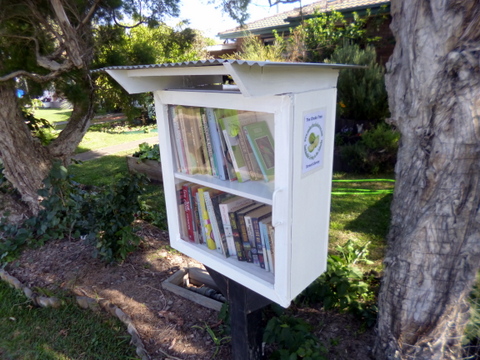
As I have said on many occasions, I am a technician not an artist, and so my design for the street library reflects my skills. The carcase would be a fairly prosaic, almost square box with one shelf, a clear door and a skillion (flat sloping) roof to shed the rain. The clear front panel I had left over from a previous project and it had been kicking around the garage for quite a few years. My initial thought was glass, but for public safety (and the fact I didn’t have any glass the right size) the PVC sheet won out. The size of the PVC sheet (600mm high by 550mm wide) set the dimensions of the outside of the carcase.

The carcase would be constructed from marine ply which had some history. Before I was married (yes, back in the dark ages!) I had worked for a plywood company in Homebush Bay, Sydney and I had bought some of their produce to make a bookshelf. The bookshelf started off in my room in my parents place, came with me when I moved out to St Clair, but for the last 20 years of so it was used for chemical storage in the garage. When the chemicals went I pulled it apart for renovation but decided it would make a great street library. The roof and door framing were recycled pine from old chook tractors and the flat roof was cut from some mini-orb I had souvenired from a discard pile on a building site (with permission!).
The fittings (hinges, handle etc.) were taken from stuff already in the garage and the only new piece was some Masonite to make the back piece, because I had nothing big enough that was water proof in my store of materials.
Construction
The Carcase
The first thing to do was to construct the carcase, the long sides of the bookcase which were to form the bulk of the carcase were too long, so I cut them down to 600mm and as luck would have it, the existing shelves were the right length to give the carcase an overall width of 550mm. The plywood was pretty old and a bit rough so I gave each piece an overall sanding to improve the surface, I had not applied any finishing to the bookshelf so the surface was original. To connect everything I used 50mm x 50mm x 40mm wide 1mm thick angle brackets, one in each corner of the outer box and one each end of the shelf, giving a total of 6, originally brought in for another project and not used, quite a while ago.

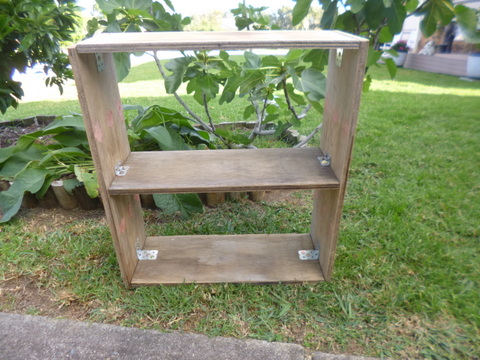
I secured all the angles with 8 gauge x 15mm button head timber screws. The carcase was not particularly dimensionally stable at this point (ie it wobbled!) but was much more robust when I attached the Masonite backing, using the same type of screws. With the carcase more or less complete, I gave the entire inside and outside 2 coats of water based outdoor acrylic white paint, with a day or so in between coats for drying. Just to make sure, I applied a small bead of silicone sealant to all inside joins, preventing any rain from getting in through any remaining small cracks.

The Door
To make the front door I grabbed some 41mm x 19mm DAR pine recycled from an old chook tractor and measured up the outside of the PVC sheet which was to form the clear panel at the front. I cut 4 pieces of the pine on a 45° angle on our drop saw so that they would form a rectangular frame when assembled. To join these all together to make the frame I used 8 25mm x 25mm x 20mm x 1mm thick angle brackets, one on the inside and one on the outside of each 90° angle joint, which formed the corners of the frame. When the frame was completed it also got 2 coats of outdoor acrylic white paint, then the PVC panel was attached to the inside for the frame using the same 15mm screws.


To attach the door to the carcase I used a pair of recycled hinges off an old door and then screwed on a couple of magnetic catches I found in the garage (while looking for something else of course!). This completed the door.
The Roof
To make the roof I used my nibbler to cut a piece of the mini-orb 680mm wide by 500mm deep. To support this I made a frame with the long sides made from two pieces of 84mm x 19mm, 460mm long pine, joined to form a square by two pieces of 41mm x 19mm pine 500mm long. I cut a wedge off the bottom of the 84mm thick pieces so that when it rested horizontally on the carcase, the top had an angle of a bit less than 5° to ensure the rain would drain off. I also cut the front to a 45° roughly so that it did not stick out at the front. Once completed the frame got the white paint treatment as well.


To attach the frame to the carcase I used 20mm screws and then used the 15mm screws to attach the mini-orb to the frame. This completed the library part of the street library, I just needed a way to mount it in out front yard.
Mounting
The first question was “where?” I wanted it to be in the front of the yard, in our longitudinal Food Forest and after much discussion and wandering around, worked out that it would be best near the water meter in the middle of the food forest. In the place we picked there would be protection from the weather by reasonably large melaleuca alternifolia trees on each side which would cut down the force of the sun and the rain. We have just had a blustery and very rainy day and the trees did protect the library quite well, no water got inside the library.
Now the question of “how?” I was a little concerned because the street library itself weighs quite a bit and full of books it will only be much heavier so mounting on a flimsy stick frame was not going to work. After much thought I eventually went with the design on the Street Library Website. It consisted of a central 90mm x 90mm post cemented into the ground, with two 90mm x 90mm angled supports, one on each side a top plate. The street library is then secured onto the top plate by screws.

As luck would have it I had some 90mmm x 90mm posts recycled from when a friend of mine did his place up and had them replaced with something fancier, one was over 2 metres long. I cut the main post to 1500mm long, the idea being that it would be buried 800mm into the ground and have 700mm above ground.
I used my post hole digger to dig the mounting hole down to 800mm and about 250mm wide, although I did remove some soil from the top third or so to open it out a bit. I mixed up 2 x 20kg fast setting, high strength concrete in my wheel barrow, then shovelled some of the wet concrete into the bottom of the hole. I placed the post into the hole and filled in the rest of the wet concrete around the post. I used my spirit level to make sure the post was upright correctly and tamped it down with some spare timber to remove any voids or gaps in the concrete. Even with two bags of concrete I could probably have done with another third or half a bag extra, but once the concrete had gone off the post was stable enough.

I left the post untouched for a couple of days to let the concrete set completely.
To make the supports I cut two 260mm long sections from the remaining 90mm x 90mm post and then chamfered the ends off at 45° using a hand saw, tiring but it gave a better result! To finish off the mounting post I took some of the leftover marine ply and screwed a sheet down to the top of the post with a couple of 8 gauge 50mm countersunk chipboard screws to form the top plate. I then held the supports in place, on each side of the post so that they were in contact with the top plate and the side of the post, then screwed them into place with 3 of the same type of screws at each end.

With the mounting now complete, I placed the street library on top of the top plate and then put two screws each through the bottom of the library, through the top board, and down into the three supports. This gave the library a solid mounting which feels quite secure.
The Books
The idea is for the library books to be second hand or otherwise surplus and in that way they can be passed on to a new readership. My idea was to have books about growing food, making stuff and living sustainably but we also threw in some novels (Tom Clancy, a bit of sci fi and even a couple of Mills & Boon) as well to round things out a bit.

There is a sheet of labels you can download from the Street Library site and if you print them off onto self-adhesive paper you can cut them up to make stickers and put them on or into your books so people are aware they came from a street library. So I did just that and applied them to each of the books, there are 30 labels on the sheet.
The Choko Tree street library is now in place and awaiting customers!