


This is a reprint of an article published in Australasian Survivor Magazine, back in the early '80s
This article is designed to introduce some of the tools used in moulding and metalcasting. This is an introduction, I don’t intend to go into great detail about how, when and where particular tools are used. This will come later in the series when we get into some “real life” moulding and casting.
A few tools are not shown in the photo; either because there was no room to fit them in, or I had not yet made/bought/scrounged them. We’ll start off with these.
You could use your hands to fill your moulding boxes with sand. However tradition and common sense suggest a shovel is much more efficient. (Moulders don’t call a spade a spade Fred, they call it a bloody shovel). Unless you are casting very heavy work requiring large boxes, a small gardening shovel or army disposal (folding) type is ideal. I’d suggest getting one with a proper handle, though, as this can double up as a rammer.
A rake is also handy for helping to prepare the sand.
A riddle (of the sieve variety not the “how many Patagonians does it take to change a lightbulb” variety) is used to sift the sand before moulding to remove lumps, stray pieces of metal from the previous cast etc. Different mesh riddles are used but ¼” or thereabouts is generally adequate (remember the sand is moist so it is not going to run straight through).
A small bellows is useful for blowing stray particles of sand from a completed mould before casting.
An ordinary ball peen or claw hammer can be used for knocking out the completed casting from its moulding box, but if you are using wooden moulding boxes (about which more in a later article), then a rubber or wooden mallet is better, for obvious reasons.
Metal rulers, set squares, calliper gauges etc. are used extensively in patternmaking (you can get special rulers which give the patternmakers shrinkage allowance, but they are not really necessary in a small foundry). Measuring tools other than a small metal rulers/set square are not really essential in moulding unless you plant to do a lot of machining of castings.
On the other hand, a small set of scales is pretty important for weighing scrap and castings, weighing patterns to calculate the equivalent amount of metal required to fill the mould etc. Suspension (“hook”) scales as used by anglers fit the bill.
Small hessian or cheesecloth bags are used to dust the surface of a mould with plumbago, flour etc. for a fine finish or to help the two halves of the mould to part during the moulding operation.
A soft camel hair brush or a swab is used for moistening a mould around the contour of the pattern before drawing it out, and for moistening any damaged section of the mould before repair.
A sprayer such as a small, hand held insect, weed etc. sprayer, is used to moisten the mould surface before finishing operations (if necessary) and for applying refractory washes etc. (again, if necessary).
Two items not shown here are used in the casting operation: a set of crucible tongs for lifting the crucible from the furnace and a ring shank to hold the crucible while pouring.
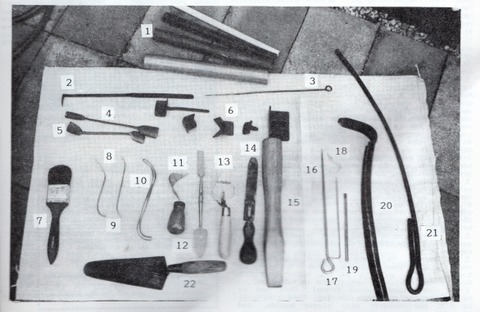
Now for the gear in the photo. The trowel at the bottom (#22) is exactly 1 foot long, which gives some idea of the scale.
1. Four runner formers used, you guessed it, for forming runners (vertical channels in the mould down which the metal runs to reach the mould cavity) and risers (channels up which the metal rises, after the mould is filled and which act as a reservoir of molten metal to prevent shrinkage defects in the casting). These formers are simply pieces of pipe, diameter from approximately ¾” to approximately 2”. Some moulders prefer to use wooden dowels – it is basically a matter of what turns you on.
2. Cleaner and lifter. The angled end is used to lift pieces of sand which may have broken off from the bottom of the mould so they can be put back and smoothed into place. The other end is just a flat blade, used for this smoothing and patching. These tools are usually made of steel. (not shown is a smaller one made of brass which I made for use with smaller moulds).
3. Vent wire. Used to poke holes in moulds and cores to allow gases generated during casting to escape. Not shown is a larger version of this, called a “whistler”, which I made of 3/8” brass rod, with a small steel point embedded in one end to anchor it to the pattern during ramming.
4. Boss tool. Made of brass, used for cleaning, smoothing, repairing core prints and small depressed areas in the mould (which produce raised “bosses” on the finished casting).
5. Spoons. Also of brass, for trimming and repair of moulds and cores.
6. Various (5 types) straight and curved, edge and corner smoothers. Made of brass, used for smoothing edges and corners (surprise, surprise!).
7. Paint brush. Multitude of uses: brushing away sand, moistening sand around pattern contour before lifting (although finer camel hair brush or swab is better for this), applying refractory washes to cores etc.
8. Small sleeker. For smoothing, patching (i.e. “sleeking”) small moulds. The flattened end is round nosed, the other end just rounded off. Made from 1/8” brass rod.
9. Another small sleeker. Both ends flattened, one square nosed, the other diamond nosed.
10. Beading Tool (or “slide”). For finishing, repair of rounded or beaded areas in a mould. Not shown is a similar double-ended tool with one curved end, square in cross section, for smoothing flanges etc.(called a flange tool) and one straight end, also square in cross section for finishing small flat sections (called a girder tool). These can be made by soldering the two ends, 3/8” brass rod, at an appropriate angle to the middle bit, made of 3/16” brass rod. The ends can be ground square, bent, have a semi-circular or angled groove ground into them, to fit the particular purpose.
11. Gate and sprue cutter. For cutting the external runner “cup” (sprue) or internal “gates” for entry of molten metal into the mould. A smaller gate cutter is not shown. This is simply a double ended spoon, one end flattened, the other is a curved spoon shape similar to #5 but deeper (half-round).
12. Plasterer’s “heart and trowel”. Useful general purpose tool for smoothing, patching and repairing.
13. Trowel. This one is a cut down plasterer’s trowel. Some moulders prefer a rectangular trowel. Either way it is the basic tool for most of the finishing operations in moulding.
14. Long taper nosed trowel. This one is slightly curved in the cross-section. Used similarly to #13, particularly with bigger moulds, and also for smoothing off mould tops.
15. Bench rammer. One wedge end, one flat round end, made of wood. Used for ramming up moulds. A longer rammer, usually made of metal, is used for ramming bigger boxes made up on the floor – or you can use the handle of your shovel.
16. Straightedge. Used for “strickling” excess sand off the top of the mould. This is just a 1”x 1.5” piece of wood. (In its original use as a skirting board it was painted white, so it may be hard to see against the background of the photo).
17. Draw spike. Threaded at the pointy end, used for lifting out large patterns, which are first gently “rapped” with a wooden mallet. Can also double as vent wire.
18. Lifting screw. Used in conjunction with #19 for lifting small patterns.
19. Rapping bar and rapper. For loosening small patterns prior to withdrawal.
20. Skimmer. Used to skim slag and dross off molten metal before pouring. Made of steel.
21. Stirrer. For stirring molten metal in the crucible, ½” steel rod. I’ve made it curved so I don’t have to stir directly over the crucible and furnace (it gets a bit warm). It isn’t visible in the photo, but I’ve notched the end and split the two halves apart so it can be used to “dunk” deoxidisers or fluxes, alloying metals etc. under the surface of the molten metal when necessary.
22. Brickie’s trowel. For smoothing sand on top of the mould. Also very useful for lining the furnace with refractory clay and patching furnace lining.
The above is a pretty comprehensive tool kit. Certainly more than the average person starting out is likely to need. But to do any job properly it is better to be well equipped than ill equipped, and foundrywork is no different.
A few tools will be used all the time, and all will be required eventually. Indeed some foundries expect all their moulders to have tools to match nearly every variation in edges, corner and fiddly bits in every casting they produce. However, as on old moulder where I used to work (Who I scrounged a few extra tools off) pointed out, a foundrymans’ best tools are his hands and fingers, so there’s no need to go overboard with fancy tools!
For other articles in this series, or other series of articles about backyard foundrywork by the same author, check out here.
