


This is the reprint of an article published in the Austrlasian Survivor Magazine, back in the early '80s
This is the second series of articles on small-scale foundrywork. We are calling it “Practical Backyard Foundrywork” to distinguish it from the earlier series which basically jumped out of the author’s head, with a bit of help from the old trade manuals.
“Practical Backyard Foundrywork” will cover all the material dealt with earlier and more besides, but in a step-by-step, logical and more importantly practical fashion. I am in the process of actually setting up a backyard non-ferrous foundry: readers will be able to follow the process as it occurs. Hopefully we might all learn something – even if only from my mistakes.
At this point it is worth warning anyone thinking of getting a foundry off the ground that they will almost certainly have difficulties getting supplies (tools, sand additives, core binders, crucibles etc.) If you live in or near a major city you will find it easier than if you live in the scrub, but either way you will have to do some hunting around as well as doing a lot of the work yourself, which is not necessarily a bad thing.
The fact is that foundry suppliers today are geared up for large commercial interests, not the backyarder or small business. When I was employed in the industry the situation was nowhere near as bad – and that was only 8 years ago. (1979). There are still a lot of small foundries around, but it seems that in common with small business generally, they are getting the rough end of the pineapple.
I would like to be able to offer a list of suppliers for refractories, tools, chemicals etc. However such as list would have to cover all capital cities and just don’t have this sort of information. All I can suggest is use the yellow pages, be specific about what you want, and ask to speak to someone on their technical staff as well as sales. Better still, make friends with someone who works in a large foundry!
Before getting into the main part of this article, take a look at the three photos below which show what a one-person shed foundry looks like – and what can be produced.
The first shot shows the overall layout of the place: the 44 gal. drum furnace is in the bottom left. Stacked against the wall are cast iron and steel moulding boxes of various sizes. Note the gap in the roof for the furnace “chimney” (the large upright pipe in the centre of the photo). Behind the shovel is a half mould for one of the aluminium gas lamp holders which are shown on the beam in the second photo. The long necks of these holders are reinforced with steel rods, left in the mould cavity when the aluminium is poured in.
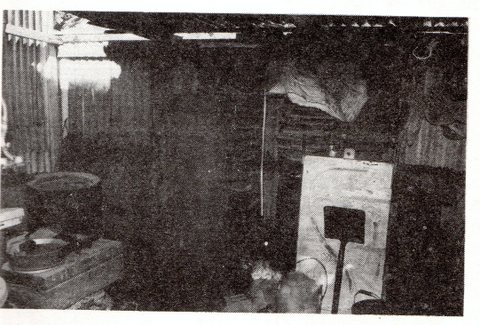
The mould is white because it has been dusted with “facing sand” – fine sand sprinkled over the surface to impart a smooth finish. Why not use fine sand for the entire mould, you may ask. The answer is simple: very fine sand does not allow enough air spaces between the grains for the gases generated (mainly displaced air and water vapour form the moisture in the sand) to escape during casting, which would lead to a mini-Mt Vesuvius in your shed.

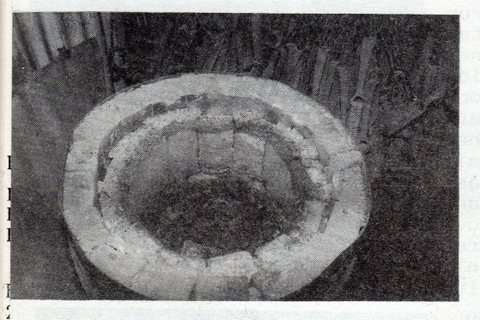
The third photo shows a close-up of the furnace, and yes, they are rabbit traps hanging behind it. Nothing to do with foundrywork, just a handy place to store them.
You might think this foundry looks a wee bit cluttered – and you’d be right. A working foundry (as opposed to a non-productive showpiece) is almost by definition a mess. The important thing is to make sure your chaos is organised and never compromise on safety. Whenever the owner of this foundry casts up, he makes sure all the odds and ends around the floor are out of the way so there is nothing to trip over or get caught up in.
A Work bench
The first thing you’ll need for any sort of workshop is a good solid bench. There are plenty on the market, generally chock-a-block with “gee whiz” gadgetry and a price tag to match. If you’ve got a welder you can knock up your own metal bench. Otherwise it’s well worth making your own out of wood, to fit the space available and the type of job it will be put to.
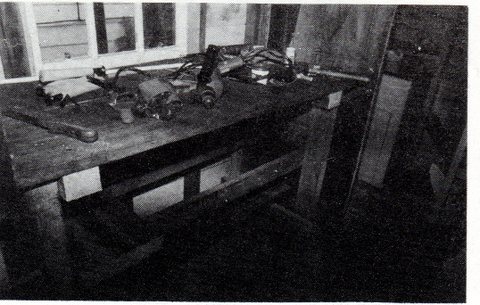
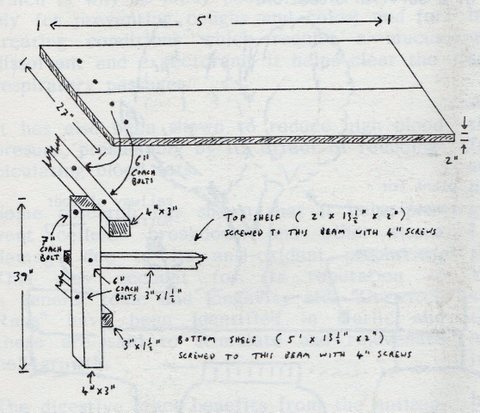
I chose to build a bench from second hand hardwood. All up, including bolts and screws it cost under $40 (1980s pricing!). The photo shows more-or-less what it looks like. It appears distorted because I used a wide angle lens, the only way to get a full view in a small space. The short shelf in the middle and the longer one at the bottom are optional, and certainly sturdier than necessary (2 inches thick!) I was going to make the bench three plants wide but decided two were sufficient, so I didn’t want to waste what was left.
The wood I got in various odd lengths and cut to size, ending up with:
2 x 5’ x 13.5” x 2” (top)
1 x 5’ x 13.5” x 2” (shelf)
1 x 2’ x 13.5” x 2” (shelf)
4 x 39” x 4” x 3” (legs)
2 x 27” x 3” x 1.5”
2 x 5’ x 3” x 1.5”
2 x 27” x 4” x 3”
To make sure the bench was solid I used coach bolts to hold it together as follows:
16 x 6” x 1/4“ Coach bolts
4 x 7” x 3/8” Coach bolts
8 x 4” x ¼” Screws (for shelves)
Overall length was 5 feet and height 41 inches. I am 6 foot one and like a high bench. Others may prefer a lower working height – so just use shorter legs!
The following plan gives a rough (not to scale) idea of construction.
It is definitely carpentry of the bush school, but the final product is rugged, solid and has a large working area. The shelves are handy for storing bins, moulding boxes, patterns etc.
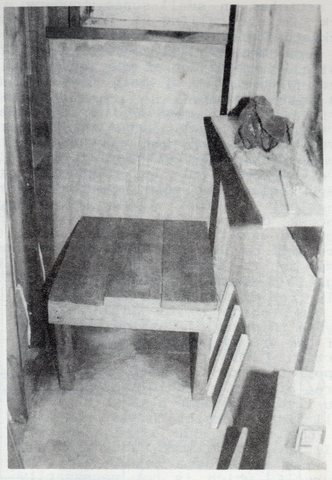
A Sand Bin
In industry, moulders often use a special bench which incorporates a trough for moulding sand. This is all very well if the only thing you are using your bench for is moulding. If you need as space for grinding, drilling and polishing castings – or for that matter any other metalwork, woodwork etc – it is worth keeping your sand elsewhere.
The floor is always an option however sand has a habit of spreading itself around, and a bin cuts down mess considerably. Moreover you can store things under a bin, which is a bit hard to do under a pile of sand on the floor unless you’re into playing pirates with buried treasure.
The photos basically tell the story. I spent around $15 on second hand timber and used 2” and 3” recycled nails.
7 x 30” x 8” x 1.5” (bottom and sides)
2 x 21” x 18” x 1” (front and back)
4 x 18” x 3” x 2” (legs)
2 x 24” x 3.5” x 1.5” (the three bottom planks are nailed onto these)
4 x 16” x 2” x 2” (back and sides are nailed onto these)
1 x 24” x 1.5” x 1” (see text)
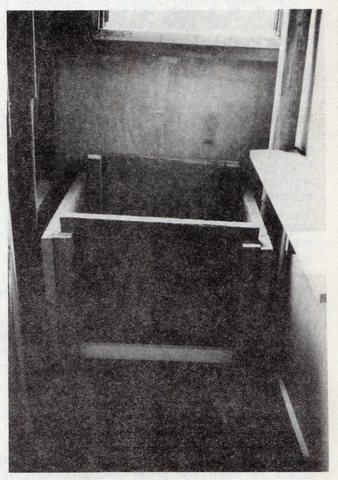
Note that the back and sides of the bin are not nailed on to the “table”. There is really no need, and if you are reasonably accurate in your sawing and nailing there should be no significant gaps for the sand to escape through. Also as it is built in two “units”, the table and the bin itself, you get two for the price of one. A small, low work table sometimes comes in handy and the bin will do its job of holding the sand directly on the floor as well as sitting on the table.
The front board is not nailed to anything, the idea being to allow it to be moved freely inside the bin depending on how much sand is in it. A 2” x 1.5” piece of wood has been nailed across the open front end between the sides of the bin to hold it rigid.
The piece of board with the three strips of wood leaning against the wall in the photo of the “table” has nothing to do with the sand bin. It is a “turning over board” of which more in a later article.
For other articles in this series, or other series of articles about backyard foundrywork by the same author, check out here.
