


By Paul
Patternmaking is basically a sub-species of carpentry. Although metal, fibreglass and specialised plastic patterns are increasingly employed in industry (especially for long production runs), wooden patterns are still the mainstay of one-off jobbing work.
Several different types of wood are used in patternmaking. Although other factors come into the calculations here, the main consideration is how long the pattern is expected to last.
Since the small scale operator is unlikely to attempt a production run of thousands, pine and plywood should prove perfectly suitable. Pine is soft and easily machinable, has lock shrinkage and insignificant warpage. Plywood is strong, machinable and can easily be ‘layered’ to make built-up patterns.
The simple patternmaker (a maker of simple patterns, Fred!) can make do with a saw, a Stanley knife, a tin of plastic wood and a tube of aquadhere (PVA glue). However, a decent carpentry kit – jig and fret saw, jack and smoothing planes, drill, chisels etc – should be considered the minimum for serious patternmaking. The ambitious worker might like to include a lathe and bandsaw. I need hardly add that these come in handy for a lot more than making patterns.
I don’t intend on going into the use, care and maintenance of woodworking tools. Indeed, although the quality and complexity of a pattern depends in a large measure on the skills of the patternmaker, quite acceptable work is possible with only a basic knowledge of carpentry.
The trick lies in building up the pattern, using simple shapes (wooden blocks, cylinders, sheets etc.) to construct a more complex shape. Figure 1 shows a simple example of a ‘flat-base’ pattern, using a cylindrical pine base and plywood rings.
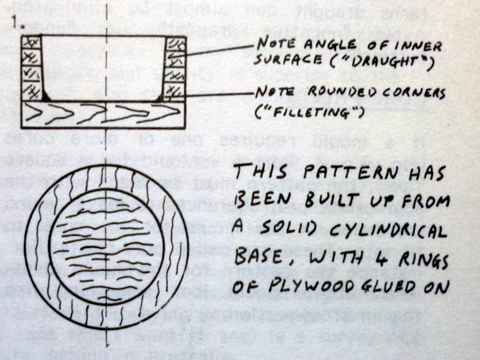
Figure 2 shows a more complicated pattern, for a flat-belt pulley. The same principles of construction apply, ie building up from the simple to the complex.
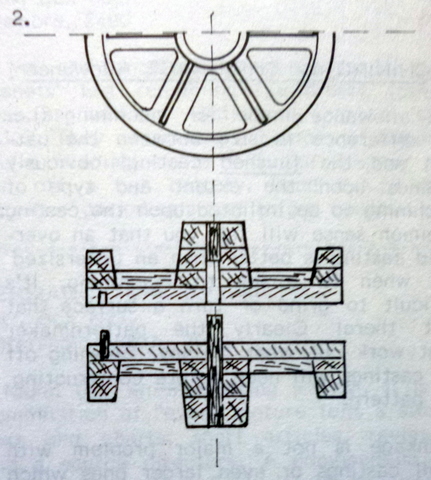
I have shown as split with dowels and corresponding holes for registration. Omit the dowels and you have a solid ‘oddside’ pattern (see part 4 on moulding split and solid oddsides). In practice, since the two halves of the pattern are symmetrical, the patternmaker would be more likely to construct this as a ‘turn-over’ plate pattern (again, see part 4 for moulding techniques. This would be easier to build, and easier to mould. A half-pattern only is required, and this can be built up directly on a board (the pattern plate).
Now we’ve covered the general points, it’s time to get down to a few specifics.
Draught
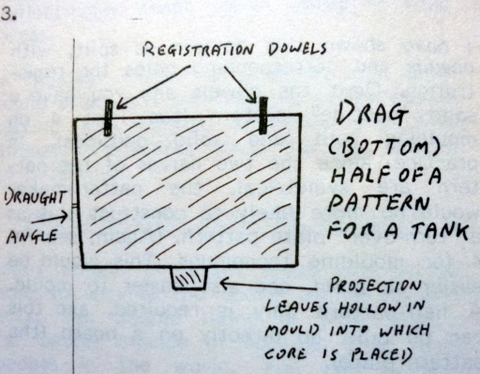
The ‘draught angle’ refers to the angular clearance given to a pattern which allows it to be drawn from the mould. 5 Degrees of slope should be more than adequate for large patterns. With very shallow patterns draught can almost be eliminated. Avoid ‘negative draught’, ie undercutting.
Core-prints
If a mould requires one or more cores (eg Figure 4 Part 5 Mould for a square tank) the pattern must be made with the appropriate protuberances to leave behind the holes in the mould for the cores to fit into. These are called core prints. For instance, the pattern for the mould mentioned above would like something like this in cross –section.
Machining and Shrinkage Allowances
The allowance made for machining (ie the difference in size between the pattern and the finished casting) obviously depends upon the extent and type of machining to be inflicted upon the casting. Common sense will tell you that an oversized casting is better than an undersized one when it comes to machining. It’s difficult to grind or turn a surface that isn’t there! Clearly, the patternmaker must work out what, if any, finishing off the castings will need before constructing the pattern.
Shrinkage is not a major problem with small castings or even larger ones which don’t require much accuracy. However for large and/or very accurate work, the shrinkage of the metal as it cools and solidifies should be taken into account. Patternmakers in industry use special shrinkage rules. These are proportionally larger than normal rules. Yet even without a rule the allowance is easy to calculate. Iron shrinks about 1% (1/8” per linear foot), bronze at 1.5% (3/16”), brass at 1.6% (1/5”) and aluminium at 2% (1/4”).
Filleting and Rounding
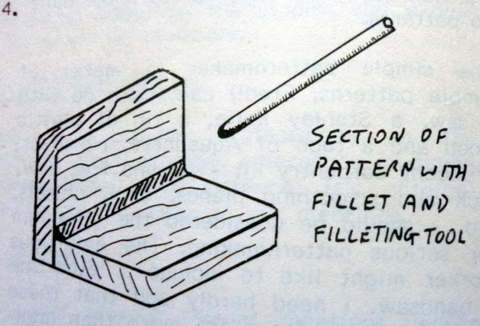
Sharp angles in in patterns should be avoided where possible. Filleting eliminates the internal corners of castings, while rounding does away with external corners. Filleting and rounding make removal of the pattern from the mould easier. The also prevent the formation of shrink holes and cracks in the casting. Plastic wood is ideal for making fillets, and can be shaped into place with a piece of rounded ¼” dowel. (commercial patterns used for long production runs generally employ wooden fillets; either shaped as part of the pattern, or glued on later). Plastic wood is also useful for building up details, levelling hollows etc.
Finish
A fine smooth finish is essential. Edges and surfaces should be sanded with a very fine grade paper. Traditionally pattern shops have finished off with 2 or 3 coats of shellac varnish, cut back between coats. Today cellulose based ‘sealant’ finishes are often used. These have the advantage of drying quickly, and imparting hardness to the pattern surface.
Estapol provides a smooth and hard surface, which can be cut back between coats. Even ordinary gloss paint is acceptable, as long as it is applied carefully. Avoid ‘puddles’ of paint which will create irregularities on the surface after it has dried.
Well, that basically concludes the present series of small scale foundry work. There should be enough in these 6 ‘chapters’ for anyone who’s interested to make a start.
