


This is a reprint of a series of articles which were originally published in the Australasian Survivor Magazine back in the early 1980s. They were written for the magazine by a small scale founder by the name of Paul.
The information for this series comes firstly from my own experience of 5 years work in a ferrous and non-ferrous metal foundry. Secondly, from the experience of friends who have successfully experimented with small-scale and backyard foundry work – including running a small business – and lastly from technical books on the subject.
Safety
The most important point to stress at this stage is safety. Of the survival skills discussed in this journal, foundrywork would have to rank among the most dangerous, if you go at it without being aware and prepared. Carelessness can mean serious injury, and I can’t stress this too forcefully.
At the foundry I worked in a young apprentice, largely through inadequate supervision, got about a teaspoonful of molten iron down the back of his boot. He was off work for over two months: the doctors had to virtually reconstruct his heel. Good medical care coupled with his own youth fitness meant he recovered completely, but an older person could quite easily have been left a permanent ‘walking stick case’.
I will return to the safety theme when I get down to specific aspects of foundrywork, but for starters here are a few general points:
- Never use ladles, crucibles, tongs or other equipment that are not in top condition.
- Always wear safety glasses when handling molten metal. (I would also add face shield and leather apron to the list)
- Never work on a wet floor. Water and molten metal don’t mix, as anyone who has seen the solidified splashes of aluminium on the 20 foot high ceiling of the place I worked could testify.
Commonseanse is really the keynote, and it is probably safe to assume if you’re reading this mag you have at least basic amounts of that.
Background to Foundrywork
An old moulder I knew told me he’d been walking to work one day when a donkey winked at him. “I knew he must have been a reincarnated foundry worker”, he said, “because of the features we had in common – a strong back, a small brain and a big tool”.
That’s his story and he is sticking to it. However, “it ain’t necessarily so!”
The small scale foundry can be nothing fancier than a quiet corner of the kitchen. On the other hand you can go the whole hog and make your own patterns and experiment with different alloys, which in addition to moulding skills requires a knowledge of woodworking and metallurgy. This sort of thing is best tackled by several people pooling their skills and resources. Even in its simplest form – an iron saucepan full of scrap aluminium in an open fire – foundry work provides an alternative to, as well as an adjunct to, the other methods of fashioning an object out of metal.
What Goes On
A life-size “positive” model of the object to be cast – the pattern – generally made out of wood is embedded in sand in a moulding box and later withdrawn leaving the “negative” of the object to be cast. Molten metal is poured into the cavity, and when it solidifies the mould is broken up and you have your casting.
Starting Off
Aluminium melts at 659⁰C, a heat easily reached in a good open fire or wood-burning stove. With such a ‘furnace’ all you need is a melting pot, which can be a simple iron pot, a pair of tongs to handle it and you are in business.
If you do use an iron pot I’d strongly suggest using a refractory (ie fireproof) wash on the inside (available from a foundry supply company or even a friendly foundry) or lining the pot with a half inch layer of fireclay. Dry before use! Iron is soluble in molten aluminium and weakens the final casting – not to mention the pot, after repeated use.
A more general sort of melting pot you can use for all metals including iron is the plumbago crucible. Plumbago is just another name for graphite or black lead. Available from foundry suppliers, these crucibles are made from a mixture of fireclay and plumbago. Given reasonable care they have an almost unlimited life when used for melting non-ferrous metals and can survive a hundred or so melts of iron.
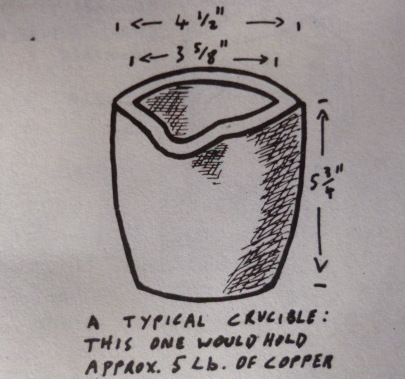
You can make your own crucibles as follows: mix 2 parts plumbago and 1 part fireclay with water to form a firm paste, press in moulds of the appropriate size and dry (but don’t bake in a kiln). The mould should allow for crucible thickness to size ratio about proportional to that shown in the illustration above.
Warning: If you are making a crucible for the first time, take extreme care when testing it out.
Furnaces
If you are serious about your home foundry, and especially if you want to try casting metals other than aluminium, a proper furnace is a necessity. One cheap and easy solution is illustrated below.
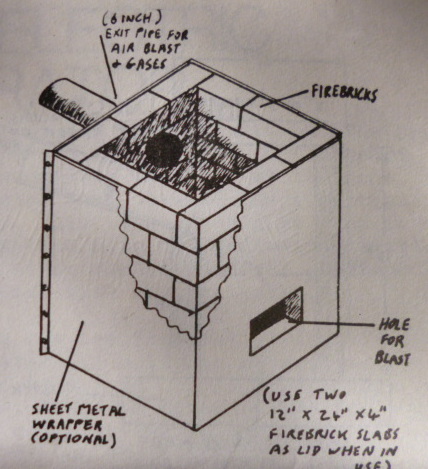
The illustration shows a fairly large capacity furnace (18”x 18” x however many layers of bricks you use – three foot high should be ample with this diameter). The potential output from a furnace this size is really more appropriate for a small business or self-sufficient community foundry. For basic workshop / hobby use a 2 brick per side furnace is adequate, giving a 9” x 9” diameter quite capapble of handling a good charge of coke and a crucible. Construction methods for both sizes are the same – I would suggest building the smaller one before trying anything more ambitious. Be sure to use a fireclay mortar mortar for your bricks!
A metal drum (from 5 to 44 gallon) makes a good furnace when lined with 2 – 2 ½ “ of fireclay. Some crushed firebricks added to the clay will give it extra strength. With a 44 gallon drum you will need to cut off the top quarter or so, so it is not too high to allow easy access when removing the crucible.
A cylindrical slow combustion stove can also be converted into a furnace after building up the lining with fireclay. The air outlet pipe and blast hole are already built into such a stove.
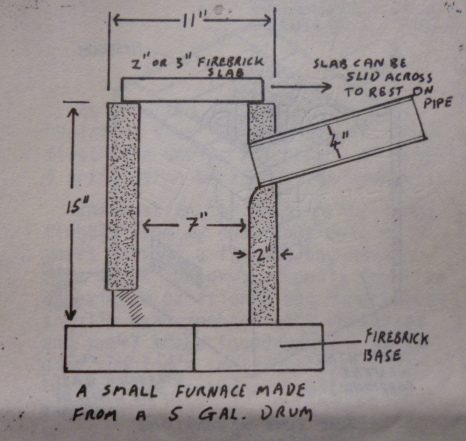
To line your drum with fireclay, use a former the diameter of the furnace cavity, rolled from sheet metal and braced internally with wooden struts. It should be constructed so that once the struts are knocked out the former will spring inwards for easy removal.
The dry fireclay (and crushed firebricks) should be mixed with 5 – 10% water to form a heavy clay, which is then rammed down solidly into the space between the metal former and the inside of the drum using a spiral motion – keep going until its finished to avoid breaks in the clay. Tidy up with a trowel.
Dry the lining with a small wood fire until the clay stops steaming, then bring up the temperature by adding coke until the whole interior gets red hot (about 2 – 3 hours depending on the size of the furnace). Pack with coke, leave to burn out and its ready to use.
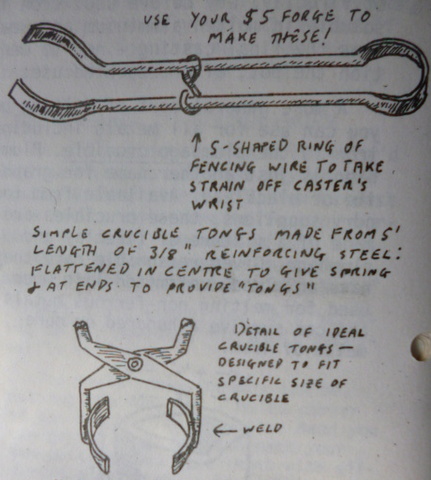
Safety Warning: When lifting a crucible of molten metal from the furnace you will need elbow length protective gloves and good tongs, the heat is intense.
Using foundry coke or even ordinary gas coke as a fuel you should be able to melt aluminium, the copper alloys (brass, bronze, gunmetal etc.) and even iron in any of these furnaces. For melting aluminium, a natural draught through the “blast hole” and out the exit pipe is enough. To melt copper alloys an 8 – 10 foot chimney connected to the exit tube gives an improved “natural blast”. For the best and quickest results with any metals, nothing can beat forced air. You will certainly need it for iron. Use a reversed vacuum cleaner connected to the blast hole via a sheet metal funnel, or shop around for a commercial “blower”.
Our next article will cover the basic techniques of moulding – or what to do with all that molten metal you will have hanging around by then.
