


Called variously bee walls, insect hotels or bug B & Bs these collections of stuff with holes in them can look artistic or just messy, but they perform a valuable service for those of us who grow our own. They provide a habitat for beneficial insects, providing them with places to live and reproduce so that if they turn up, they will stay where we want them; in our gardens.
There are two broad classes of insect we want inhabit our hotel, the first are solitary bees such as the blue banded bee, teddy bear bee, the leaf cutter bee or other native bee. These bees, while they do not live in a hive and produce honey, do carry out pollination services for us, ensuring a bountiful harvest from our fruit and vegetables which require pollination to produce.
The second class provide us with protective services for our produce. There are a range of beneficial insects which act as predators on the pest which attack our crops, these include lacewings, ladybirds and predatory wasps. The bug hotel gives them a place to set up home and breed so that we always have these willing workers in our garden to help us keep the bad bugs under control.
Structure
You need something to fit all the other elements in and it can be as big or as small as you want, so long as it fits the elements you want it to contain. I had an old pine packing case I had cleaned out of the shed, waiting to be disposed of, but as soon as I knew I wanted to make a bug hotel I grabbed it and cleaned it up. It is 630mm wide x 500mm high x 360mm deep and seemed large enough and solid enough to put up with the weight.
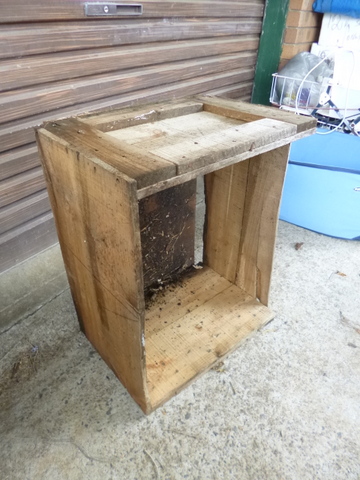
The top of the box was nowhere near waterproof and nobody likes to live in a damp house so I needed to put together a roof somehow. I had some colourbond miniorb corrugated steel which I had picked up from a construction site rubbish heap years ago and I figured it would do the trick. It was wide enough but too deep, I wanted 100mm overhang all around so I used the nibbler to remove the unwanted metal from one end of the sheet.

I wanted a pitched roof to shed the water better so I put the cut sheet on the floor of the garage and placed a broom handle in the central groove. By gripping a free end and pulling it up and over I was able to form a vee, which I would invert and place on the roof. I also had a length of terra cotta sewer pipe which had been stored underneath the tanks for 30 odd years, it went onto the top of the box in the centre and was fixed in place with some wedges. The miniorb was then put into place over the top of the terra cotta pipe and screwed down onto the box, forming a weatherproof roof.

Between the compost bin and the fence there is a small protected area near the greenhouse which is where I set the hotel up. To get it off the ground I put it up on some bricks, which were made with holes piercing through them, my thinking being that they may provide a habitat for something as well, even if it was only redbacks! I know the other elements would add considerable weight to the box so I made sure it was on a solid foundation and well located before I started putting in anything else.
Elements
Once your outside structure is completed, the next job is to decide what elements you want to put in you hotel, to attract which insects. Following are some of your options, put a few of each in, or concentrate on a particular insect, the choice is yours.
1. Wood with Pre-drilled Holes – These are used by solitary bees. They will cater for a number of different bee species so they should offer a variety of hole sizes. Almost any type of timber will work provided it is the correct size, 200mm of depth is good and I used 50mm+ diameter branches. Hardwood works best and of course treated timber of any description should be avoided. The best hole sizes are as follows –
- 1/8” (3mm) wide by 70mm deep
- 13/64” (5mm) wide by 120mm deep
- 1/4” (6.5mm) wide by 150mm deep
- 3/8” (9.5mm) wide by 150mm deep
- 1/2" (13mm) wide by 150mm deep
(Yes, I know I’m and old fossil but all of my drills are in fractions of an inch and I can’t get used to millimetre sizing for drills!)
I found that it is easier to drill the large holes first, for two reasons – one – it is easier to clean the spoil from the smaller drill holes out of the larger drill holes than vice versa, and – two – it is easier to fit the smaller holes in and around the larger ones, once the larger ones are drilled. Anyway, that has been my experience.
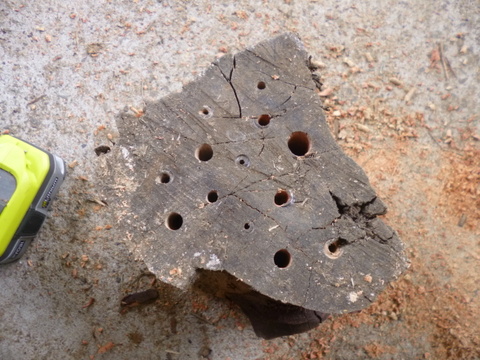
I collected the size of drills I wanted then went to the woodpile and extracted some of the firewood which I had cut from fallen branches. After cutting it to length with my drop saw it was just a case of securing each piece in the woodworking vice, end up and the drilling the required sizes and numbers of holes. If you are doing this for more than a couple of bits of wood it will take a while so be prepared for that, there will also be a remarkable amount of sawdust! Once the holes are drilled the timber can be stacked into the structure you have made with the holes facing out.
2. Sticks with pithy centres - Reed bees are common in this area and they like to nest in (wait for it!) sticks with pithy centres. The white and very friable pithy centre is easy to tunnel into and in the wild there are a number of species available for the bees. In your garden plants to look for could be lantana, hydrangea, tibouchina or even a grape vine. Hack around a bit and see what you can find, I found offcuts from our mulberry tree and the pithy centre is there so we will see how well it works.

Cut your chosen sticks to about 200mm long and in various thicknesses (whatever you have available) then slide them into your bug hotel with the cut side out. To make them easier to handle you can pack them into a PET bottle and then locate the bottle where you want it, slip the sticks into gaps between other elements or hang up a collection of sticks tied together with wire in a tree.

3. Pine Cones - Pine cones are in there to provide a habitat for beneficial ladybirds. To keep the pine cones all together and stop them falling out of the hotel, but still make them accessible to the ladybirds, I put them into a box. I made the box out of offcuts so that it was big enough to take 5 pine cones. I cut a backboard to size and then screwed on the sides while holding everything at right angles with a couple of framing clamps. To finish it all off, once the pine cones were in place I stapled some chook wire on the front to keep them there and screwed the box onto the inside of the hotel – job done!


4. Corrugated Cardboard - Lacewings are a predatory insect which are handy to have around and they like to nest in the small spaces inside corrugated cardboard. To make their accommodation I got hold of a PET drink bottle and cut the lid end off at the shoulder, so that the sides of the bottle were more or less parallel. I got hold of a cardboard box due for recycling and cut it up into 200mm widths then rolled it up until it was the same diameter as the inside of the bottle and the ends of the corrugations all pointed out. I then stuffed the roll into the bottle, which keeps the cardboard dry and stops in unrolling. I then slid it into the hotel, ready for its first client.


5. Clay Filled Pipes or Mud Bricks - Some bees and in particular blue banded bees, like to nest in sandy clay soils and this can be reproduced in the hotel by including mud bricks or packing the soil into plastic or terracotta pipes. If you are ‘rolling your own’ a mix of one part clay to three parts clay seems to work well, or use what you have access to and see how it works.
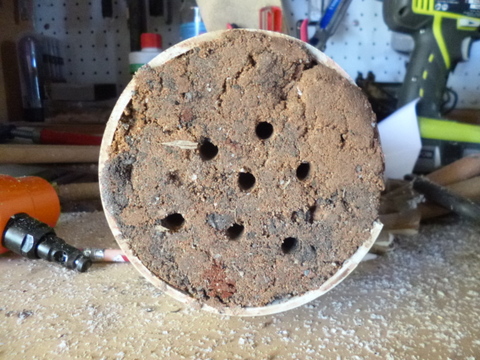
I had some 110mm diameter plastic pipe so I cut some 200mm lengths and grabbed some sandy clay left over from making a cob pizza oven. I sat the pipe upright in a cat litter tray (without cat litter of course!) and then packed the sand clay mix into the pipe. By picking the whole assembly up and dropping it a short distance several times it compacted the clay sufficiently that it all didn’t all fall out when I lifted the pipe up. I filled the pipe up completely, compacting after each top up then using the flat end of a ¼”drill I poked in some starter holes 60mm deep into the clay soil mix. With that done I placed the filled tubes on their side, starter holes facing out of the hotel.
Siting your bug hotel
Ideally your bug hotel should face north, get at least some sun on it and not face the direction that your prevailing wind and rain comes from. After considerable looking around our place I decided on a protected area between the fence and the compost bin facing east. It is facing away from where most of or weather comes from (south and west) and I’m hoping it will prove attractive to those insect we want to attract. Time will tell.
Don’t be Impatient
Speaking of time, it can take some time for your hotel to become tenanted. It can take several seasons for your local bugs to find and occupy your hotel, so check often, but don’t panic if it takes a while to see any changes.
As everyone knows, if you want someone to come and stay somewhere you need to provide not only accommodation but food as well. To provide the food for our insect friends, you can put in an Insectary Garden.
Update
It appears I didn't get it 100% right on the location, you can read the story here.
