


Thirty years ago an old friend of mine by the name of Bill Tarplee was operating a magazine out of Canberra and he wrote a series of articles on tools. Bill was a manual arts teacher at one stage, very skilful with his hands and knows all that there is to know about hand tools, their care and sharpening. I have been lucky enough to secure his permission to republish some of his original articles.
This one was first published in March 1983 and is the second in a series of three articles about tool sharpening. I have reproduced his drawings and photos from the original article, my apologies for the quality of the photos, but it was the best I could do with the technology available to me.
The one point that tends to set back the amateur handy-person more than any other, is having blunt tools. Very few people understand how to sharpen. Indeed, I suspect that few even know just what they are trying to do! Yet, when the correct steps are followed, sharpening is both quick and easy.
Firstly though, how do you know when something is blunt? In simple terms, if a plane blade, knife, chisel, gouge etc. won’t cut the hair on your arm at one pass, IT IS BLUNT! If you follow logical steps, as shown here, it is both quick and easy to fix.
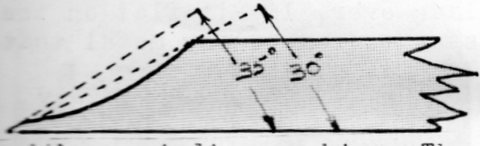
In the sketch above we have an ideal plane or chisel blade. The 30⁰ angle is called a ‘grinding angle’, and is produced with a grinding machine. The 35⁰ angle is called the ‘sharpening angle’, and is formed with an oilstone. While the angles may vary according to the tool, the proportions should remain as shown in the sketch. Once the sharpening angle becomes a fair proportion of the grinding angle (also known as the ‘grinding facet’), the cutting ability will be lost. Thus we re-grind after some eight or so re-sharpening actions.
The first action with a plane is to loosen the blade from the cap iron. In Figure 1 the correct method is shown. Using a large screwdriver the bench supports the blade. If the screwdriver slips it won’t go through your hand – as it would if you supported the blade in your hand.

With the blade supported by both hands and with a very light action, pass the blade (from edge to edge) across an emery wheel. After every five to ten passes dip the blade in a tin of water. If you find colours appearing on the steel, you are pushing too hard against the wheel and/or are travelling too slowly on each pass. Note how my right forefinger is curled beneath the blade. This gives a depth stop so that the same amount of blade is held up to the wheel each time. Also, while Figure 2 doesn’t show it, use safety glasses – every time! Slow and careful grinding should continue until all the sharpening facet (or sharpening angle) has been removed. Remember to keep the blade cool – once the colours start to show you are removing the hardness from the blade.

Ideally, sharpen a number of blades at the one time. This is time saving, in that if you are going to stop and sharpen one tool, you may as well do several.
In the article on planes we looked at a number of types. Figure 3 below shows the blade from a ‘German Jack’. Note the excessive sharpening facet – time for ‘the treatment’. Figure 4 shows the same blade with the sharpening facet ground away on my emery wheel.


Sharpening is just as easy as grinding if you follow a set of simple steps.
As I have mentioned before, I prefer a smooth oil stone. Most of the older stones had a smooth and a coarse side. While the same is claimed for modern stones, the smooth side is about as coarse as the fine side of the old stones. Since you don’t want to remove metal so much as smooth out any scratches left from a grinding wheel, fast cutting is no advantage. One old trick was to put an oilstone in a tin of molten petroleum jelly. This filled the pores and slowed down the cutting action. While I have never done this, I think it would work well enough.
To sharpen, put the oilstone on a firm base so that it will not move. Upturn the blade s that the sharpening facet is against the stone. If you lift the end of the blade you will feel when the grinding facet is against the surface. Lift the end of the blade a fraction more, and you have the sharpening angle. To hold the blade at this angle is the trick!
Years ago, I found out that if you turn the blade a bit, so that it is at a angle to the edge of the stone, rather than at right angles to the edge you can effectively increase the thickness, thus making it far easier to hold a constant angle.
The stone should be moistened with a floating solution that will lift the flecks of metal from the surface and prevent clogging. Neatsfoot oil is the best, car oil and kero are second best. (Note in Figure 5, below, how the blade is held at an angle. The plastic bottle holds neatsfoot oil).

Convention has it that that the blade should be ground with a ‘figure 8’ movement. This is a good way and is one you should try. Alternatively you can sharpen with a straight motion. Just take care to reverse the stone for each sharpening to keep wear as even as possible. With the straight motion it is easier to hold a constant angle. (See Figure 6).

Either way, you won’t need more than five or six strokes along the stone to produce a facet.
The next step is to turn the blade over, lie it flat on the stone as shown, and make several passes to remove any metal which has been bent over by the wheel. A ‘wire edge’ will be produced. This is a very fine strip of loose metal along the cutting edge, and it has to be removed. I usually strop the blade across my hand a few times (see Figure 7 below). Take care to pull the blade so that it is almost flat, (alternatively you can use a piece of leather, which is safer). The leather can be dressed with an abrasive compound. This will give an even finer edge, though I have never had a reason to strop this way.

Putting the blade back together should be done carefully, to prevent damage to the newly sharpened edge. If the blade is turned at right angles to the cap iron it can be slipped on without any damage to the blade. The blade can then be turned in line with the cap iron and pulled down until the blade is just above the edge of the cap iron. (See Figure 8 below)

The last step is to adjust the blade so that only the required amount of blade projects. Over the years I have developed a habit of running the set plane across the palm of my hand. I have learned the feel of a blade that is either too deep or not deep enough.
Chisels are sharpened in exactly the same way as plane irons except that they don’t need setting after sharpening. Gouges and other curved chisels require a special curved stone – a ‘slip’ – to remove the wire edge. Otherwise the principle remains the same.
Knives are sharpened in a similar way with the proviso that grinding is usually not necessary unless you are working on a blade from which a lot of metal must be removed.
In the shed I keep a range of knives – a Stanley retractable blade, a leather knife and half a dozen homemade knives. All handy and all sharp. (I take pride in the fact that in thirteen years, I have only once replaced the Stanley ‘disposable’ blade, and that was after I dropped it on the cement floor! With a modicum of care (and a good stone), those blades will last almost forever.(see Figure 9 below)

The only point to watch is that you remove equal amounts of metal from each side of the blade. Also, you should reduce pressure once you are starting to achieve a fine edge. At that stage keep swapping sides and just give the stone a couple of light strokes. Again, the wire edge should be removed by stropping. If you are using a very fine stone such as the American ‘Arkansas’ stones that are starting to reappear on the market, the wire edge does not seem to form up to the same degree.
Returning to the opening paragraph, just how often should you sharpen a tool? I have found on numerous occasions that I was forced to stop and re-sharpen a blade after as little as two or three minutes work! Once a chisel refuses to cut a clean chip, or a plane refuses to cut, it is time to re-sharpen. Since it should not take more than several minutes to produce a keen edge, it is not a task to be avoided. Also “practice makes perfect”.
One last point – when you finish using your oilstone, wipe the surface clean of oil with a bit of cotton rag that is free of dust and grime. Keep the rag handy, and wipe over the sole of the plane from time to time, while you are planing. You will be surprised just what a difference it makes.
