


When I started out producing my own seedlings I worked out pretty quickly that it would be much easier if I had a greenhouse of some description. This was in the days before I discovered how to make the low cost mini greenhouse. As well as providing a dedicated area to keep the seedlings and going some way towards providing a warm environment, the greenhouse would keep out pests like the cabbage white butterfly which could lay waste to a brassica crop before it started. So began my journey.
The small one
We started out with a small steel tube and plastic fitting one with a clear plastic cover that zipped up in the front, the original one we bought had three shelves, which for the work I was doing at the time was plenty. It had a small footprint of roughly 50cm x 70cm and was probably about a metre high so it could fit in almost anywhere.
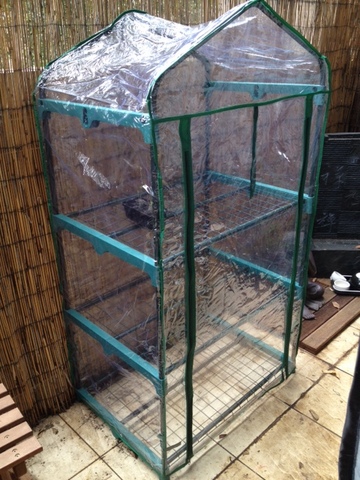
You need to visit your greenhouse regularly to water it and check on your seedlings so while I would like to have put it on the back deck next to the back door for easy access, that side of the house faces west, not north. To get the best out of the winter sunshine it needs to go against a north wall, but to keep it easy to get to I put it more out in the open......bad idea! The first time we got more than light winds it blew over; wasting all of the work I had done to get the seedlings that far. Needless to say I made space for it against our north wall, which is protected from the prevailing southerly wind. The lesson to be learned if you are using one of those small greenhouses, is tie it down unless it is in an area well protected from wind.
These small greenhouses are very handy because they are small, easily relocatable and best of all cheap! Although they do have some disadvantages like the wind problem above, their small size means they gain and lose temperature quickly and if you are planning to use one to grow your winter supply of tomatoes, forget it! They are a great way to start out though and for places like units or flats may be your only option. After a while what it did was to convince me to get a bigger one.
A Bigger One
I was still not flush with cash, but I saw a larger greenhouse in one of those “order this and we’ll love you forever” catalogues that turn up in the mail regularly, at least around here they do. It was 2 metres by 3 metres and high enough for me to walk in comfortably; it had green translucent plastic cover with a zippered entry door in one end and a zippered roll up window in the other. The skin fitted over a steel tube and plastic connection inner framework. All up it cost $130 which I considered to be a bargain!
I bought one and put it up in the north western corner of the yard. This cut down some of the light and heat that the greenhouse got since it was against the northern and western fences but it still got enough sun overall and most of the morning sun. It really kept quite warm in winter. I put in three black barrels full of water to act as thermal mass, some concrete pavers down the centre and a steel framed potting bench with a mesh top I had welded up which gave me a surface to work on. The other side from the bench had a table which held the seedlings and I used some of the space there to grow tomatoes quite successfully.
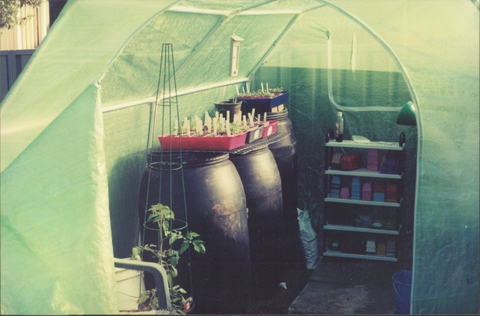
In the end the black water-filled barrels didn’t seem to make much difference to the overnight temperature and since the inside of the greenhouse did not freeze I wound up taking them out to give me more room. I did leave one barrel in which had a tap in the bottom which performed the dual function of retaining some thermal mass and holding liquid manure. I got hold of some horse, cow and chook manure, shoved it all into a woven chook feed bag and then suspended it in the drum three quarters full of water, instant liquid manure!
By and large I was really happy with my el cheapo greenhouse and while it was big enough and warm enough to do the job it still had one teensy problem. After not quite 12 months, the outer skin covering fell to pieces. It only just made it through one Aussie summer and that was it. The steel tube frame was still in good condition and it seemed such as waste to throw it all out and start from scratch! What to do?
The Next Step
It’s funny how things work out, I used to drive past this place on the way to see my father that handled commercial greenhouse supplies, so I stopped in to see them and for a very reasonable fee (around $80 I think) I was able to get an offcut from the end of one of their greenhouse plastic rolls. The offcut was large enough to cover the entire top and sides of the greenhouse with plenty left over to go around each end. The next challenge was to work out how to wrap it around each end and close it off to keep the heat in, but still allow me access into the greenhouse.

The way I worked out was to make a doorframe out of scrap timber, about 1.9 to 2.0 metres high and about a metre in width for each end so that it sat in the middle of each end. I secured the doorframe to the steel tube above it with a piece of sheetmetal strap which was screwed to one side of the frame, then run up and over the tube, down over the other side and screwed into the other side of the door frame.
What that enabled me to do was, after I had pulled the plastic taut over the top of the frame I pulled the plastic around the back and then folded it around the rear doorway and, using a staple gun (and looooots of staples!) I fixed it to the inside of the door frame, all the way around. This secured the plastic nicely so that I was able to pull the plastic taut around the front doorframe and do the same thing. I then made up two light doors by making up a frame of scrap timber the same dimensions as the inside of the door frames and covered them in the greenhouse plastic by cutting it to size then stretching over the frame and tacking in place with the staples.

Since the back “door” was going to be against the fence anyway I just screwed it into place through both the door and door frame with long screws. The front one I hung using a couple of old hinges that I had floating around. I also put on a bolt to keep the door closed when I needed to. There was no ventilation beside the front door but the greenhouse proved satisfactory for raising seedlings for probably 7 or 8 months of the year. During summer it just got too hot, so I installed a shade cupboard (well, it was far too small to be called a shade “house”). Although a couple of years back we got a really wet summer and the shade cupboard worked too well and I was getting leggy seedlings due to lack of light. There was just not enough light getting through so I had to transfer the set up back to the main greenhouse.

This set up worked well for another 3 or 4 years when due to all that time in the Aussies sun, the plastic connectors themselves started to break down resulting in a very sad and wilty looking greenhouse. Again it was time for a change!
The current situation
I started checking up and it seemed that at that time a proper glass and aluminium glass house was about $5000, which was somewhat more than I could spring for so I kept looking. We were driving past a place that sold sheds and they had a wonderful little greenhouse that was made from polycarbonate corflute type material and plastic glazing bars. It was a RION brand from Israel and the bloke was getting a new shipment in a couple of months, so we paid a deposit and waited.
When it finally arrived I pulled the old one down, cleared the area and put a brick surround in, then put square concrete pavers down each side of the site and crushed terra cotta tiles in the centre to walk on, then I could put the new one up! At 2.4metres by 2 metres it was a bit shorter than the original one and it took about three days by myself to put the thing up, but it was a joy to behold! Due to its shorter length I had to carry out some radical surgery on my steel work bench to make it fit but my trusty angle grinder made short work of it!

In the five years or so that we have had it, it has performed wonderfully and allowed me to produce countless seedlings as well as a bit of out-of-season stuff too. It has proved to be a wonderful place to work on a sunny winter’s day or even just a place to sit and relax in the warm. To make it easier to check when I got home from work on a long winter's night, I installed a 12 volt caravan fluorescent light and wired it back to the 12 volt system in the garage. It gives me plenty of light to do what I need to do.
This summer we have added a new wrinkle. Some friends wise in the ways of growing came over to have a look at what we were doing and asked when I put shade cloth on the greenhouse. I replied as I wrote earlier that we move to the shade cupboard for summer growing but his question sparked some thought. This year I have placed some black shade cloth over the top and rear of the greenhouse to try and cut the summer sun down a bit. It is still in the early stages of summer yet, but the difference can easily be felt and I am sure that it will prove to be a great modification.

Your own greenhouse is not a necessity, unless you are growing lots of stuff all year ‘round, but it makes the job easier and gives you a nice place to retreat to when the weather is cold and windy.

