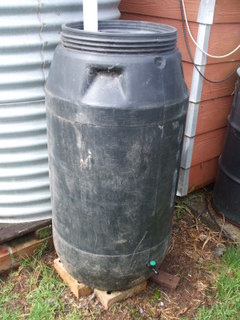
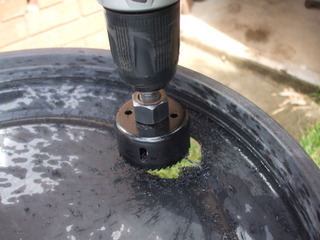
If you want to gather and store your rainwater in a cost-effective manner, this is the way to go! Second hand plastic 200 litre barrels are available quite cheaply and to make it easy when we get to the bit about fitting the tap it is best to get a full-open-head barrel that you can climb inside if necessary. Needless to say the barrel must be made of food grade materials and only used to store and transport food materials otherwise just buy a cheap poly water tank, around here there are pickle barrels available which fit the bill nicely.
When you buy your barrel though go over it with a fine tooth comb, read any labels left on and sniff inside to see if you can detect any chemical residues and give it a rinse with water before starting work just to make sure.
It will be handy to know where you want to site your barrel and this would preferably close to, if not right under, a downspout of some description so that it will reduce the amount of plumbing that you have to do to get the supply to the reservoir. Depending on the height of the water harvesting surface above your barrel you will probably want to raise the barrel up on a platform of some description (I used some spare bricks and concrete blocks), to make the tap easier to access. Don’t forget that the full barrel will weigh upwards of 200 kg so make the platform solid enough to bear this weight.
To turn your used pickle barrel into a new rainwater barrel you will need a couple of tools and fittings –
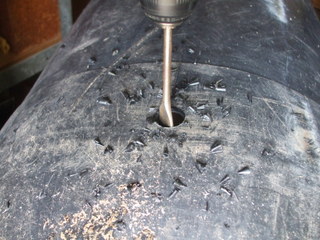
• A 25mm spade bit (and a drill to drive it of course)
• A hole saw as big as the downpipe that will be servicing the water barrel, I use 50mm piping so a 50mm hole saw works well for me. (and the drill as above)
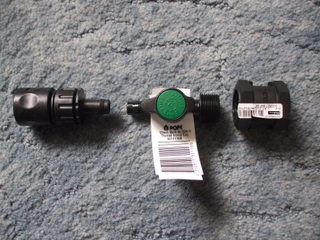
• One x 13mm barb to 20mm thread inline tap which can be found in the irrigation section of your local hardware
• One x ¾ inch BSP socket, which can also be found in the irrigation section, and
• One x click on connector to 13mm barb fitting, which allows you to connect the tap to a standard garden hose female fitting with a bit of 13mm irrigation pipe.
The process is an easy one, work out where you want the tap to be and the, taking your 25mm spade bit and drill out the hole. In any case it should not be right at the bottom of the barrel so that the inevitable detritus that gets washed in from your collection surface eg roof, can accumulate on the bottom of the barrel without contaminating the water you draw off.
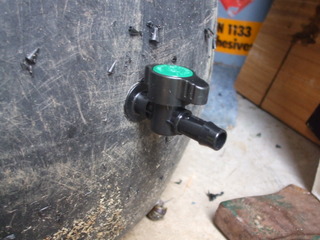
To fit the tap, screw the threaded end into the 25mm hole in the barrel and then (here comes the fun part!) with the barrel on its side climb in as far as you need to and screw the ¾ inch BSP socket onto the exposed threaded end protruding through the side of the barrel . You may need an assistant on the outside to hold the tap to prevent it rotating while you screw the socket on and the assistant could also provide some help it you have difficulty exiting the barrel. You should find that this will provide a good enough seal but if you are still concerned a bead of silicone sealant around where the tap meets the surface of the barrel will prevent any problems (always remember “silicone is my friend”!)
If you barrel is like mine, it will have a separate lid which is a push down seal on the main barrel, work out where your downpipe will meet the lid and drill your hole. A nice snug fit will reduce the likelihood of mosquito problems down the track. You may also want to drill an overflow hole at the side of the top of the barrel so that you can control which way the overflow goes.
Once your water barrel is installed, you need to think how you want to use the water that is stored inside. If you want to use it to irrigate nearby plants such as a veggie patch, some herbs or a bruit tree or two with plumbed in irrigation pipe, you just need to run the pipe out then shove the end of the pipe over the 13mm barb on the end of the tap and bob’s your uncle.
If you want a more flexible solution you can ram on a bit of irrigation pipe and then inset the 13mm barbed end of the other fitting, which provides the outlet with a female standard 12mm hose socket. Just insert a double ended male joiner and you can put any of your standard garden hoses on the end. Without a pump the pressure won’t be much but you can gravity feed it to anywhere in your yard, with enough hose.
There you have it, a cheap and recycled water storage system that can let you take advantage of all that free rainwater, after the rain has finished.


