


This article was first published in May 1982 as “Survival Push Bike” in the magazine Australasian Survivor and was written as part of a three part series by the then editor, Mr Bill Tarplee. Bill is a wizard with things mechanical and his advice and insights are still relevant today for those who wish to live more sustainably by using their bike. Of all the things I am, artist is not one of them so I have tried to reproduce Bill's original drawings as best as I could.
Recently, at the age of 39, I took up serious push bike riding again. (Serious in the sense that I ride to and from work each day). This is a round trip of 30 odd kilometres per day. To most people this is considered a vast distance, and I must admit that before I commenced the pastime, I thought the same way.
Bicycling has many advantages, but the one that is frequently overlooked is the time that it gives you to think (apart from the pedalling there isn’t much else to do). One thought that occurred to me is that the bike is such an ideal survival (and sustainable living) machine. It has many advantages – it is cheap; it costs nothing to run; it is simple in construction; it has a minimum of parts to go wrong; it is silent in operation; it will operate in most conditions; it requires only the power of the rider; it does not need the use of public roads; it can carry a surprising amount of material; it can be used to cover vast distances; it is one of the few modes of transport that improves the fitness of the user.
There are obvious disadvantages – use is dependent on fitness; weather conditions affect use; hills make travel a bit more difficult. Notwithstanding the negatives, the bike is an ideal mode of transport and one you should seriously consider.
When considering bikes, we have to realise that basically there are two types of bikes – old fashioned bikes and modern bikes. (This may come as a surprise to my younger readers.)
Old bikes were divided into two classes – free wheel and fixed wheel bikes. Free wheel bikes were those with a ratchet arrangement in the hub, whereby you could stop pedalling and keep your feet motionless as in the modern machine. Fixed wheel bikes came without the ratchet (or coasting) hub and were such that the pedals rotated as long as the bike moved. There were advantages in both systems and I really couldn’t which form I preferred, having had both.
You can still find both types in the second hand shops and trading/swap gatherings. They came with two forms of rim shape, and both forms were fitted with a much wider and lower pressure tyre than is currently fitted to modern bikes.
Generally these older bikes are far less desirable than a modern bike and command a much lower price on the second hand market. Unfortunately there are at least two big disadvantages to owning such a bike. The first is that it is becoming increasingly difficult to obtain the wide tyres necessary to fit the older rims. The tyres were 1 3/8 inches to 1 ½ inches wide whereas the modern tyres a 1 ¼ inches or less. Also, the older bikes will have travelled many miles – maybe 50,000 or more and in all probability are suffering from serious metal fatigue. I have had one bike break up under me from metal fatigue, and it is an experience I would not like to repeat. A fresh coat of paint and cleaned up parts will not remove metal fatigue. For this reason alone I would think very seriously about buying an older bike. Such bike may also be seriously affected by internal rust in the frame. While you can see the exterior rust or pitting, if it is on the inside it will not be apparent until he bike breaks up – maybe at speed. All things considered, I feel that the older bikes are fast becoming a risky proposition, despite the price advantage.
This now brings us to the modern version. In general it will be a bike with multiple gears – 3 speed hub gears or 10 speed derailleur gears, also they will have the thinner wheel previously mentioned. It is this type I will consider simply because such bikes are more commonly available and spares easier to obtain.

The older bikes had some advantages with the low pressure “thorn proof” tyres and comfortable touring saddles. The modern version is easier to pedal as the high pressure tyres produce less road friction and the 10 speed gears are a labour saving device on hills or when riding into the wind. While it will take a little while to become accustomed to using ten speeds to full advantage, they are far superior to older bikes with a single (compromise) gear.
To get full advantage from a cycle it is necessary to maintain the machine at its mechanical best. This is not a difficult job but one that takes a bit of periodic care. A little thought will soon show that if the bike is not functioning properly, YOU will have to do more work to achieve the same results.
In a mechanical sense, bikes can be considered as two systems – the bearings and the drive mechanism. It is interesting to note that modern ball races (best known as “ball bearings”) owe their widespread popularity to cycles, since it was necessary to produce a cheap and efficient bearing for the early cycles to function efficiently.
Cycle maintenance is easy and usually quick once you know what you are doing. Assuming that the bike is a survival tool it is important that you know how to fix it. You may not be able to rely on others to perform the basic repairs in our increasingly uncertain future.
I shall cover some basic points. If you know absolutely nothing about mechanics, then I suggest you follow the basic rule of maintenance – never wait for something to go wrong: always work upon a machine before it breaks down. That way you will recall how well (or otherwise) it performed before it broke, and you will have a ready reference once you have completed the job. Also, never work on more than one part at a time, if possible. If you pull the whole thing apart, you may have difficulty determining why it still doesn’t go when you reassemble it all. (I learned that the hard way with cars and it is a rule I can’t impress too strongly).
A cycle contains at least five sets of ball bearings. It is to your advantage to be able to clean, oil and adjust them all as necessary.
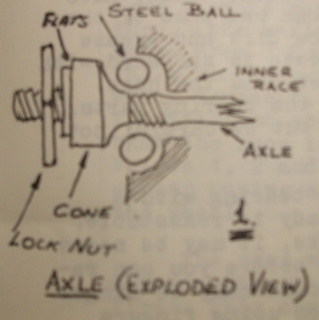
In the exploded view of a typical axel I have shown the basic construction found in most bikes. The steel balls are held in position in the inner race by a cone. This locked in position by a locknut. The forks fit outside the locknuts and are secured by another nut. It is all very simple and there are few problems involved in the cleaning or adjusting processes.
However, before I get down to specifics, I would suggest that you obtain a quality tool kit. Most of the cycle tool kits are just unadulterated rubbish, and I wouldn’t let one near my bike. You cannot improve on a quality ring spanner when it comes to tightening or loosening nuts. Don’t use sloppy fitting open ended or adjustable spanners. They will invariably mush up the corners of the nut and make it next to impossible to remove next time. Far better to go to the hardware store and buy a 14mm. Ring spanner or whatever size is needed, and not ruin any of the nuts. You’ll only need a couple of spanners to fit all the nuts encountered on a bike.
With all that said, adjusting the front wheel. Assuming that you have a new bike that has not been worked on before, file or otherwise mark one end of the axle and record which side of the wheel is thus marked. (Axles have a particular side or way of facing). I shall explain a little more in a minute).
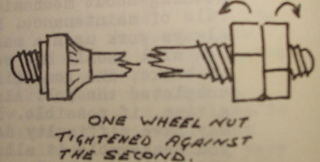
I like to work on an old sugar bag, as it stops any odd pieces from rolling away. I’d suggest that you do the same. One lost steel ball and your bike will be useless. With the wheel out and lying on its side on the bag, you will need twp spanners - one to fit the locknut, and one to go under the locknut on the two flats milled on the sides of the cone. This will needs be a thin sectioned spanner, and special cycle spanners are sold for this purpose. Remove the locknut and then the cone (the cone should only be finger tight). If the cone is tight upon the axle, roll the wheel over and try the cone on the other side. You will that on many bikes only one cone is easily removable. This is one reason for marking the end of the axle. If you can’t remove either cone, screw the outside nut back upon the axle for 12mm and then screw on the other wheel nut. Using two spanners, tighten one nut against the other, you can then use the locked nuts as a base to screw against when you fit the spanner back on the cone.
With the cone removed, the axle will fall back through the hub and the steel balls will fall out onto the bag, be certain that they all fall out. A magnet is useful for picking the balls out of the race. Put the axle, cones, balls, nuts etc. Into a tin and cover with kerosene. You can use some of the kero and an old paint brush to clean all the grease and dirt off the hub, rim and spokes. Once the grease is softened with the kero, hose the mess off with a hard jet from the hose. Leave the wheel to dry while you clean up the bearing parts, these can be cleaned in a similar manner but be careful not to lose any pieces.
Once the parts are dry, wipe out the bearing with a piece of soft clean rag. You are then ready to reassemble. If you are working on an old or abused bike, it may be necessary to clean out the threads on the axle before you can reassemble. Remember how I said the cone should be only finger tight? It should be possible to screw it on using fingers only. If you can’t tease out a bit of steel wool and pull a few strands through the hole in one of the hexagonal nuts, holding the axle with a vise, visegrips or pliers (in the middle where there is no thread) run the nut along the threads. Once washed down again with kero, you should find that the nuts can easily run on with finger pressure only.
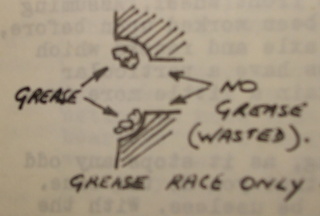
To reassemble you will need a tin of thin car grease. Apply grease all round the inside of the inner race and replace the steel balls (same number each side). The grease will hold them in position and you should be able to turn the wheel over without any balls falling out. Work over the bag just in case. Be careful to keep everything as clean as possible, as a speck of dirt could start scratching the ball race and causing unnecessary wear.
Before fitting the axle, check for the following, as I said before, one cone is usually wound up tight and can’t be easily removed (frequently it is run up to the end of the thread), the other side is the adjustable cone. The action of the wheel rotating should be trying to unwind the cone. It has to go to the side of the bike where this will happen. If the wheel turns clockwise, and you have a clockwise thread on the axle, the adjustable cone would go to the left. Make sure of this before you fit the axle. That done, replace the parts as you removed them.
To adjust the bearing, you finger tighten the cone just to the point where there is no rocking or wobbling in the bearing. The axle should turn freely with no resistance or binding, but at the same time, no wobble. It is a fine adjustment but easy to do. It is better to be marginally on the loose side than too tight. Fit the locknut and check that in doing so you haven’t increased the cone tightness on the steel balls.
If you upturn the bike, a properly adjusted cone should have no sideways movement at the tyre, but the wheel should rotate freely. The weight of the valve stem should be sufficient to turn the wheel slowly until the stem bottoms. If you have a spoke reflector this weight should cause the wheel to turn (the reflector is a bit heavier so should outweigh the valve stem). Sometimes you will find that no matter how carefully you adjust the cone, you cannot remove all the lateral wheel movement. This is an indication that either there are insufficient steel balls on one side; that the balls are worn; that the race is worn or the balls are the wrong size. Points 1, 2 and 4 are easily fixed. Point 3 could necessitate either buying a new wheel or buying a new hub and re-spoking the wheel.
The rear wheel is cleaned and adjusted in a similar manner although obviously the chain will have to be removed first. This can be done by loosening the wheel nuts and moving the wheel forward, the slack in the chain will enable you to lift it off the sprockets.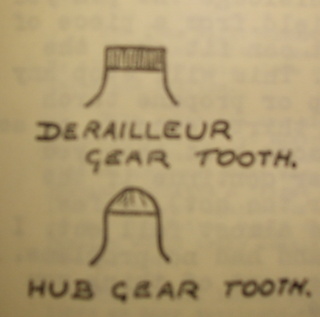
In cleaning the rear wheel, check the condition of the sprocket teeth. They should be clean and free from wear. Teeth shape will vary slightly, depending on the gear mechanism used. Derailleur gears are a flat top bevelled edge tooth; hub gears have a more pointed tooth. In either case there should be no wear on the back or sides of the tooth. Worn teeth will cause a new chain to wear rapidly, so you aren’t saving money by not replacing the sprocket.
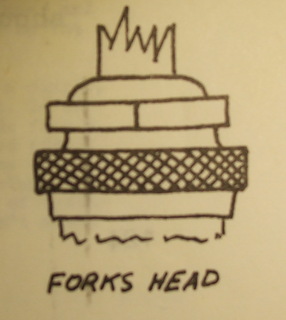
When cleaning and adjusting the crank bearings and forks head, the procedure is similar, though the mechanical arrangement varies slightly. The forks are locked with a large lock nut, and a minute of close inspection will show you how it works. The nut beneath is frequently knurled and has to be gripped with slip jaw pliers (which is a nasty way to hold a nut!). The steel balls are smaller than in the wheel bearings, so you will have to be more careful not to lose any.
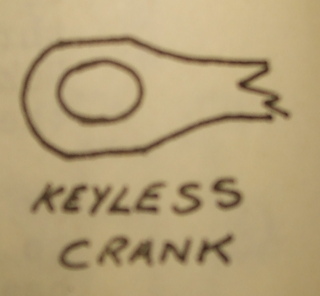
With the crank bearing you will have to remove the pedal cranks first. Usually this isn’t difficult but there are a few points to observe. Firstly, there are two types of cranks – those using cotter pins and keyless cranks. If you have the latter type, you will need a special puller that you can obtain from almost any bike shop for a few dollars. While you might get the crank off without the puller, it is false economy as you will invariably damage the bike in the process. Far better to buy the right tool now, before inflation bites any deeper. The puller will come with specific instructions on its use, so I won’t go into details here.
With cotter pins, first loosen the nut off a couple of turns only, then with a soft faced hammer or with a piece of soft metal across the nut, nit the nut a smart blow with the hammer. If you don’t use a soft face on the nut you will invariably damage it and make future work far more difficult. Also, the crank must be fully supported so that the blow doesn’t damage the bearings.
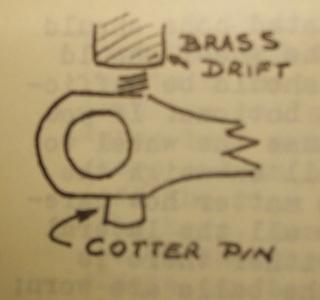
If you are working on an old bike you may find that some clown has already done the wrong thing and butchered the cotter pin. This means you will have to replace it before you can reassemble the cranks. If you have trouble in removing the damaged pins I have found that a 150mm x 12mm bit of brass makes a good drift. You will need a heavy hammer and the crank supported on a substantial block to absorb the shock.
If a couple of smart blows do not dislodge the pin you will have to use heat, Make up a heat shield from a piece of jam tin so that it can fit over the spindle, between the crank and the frame, this will stop any flame reaching the frame. Play a blowlamp or propane torch on the crank by the cotter pin for thirty seconds or so. Try not to heat the axle and don’t use more heat than you need or you will soften the steel. (Never continue if the grease starts to smoke – it’s getting far too hot). A few seconds with the torch and the pin should almost fall out. I have done a couple of repairs this way, and no problems. However it is a last resort, and not the sort of thing you should do unless you have no other choice.
