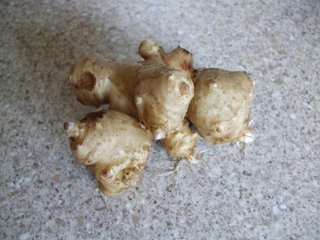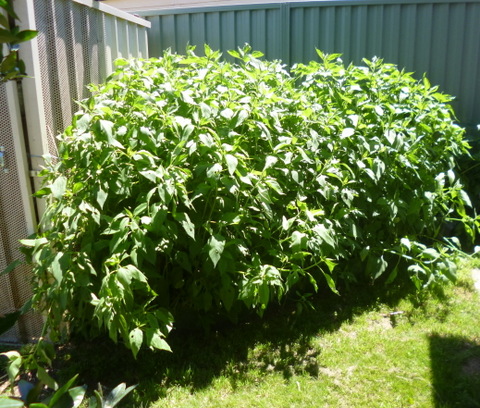
Back in the late 1920s when my father was growing up in Armidale, northern New South Wales, the family had hit a rough spot financially and things were pretty tight. Money for buying even the family food staples was getting a bit thin on the ground. Anyway, my father had been playing in a vacant area near the house which had a large patch of sunflowers growing on it. He happened to be digging at the edge of the patch and found a tuber. He took the tuber to his mother who identified it as a Jerusalem artichoke and to cut a long story short, that large patch of “sunflowers” helped my family through a rough time by providing good tucker for free. That bit of family history just goes to illustrate that a patch of Jerusalem artichokes in the back yard can provide a feed when all else fails.
WHAT THEY ARE (and what they aren’t)
The Jerusalem artichoke (Helianthus Tuberosus) funnily enough is neither from Jerusalem, nor is it related to the (globe) artichoke. It is a tuber found growing wild in North America and is related to the sunflower (Helianthus Annus). It also goes by several common names including: sunroot, sun choke and bread root, depending on who you are talking to at the time. However in this country it is generally referred to as a Jerusalem artichoke.
It is a fast growing perennial tuber that can grow stalks two to three metres tall and, if you’re not careful, it can take over the entire veggie patch because it tends to be invasive. What’s more, they can grow from peelings so be careful how you compost.
GROWING
According to the books, they will do well on any soil, but prefer lighter rather than heavier soil and should be planted about 15 centimetres below the ground and in rows about 60 centimetres apart. They are resistant to pests and diseases, certainly in all the years we’ve grown them I’ve never seen any bug or organism take a second look at them, usually on the way to my prize broccoli! Provided they get enough water they will grow on in disgusting good health during spring and summer, producing a bountiful harvest in the autumn, harvested by digging up the tubers after the stalks have died off. They will do this regardless of what else you do to them, which in most cases will need to be nothing. When harvesting, all you need to do is leave sufficient broken off bits in the ground to start next year’s crop(it is almost impossible NOT to do this!) and they will sprout next springto provide another good harvest all over again.
The way I did it was to first buy some Jerusalem artichoke tubers from our local Woolies in the late autumn. I kept them in the fridge until I was ready to plant them the following spring, but I probably could have planted them straight away and all would have been well. When I put them in originally I chose a sunny part of what was then the chook run and dug up a roundish bed approximately 1.5 metres across. I dug in a stack of the chook poo and other vegetable rubbish floating around the pen to act as fertiliser.
The reason that I chose the cook pen was so that the chooks scratching around the outside of the bed would prevent the artichokes from moving too far from their home range. I surrounded the bed with a ring of bricks and a half metre high ring of wire netting to keep the chooks out. All I did then was to plant half a dozen tubers throughout the bed and put down some straw mulch and they grew like crazy!
Each spring for several years afterward I would increase the circumference of the ring by one brick, filling in the newly uncovered area with cut grass, hay, compost or whatever was available to give them extra growing room. That first year I must have taken about 25 kilograms of artichokes from the patch, but I bet I left at least that much again in the bed that was excess to our needs.
Growing the artichokes in the chook pen has had two other side benefits in that the chooks love to eat the leaves that they can get at and because of the dense nature of the artichoke foliage, a fair degree of shade is provided in that area as well.
USING
The most obvious thing that they can be used for is to provide food for us, however there are a number of other uses that I have seen recorded in some of the books in my library –
- In the “Introduction to Permaculture” (Tagari Publications, 1991) Bill Mollison says that they can be used for animal forage (our chooks certainly love them), the dry stalks and green leaves and stalks can be eaten by goats and the tubers by pigs. The stalks can be used to provide a fast growing windbreak and the tubers will break up hard soils in a similar manner to potatoes. After harvesting the leaves and stalks can be used as mulch.
- In “The Complete Book of Edible Landscaping” (Sierra Book club, 1982) Rosalind Creasy says they can be used as a quick growing screen or hedge or as a tall background to a flower bed (the flowers are quite attractive). She also makes the point that “their carbohydrate is in the form of inulin rather than starch which means that it is an acceptable carbohydrate for diabetic diets”.
- John and Sally Seymour in “Self Sufficiency” (Faber and Faber, 1984) say you can clear land for planting by sowing Jerusalem artichokes, letting them grow and shade out all weeds, then putting pigs on the land. The pigs then dig up and cultivate the land for you, while fattening on the Jerusalem artichokes.
RECIPES
Baked Jerusalem Artichokes – Peel and slice thinly, then cover with a white sauce and bake or combine with onions and grated cheese in a baking dish and bake.
Boiled Jerusalem Artichokes – Simmer unpeeled diced or shredded artichokes in hot milk until tender, then serve in a white sauce.
Pickled Jerusalem Artichokes – Take two litres of artichokes (scraped and peeled), 500 ml of vinegar, two onions, one and a half cups of brown sugar, two tablespoons of salt, one tablespoon of allspice and one teaspoon of turmeric. Boil the vinegar, sugar and spices for ten minutes, add the onions and artichokes and boil for ten minutes then seal into jars.
Jerusalem Artichoke Chips – Was and clean the tubers and cut crossways in two mm slices. Drop in water containing the juice of one lemon to prevent discolouration. When all tubers are prepared, drain and fry in hot oil until golden brown and salt to taste.
Jerusalem Artichoke Soup – Take eight Jerusalem artichokes, two tablespoons of lemon juice, five cups of milk, two egg yolks, one tablespoon of sugar and one teaspoon of salt. Simmer the cleaned tubers in water to which the lemon has been added for 15 minutes and drain, reserving the cooking liquid. Heat the milk until it is simmering but not boiling. Stir the egg yolks into the hot milk with a whisk and then add two and a half cups of the reserved cooking liquid. Slice the tubers into one centimetre slices and add to the mixture, followed by sugar and salt. Simmer for a further ten minutes and serve.
Baked Jerusalem Artichoke Omelette – Take four medium sized tubers, the juice from one lemon, four eggs, half a teaspoon of salt and three tablespoons of butter. Clean and scrape the artichokes and boil in one litre of water with the lemon juice added for 15 minutes then remove and peel them. Preheat the oven to 220°C. Heat butter in a pan and when it gives off a “nutty” aroma, lower the heat , quarter the artichokes lengthwise and add them to the pan. Cook over a moderate heat for ten minutes or until golden brown. In a small bowl whisk the egg and salt until frothy, place the artichokes in the bottom of a buttered, one litre casserole dish and pour the eggs over them. Bake in the top half of the oven for 20 minutes or until the omelette is firm and golden brown.
So there you have it: to feel a bit more secure about your food supply, or to increase your level of self sufficiency and sustainability, put in a patch of Jerusalem artichokes and you too can have a feed when all else fails.


