


If you are interested in the why’s and wherefore’s of sprouting and just what a useful process it is, I suggest you consult a previous article “Sprout Growing using the Glass Jar Method” which covers off a fuller introduction to sprouting seeds for food. This current article is concerned with how to make and use a sprouting bag to produce your own sprouts.
It is easy to make a sprouting bag, my lovely partner in the sustainable lifestyle put one together in about 10 minutes, so it is an easy and quick project if to have a mind to make one. I used some unbleached calico, because it was what we had hanging around but any fabric that will let water through and that has no objectionable dyes that will contaminate your sprouts should do.
Making the bag

To make the bag cut a rectangle of cloth 500mm x 250mm,( I suppose any size will do but you have to start somewhere and this is what worked for us) fold the cloth over to make a 250mm x 250mm square and sew up two sides about a centimetre in from the edge giving a bag secured on three sides. Fold the material around the top over by about a centimetre and sew round the top, then make a vertical cut the width of your draw string – we used 6mm wide yellow ribbon (very pretty) in the sewn-over section. If you wanted to get techo you could sew this like a button hole but for our purposes we just left it as a cut. Tie or pin a safety pin to the end of your draw string material, feed it in and around and out the same hole again so that your draw string will close the top of the bag and then tie off the draw string ends to each other. Now turn the bag inside out and you are ready to commence sprouting!
Using the bag
1.Place about a dessertspoon full of your sprouting seed into the bag.
2.Place the bag in a container that will hold water, we use an ice cream container, and run water into the bag so that the seeds are well covered. Leave overnight.
3.The next morning, remove the bag and let it fully drain. We hang the bag up using the drawstring attached to any handy hook or knob. If you don’t want water all over the place, put the empty ice cream container back under the bag to catch the drips.
4.Rinse the bag and drain at least twice per day, once in the morning, once in the evening and then rehang to drain once the seeds/sprouts have been rinsed.
5.Repeat step 4 until the sprouts reach your desired level of maturity and then harvest and keep the sprouts in the fridge where they will last a week or so.
6.Turn the bag inside out and wash off any seed coat or other gunge and place it in with a white load in your washing machine or hand wash with soap, then dry on the line in the sun and the wind.
If you use a light coloured fabric like we did you will get some discolouration although this does not seem to affect the performance of either the bag or the sprouts. If it bends you out of shape to see your bag discoloured you could bleach it before washing as above.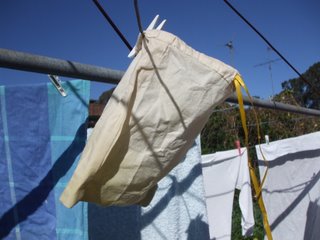
If you wish you can make a number of sprout bags up and rotate them, starting off a new bag every day or two, to give yourself a continuous supply of sprouts although there is another way to get the whole continuous supply thing happening but that will be subject of another article.
Happy Sprouting!
