


By Kevin Mechelmans
You may have heard of mead before or maybe you haven’t, but one image that always seems to come to mind when mead is mentioned is Vikings dunking their drinking horns into giant barrels and having a great time. Mostly to the detriment of everyone else.
Now when I first started, I knew more about Vikings than mead, I still do. Back then I tried commercial mead once before, but I wasn’t a fan and gave up on it almost immediately.
Just pre-pandemic a friend of mine mentioned she was interested in a Danish mead (Viking Blod) and asked if I knew where to get it. She figured me being Belgian had a better chance than her.
After some searching and asking contacts back in Europe, the answer was no. It was actually more readily available in the US than it was in the EU... go figure.
After some hard thinking and research, I found that making mead wasn’t very difficult and maybe I should give it a go. Not sure what possessed me but it wasn’t the first time.
Some extra research allowed me to find out the ingredients of that mead, if not quantities. Thus, with self-prescribed recipe in hand, off I went to make mead.
I made two meads that day, the other recipe is the one used for this article as it is much easier.
WHAT IS MEAD?
Mead is a fermented honey and water mixture, some call it honey wine, and it is quite possibly the first fermented drink that humans purposefully made. Luckily for us, it’s quite easy to make your own mead! I’m going to show you how to make one gallon of mead with this simple cherry orange mead recipe.
Mead is a fermented alcoholic beverage that is traditionally made with just honey and water, and maybe some yeast (wild yeast is often used).
Whenever you add fruit to mead it’s technically called a melomel rather than mead. I still usually default to calling it mead, though.
You could also use apple cider instead of water and then you’d have what’s called a cyser. If you add herbs and spices or other flavorings it’s called a metheglin.
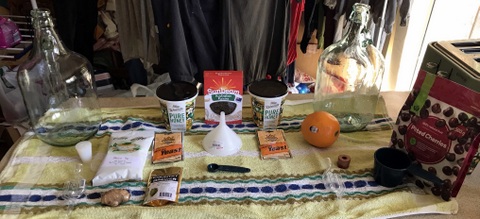
MEAD EQUIPMENT AND INGREDIENTS
There is some equipment and ingredients that you will need to make this mead. You will need additional equipment for bottling.
Standard equipment:
- 1 gallon/5lt jug – commonly referred to as a demijohn
- Airlock
- Rubber stopper also called a bung
- Funnel
- Sanitising tub
- Sanitiser (I use starsan)
Ingredients:
- Yeast, I am partial to Lalvin EC-1118, it is robust, gives a decent ABV (alcohol by volume or ALC/VOL) and is easy to find in Australia.
- Honey
- Filtered water
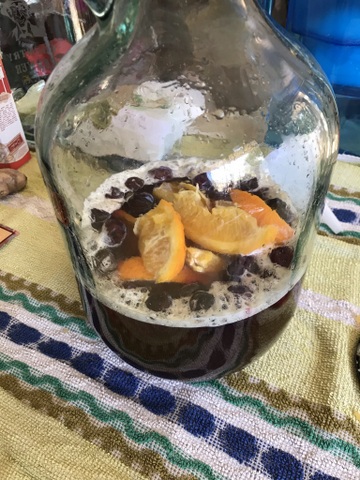
- 1 orange – cut into slices
- Cup of cherries
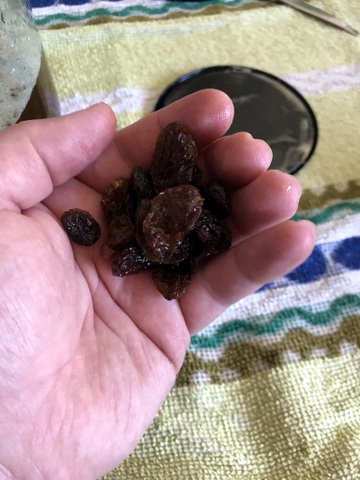
- Handful of raisins
How to Make Mead: One Gallon Mead Recipe
Alright, let’s get started on making this mead!
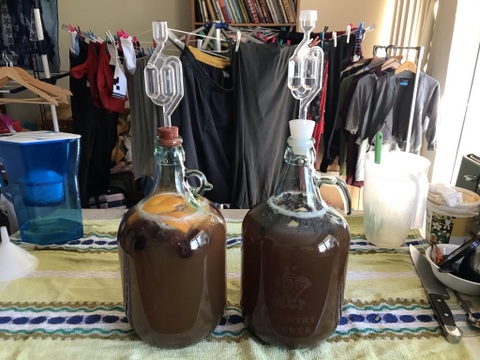
This is a recipe for one gallon of mead, but these days I’m always of the mind that if you’re making one you might as well make two.
You can split a package of brewing yeast up between two jugs (one package can make up to 5 gallons of mead).
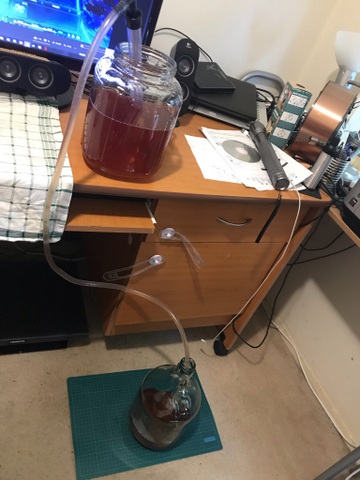
SANITISE EVERYTHING
The first thing to do is sanitise everything that will be used in the brewing process: the jug, airlock, spoon and funnel.
Simply follow the directions on the sanitiser and don’t throw it out until you’re totally done (just in case your cat licks the funnel or you drop your spoon).
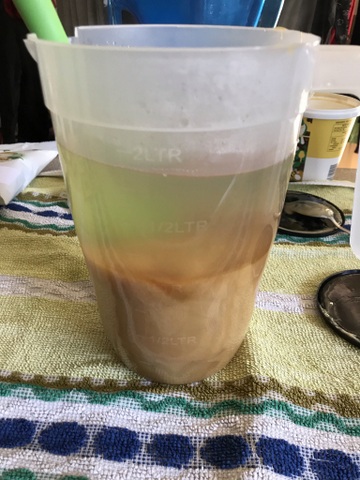
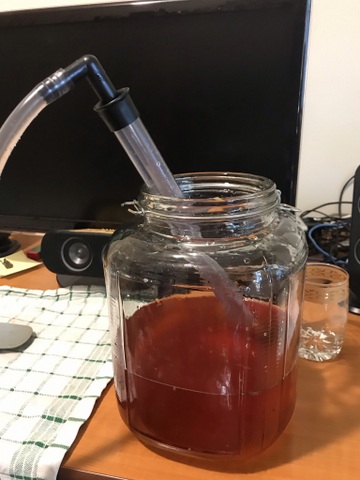
MAKE THE MEAD MUST
Once everything is sanitized, put about 1/2 gallon of non-chlorinated (filtered) warm water in a large pot or bowl, you want it warm, but not boiling, add the honey and stir until it dissolves. This step is only to dissolve the honey and make pouring it into the funnel and jug easier. You can skip this step, but the honey will take a while to pour in.

Using 1kg (2 pounds) of honey will make a very “dry” mead (not sweet), ask Nev, he knows – I once made a mead that would put the dryness of the Simpson Desert to shame, while 1.5kg (three pounds) will create a sweeter mead. You can always back sweeten after the primary fermentation is complete.
The type of yeast you use will also affect how dry or sweet the mead is. EC-1118 is a great yeast for this and will typically create a sweeter mead. Also very suitable for wines and other sparkling experiments.
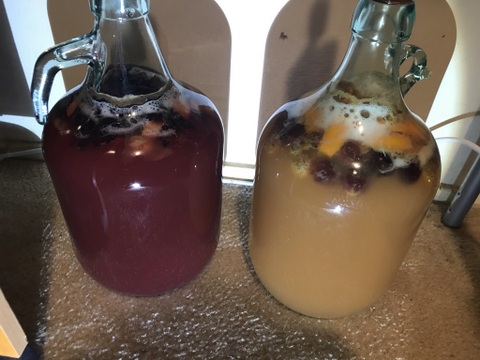
In the meantime, put the berries (or any fruit of your liking), orange slices (skin and all), and raisins into the jug.
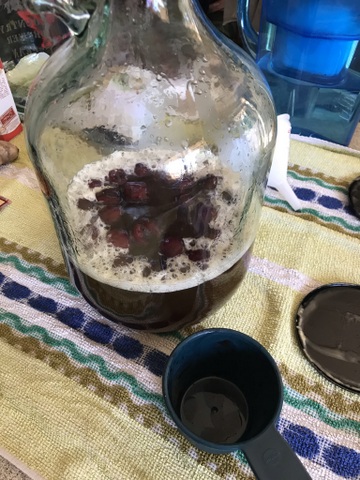
Raisins are added as a natural nutrient for the yeast. You will not notice any flavor from them in the finished mead. While not required, I tend to add a decent fist full, chopped up in the jug.
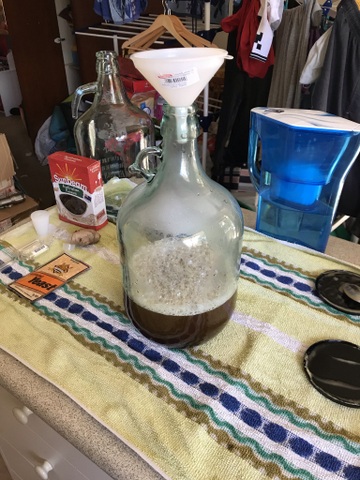
Then, using the funnel, carefully pour the honey water mixture (technically called “must”) into the jug.
Generally, at this stage I put the stopper in and give the contents a good shake or ten to create some oxygenation.
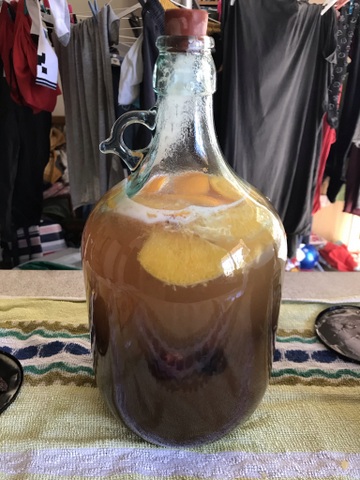
Top off the jug with cool non-chlorinated (filtered) water, leaving at least 2 inches of head space on top. This can differ on the ingredients of your mead. I have had mine go mini volcano on me and tend to go to the top of the shoulder.
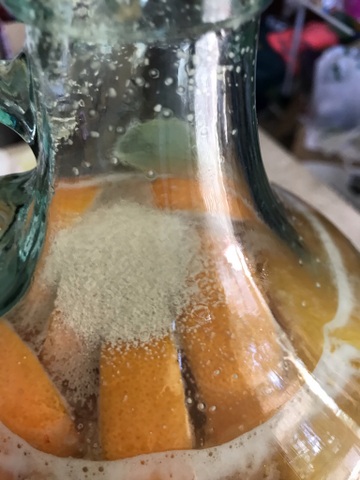
PITCH THE YEAST
The next step is to add the yeast, but you need to make sure that the must isn’t too hot, which will make your yeast inactive. It should feel lukewarm, no more than 32° C (90° F).
Once it is less than 32° C you can pitch the yeast into the jug.
You don’t need to use the whole package of yeast for one gallon, 1/2 package is enough (it doesn’t have to be an exact measurement). Store the opened yeast package with the remaining yeast in an airtight zip top bag in the refrigerator for later use.
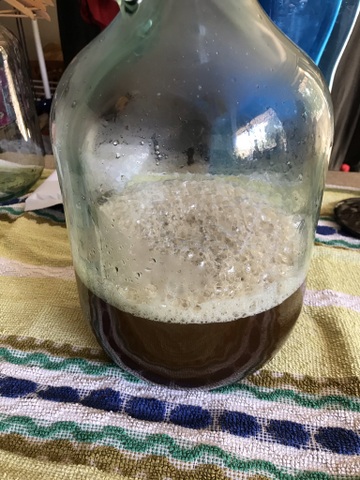
Now the fermentation fun can begin!
Once you’ve pitched the yeast, put the lid back on tightly and this time you’re really going to shake it up for several minutes.
It’s a good workout for your arm muscles, so you can skip the gym on days when you make mead!
ADD THE AIRLOCK
Put a little sanitising liquid in the airlock to the line, then put the rubber stopper into the jug. You can use whiskey or vodka to add as liquid, but you already have a full tub of sanitising liquid... why waste anything else.
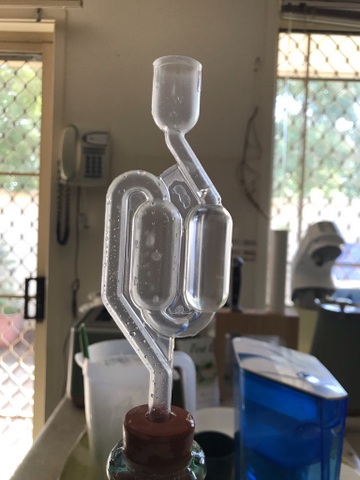
Don’t use water – bugs can and will get in the airlock and with water they will be able to swim through. With sanitising liquid or whiskey they won’t get very far.
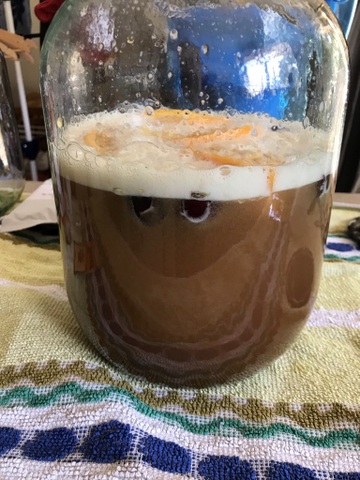
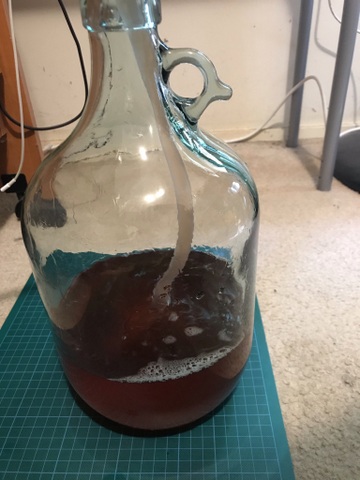
In a few hours you should start to see bubbles forming in the jug and in the airlock.
After several hours or overnight, you may see a lot of bubbles rising up the neck of the bottle! The whole top might get a little foamy at first, but things will settle down – hopefully.
Don’t worry if the bubbles rise up into the airlock for the first couple of days, that just means that you have a very active (and happy) batch of mead! You can periodically remove the airlock to rinse it out, then replace it back into the jug.
I love watching all the little bubbles! Fermentation is so cool.
SET ASIDE TO FERMENT
Keep the jug in a cool (not cold) dark place out of direct sunlight to ferment.
Mead can take longer to ferment than hard cider or beer, depending on the ambient temperature it will take anywhere from 3-12 weeks. I currently have a chocolate mead that will be going for 2 years minimum.
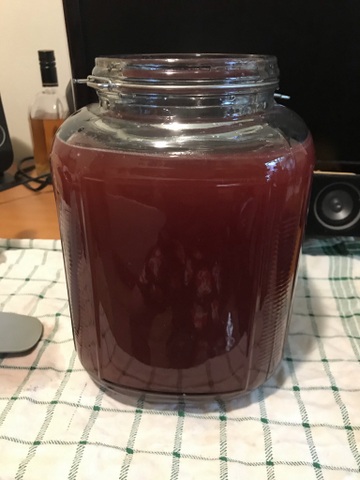
Usually after 3-6 weeks I will rack the mead. Not always, but definitely if I am adding further ingredients or back sweetening. Racking will also allow you to remove ingredients and have your mead settle and clear a bit more.
I usually give it enough time for the airlock to be still as you don’t want any bottle explosions! I’ve definitely had some very champagne like mead before.
You want to wait until you don’t see any bubbles in the jug and your airlock is still before bottling, unless carbonation is your goal. Best not to try this for your first mead.
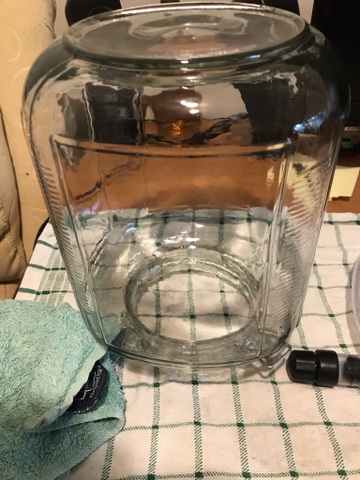
RACKING THE MEAD
Racking the mead, this is also sometimes called the secondary fermentation, or just secondary.
Racking the mead is very simple. First of all, sanitise all your equipment.
Equipment:
- Container or pot big enough to hold all the mead
- Steel or silicon spoon
- Siphon, I use an auto siphon
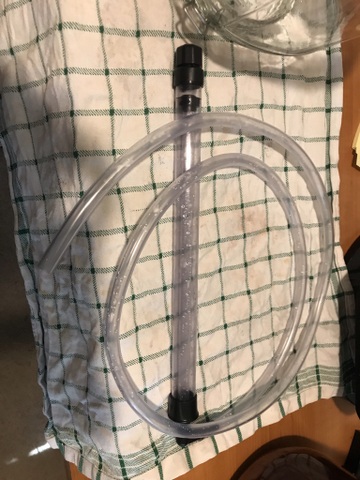
When racking make sure the receiving container is lower than the jug, let gravity help you.
One of the things to avoid is adding excess oxygen, oxygen at this stage is bad.
Once the mead has been racked into the container, give it a good multi minute stir, this is to degas the mead.

Then siphon the mead back into your clean and sanitised jug. If you are worried about oxygen, give the mead jug a good swirl, this will release the gas in the mead and push out all the oxygen through the airlock.
Now at this stage, you may see your mead a bit lower than you’d like. We can do two things here, technically more, but I refuse to entertain those.
First option is to add a mix of filtered water and honey to fill up the jug again. You may lose some ABV this way, or you may not, sometimes this addition of extra sugar will set the remaining yeast off again.
Second option is the same as the first option, filtered water, honey, but we also add a measure of unflavoured vodka.
Let sit for another 3-6 weeks. This depends on your airlock and if you have added any new ingredients. Sometimes the secondary takes longer than the primary. My blueberry mead took 12 weeks in secondary with the addition of the blueberries, but only 4 weeks in primary.
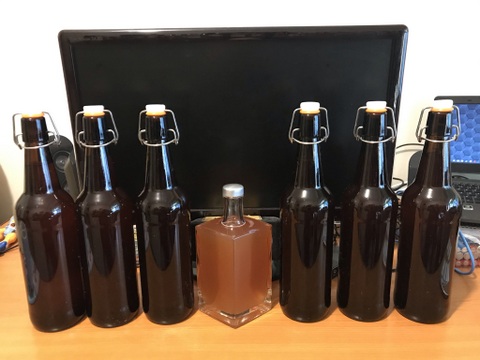
BOTTLING THE MEAD
Bottling one or two gallons of mead is a relatively easy process, I tend to get 6 bottles and a smidgen out of one gallon.
You may want to experiment and taste test your mead at specific time intervals as it definitely changes with age. Sometimes better, sometimes not.
I often drink 2-3 bottles “green” (young) as I tend to enjoy it either way, I also gift some away. That is how I started this entire endeavor after all.
My fun is to save 3 bottles for 3 months, 6 months and 12 months, just to see how the taste changes with age.
Bottling is the same process as racking, except we will be bottling from the container or pot to our bottles after we degassed it.
Equipment:
- Container or pot big enough to hold all the mead
- Steel or silicon spoon
- Siphon
- Enough bottles to fit all your mead
- Bottle filler (bottling wand) to attach to your siphon
- If using amber or green bottles, a light source will be handy
- Labels with date – unless you enjoy playing mead surprise.
That is basically it.
Since the beginning of my journey, I have experimented a lot, made over 12 different recipes, and likely will continue to do so.
Oh, and those inquiring minds, yes, she did enjoy her Danish mead made by a Belgian.
