


About 20 years ago, when our food growing techniques were different and we needed a way of preserving those summer veggie gluts, I built my solar dehydrator and it has served us very well since. Unfortunately, my choice of raw materials for projects isn’t always the best and in this case the backing of the dehydrator absorber unit was constructed from medium density fibreboard (MDF) rather than something more water resistant. It did the job for many years but its longevity is not what I would have wished for.

Over the years, the part of the solar absorbing unit backing which was in contact with the ground (and quite often wet grass), had started to swell and fall apart due to the water it had absorbed over the years. Even worse, just recently the area where it was being stored developed a leak, and by the time I realised, a large part of the top area of the backing was now also swelling and falling apart. Thus causing me to use words that I shouldn’t.
To replace the (unfortunately terminally stuffed) backing I bought in some external grade 8mm 5 ply of what appeared to be the right size, from the hardware store.
It was interesting to note that the original screws holding the base on were slotted wood screws of the old type, not the Philips style I use today because they can be driven by a battery drill, that’s how old it is! I had to hunt around and find a slotted style screw driver and then removed them all. The screws themselves are not really in bad nick, just a bit of rust, so they have been put away and will find service again at some time on the future. With the screws removed the backing came away, and all I had to do then was undo one screw which held in the pine support for the middle of the corrugated iron I use to capture the suns heat.
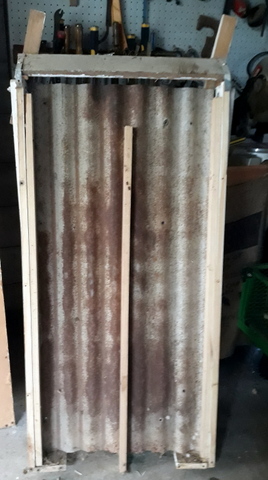
I built the absorber by making a backing and sides, then putting some supports in such that the absorber plate (black painted old corrugated iron cut to size) sits half way up in the absorber box and the centre support stops it sagging. That way the air is heated on both sides of the absorber plate, increasing the volume of warm air entering the cabinet and drying the food.
With the old backing removed I placed the new one up against the casing to check for the correct location of the centre support, then drilled and screwed it into place. All that was left to do now was to slip the plywood backing in and secure it to the casing. I slipped it in and pushed it hard up against the top end, but noticed it was a couple of centimetres or so shorter than the original and in the current position could not be screwed into the support at the other end. Bugger!


I compromised by pushing it down towards the bottom far enough that I could get a couple of screws in, although this did leave a gap of 18mm at the top, which would allow some of the nicely heated air to escape when the dryer was in use. Fortunately I was able to find a length of 15mm x 7mm half round dowel which fit the gap remarkably well. To secure it and seal the last bit of gap, I ran a thin bed of acrylic sealant along the top and the job was done, we were ready to dehydrate!

The original solar food dehydrator article can be accessed here.
