


Note: Check your local regulations to ensure DIY wiring extra low voltage is OK before starting your own system
Introduction
We live on a 600m2 suburban block in western Sydney, Australia in a late ‘70s vintage brick veneer house. The suburban location has driven some of my decisions.
This all started about 40 years ago when I decided to put in a 12 volt back up/emergency electricity supply into my house. The catalyst was a series of random blackouts/brownouts which happened due to the condition of the NSW electricity system back in the early 80’s, one of which caught my wife in the shower one night while I was in town at a meeting. That was not going to happen again!

The system started out in reverse: instead of getting a power source, storage system, then wiring, I did some initial wiring, put in some lights and switches and then got a couple of batteries. To charge the system originally I used a 240v battery charger.
Over 10 years ago the federal government were offering good deals on grid connected solar systems (panels plus inverter) and a feed in tariff of 60c per kilowatt-hour pumped back into the grid as against a cost of 22c per kilowatt-hour which we bought from the energy supplier. By that stage our stand alone solar system (panels, plus batteries) was running the lights and a 12 volt fridge. Unfortunately about three years ago the good deal dried up and the energy supplier now pays us 8c per kilowatt-hour for what we pump into their system but charges us 28c to buy a kilowatt-hour from them.
At that time we decided to go off grid (more or less) with a professionally assembled and installed 24 volt DC system feeding a 3000 watt 240vac inverter which powers the whole house. The 12 volt DC lighting is still in place and in use, the rest of the system is 240 volts AC. An overview of that system can be found here.
The 12 volt system evolved, and worked well, for over 35 years. I have no training in this field, but put it all together based on reading books, discussions with other enthusiasts and learning from my own mistakes. The system was the vindication of the amateur and on one of our open days a gentleman asked me if I was an electronic engineer (turns out he was!). If I can do this, almost anyone can.
The following information is current up to the time the system was partially decommissioned and replaced by the new system in February 2017.
Wiring
All the wiring used in the circuits throughout the house is multicore, plastic coated, two run (ie two sets of wires) polarized (ie one wire has white marker along it so I can tell at any point in the circuit which is negative and which is positive), and the thickest wire that I could afford at the time. Originally that was 3.5mm thick (including plastic coating) and obtained from Tandy, the wire I use now is from Jaycar Electrical and 5.0mm thick. The multicore is more flexible and generally thicker than the single core used for 240 volt house wiring.
The original lighting circuits have up to half a dozen high efficiency 12 volt fluorescent lights or 12 volts LEDs on them. The longest circuit with the fluorescents on (the bedrooms, bathroom and hall) can have a problem with the fluoros not starting up if the batteries are down a bit and there are two or more fluoros already on. This effect has not been an issue with the LEDS.

The newer circuits have only two lights per circuit and with the thicker wire, there is little or no dimming. This is the result of line losses which can be devastating in a low voltage system, so to reduce this to a minimum keep your wire runs as short as possible and your wire as thick as possible, or rather as thick as you can afford!
To connect the wires I originally used the 3M Scotchlok connectors which are designed for use on auto wiring. They usually give a quick, solid connection but can be difficult to get, and over a long time due to build-up of corrosion or whatever they can give a bit of trouble and lights can refuse to work. These days I tend to use 240v terminal blocks – cheap, accessible, easy to use (although not as quick as the Scotchlok) give a good solid join and they can accept the thicker wires much more easily. I have replaced almost all of the Scotchlok with the terminal block type.
Each circuit has a wired in auto-style fuse on the positive wire so that any short circuits do not result in a fire, and this is critical as one short circuit can burn your house down! So the lesson is – don’t energise any circuit until there is a fuse in line. Initially I used the cylindrical glass automotive fuses, which did the job, but each fuse had to have its own separate mount, which is spring loaded. Over time the little plastic lug that held the spring and fuse in place would harden and eventually snap, so that at the least convenient point in time the lights would go out and I would have go into the garage and play hide and seek with the fuse, (annoying!).

The system I use now is based on the European style blade fuses in a fuse block that can take six or eight fuses in a row, the new system also allows me to use the push on type spade terminals to attach the wire, where the other type required soldering (which I never got around to). Overall the new system takes up less space and allows me to number each fuse so that I can record what is on the circuit that each fuse covers.


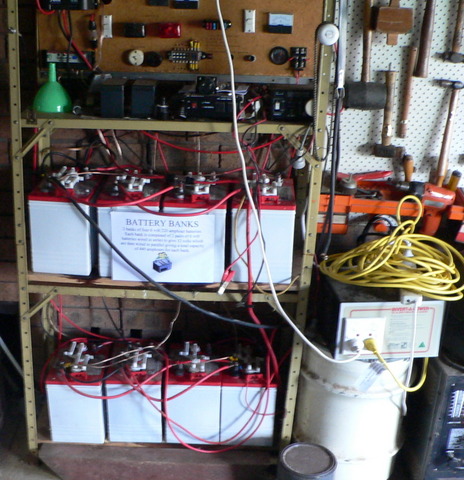
Wiring between the solar panels and the batteries and between the batteries and the bus bars is single run, either red or black plastic coated (red for positive and black for negative) 8mm multicore copper wire. To run multiple circuits I run a single supply wire to the bus bars, then run the multiple circuits from the bus bars (one positive one negative) otherwise you get a messy collection of lugs attached to the main battery terminals which can cause supply issues if they become corroded (due to the sulphuric acid). The bus bar system is much simpler, tidier and makes it easier to prevent interruption to supply.
Lessons:
- Get the thickest wire you can afford
- Run a number of smaller circuits rather than one long one
- Use bus bars to run the circuits.
- Don’t put too many loads on each circuit
- Install a fuse on EVERY circuit!
Switches
I use the normal surface or wall mounted 240v switches. The books say that the surface mounted switches give a faster break of the connection and so result in less sparking and therefore less erosion of the switch terminals. They also say that the normal wall mounted type are unsuitable for low voltage and erode quickly. While not being sure of the theory, all I can say is that I have had some wall mounted 240v switches in regular use for over 30 years and have yet to see one fail in service. I have had one fast-break type act up intermittently, however.


Lessons:
- Most switches will be OK
Batteries
When you decide that you are going to use battery storage it is important to decide where your battery storage area will be, while modern batteries are reasonably robust they do need some basic amenities in their accommodation. The area must be out of the weather, not too hot or cold (ie below freezing) and have good ventilation. Charging batteries results in hydrogen gas being produced which is highly flammable and too much of a build-up that come in contact with a source of ignition (which can be as little as a light switch being turned on) and you have a most disconcerting bang! You will also need to be able to get to them easily, that will make it more likely they will get maintained. If you are using lead acid batteries they are also likely to leak sulphuric acid and so they should be placed in tubs or whatever to contain any spillage, I originally used small melamine trays but the couldn't cope with the sulphuric acid, so I moved over to plastic trays, slightly larger than the base of the batteries and about 50mm high.
I still have my copy of Wind and Wind spinners by Michael Hackleman and it was this book that advocated the use of 6 volt batteries in series to obtain 12 volts. I have used that system mostly since. My first batteries were obtained in 1983 and they were a pair of 138 amp hour reconditioned second hand truck batteries and they served me well for 4 years, but they were not deep cycle (Note - deep cycle batteries are specifically designed to survive deep discharge and recharge cycles, but having said that repeated deep discharge will reduce their life). Some time after I commissioned the first set, I put in a second set, the same batteries from the same reconditioner, but they never would hold a charge and when connected in parallel only served to drain the originals. They were certified as OK by the reconditioner, but I was never able to make them work. I suppose this illustrates the first law of battery banks – thou shalt always buy all thy batteries at the same time and install them together.
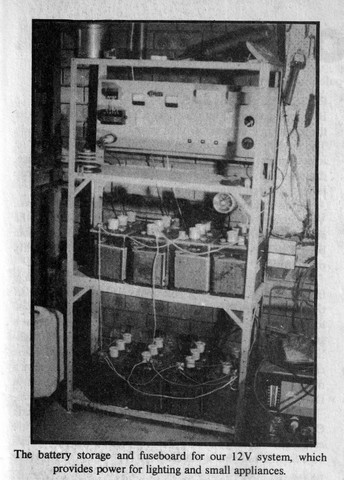
In 1987 I was offered 8 x 90 amphour deep cycle batteries ex telecom, standby batteries out of a telephone exchange from a friend of mine (see the B&W photo in the intro). They could have been in the exchange for ten years, and my friend had them under his house for five years, by the time I recycled them 13 years later they wouldn’t carry a charge in a bucket but I got pretty good use out of them. In 2000 I inherited some money about the same time that the batteries shuffed off their mortal coils and used some of it to buy 4 x 6 volt 220 amp hour deep cycle batteries. They are American – (US2200 made by US Batteries) - generally I prefer to buy Australian but they were by far the best price per amp hour that I could get.

This gave me 440 amp hours of storage, but I got greedy and put on another bank of 4 of the same batteries. Initially I broke the above rule and wired them into one large bank, but the performance was down so I had split them and manually change over the charging lines to keep both banks charged. There are regulators that will automatically switch between banks as one becomes charged, they are expensive but I got one (the Morningstar SunSaver Duo 12 volt) but it only lasted a couple of months before refusing to transmit any charge at all to either battery bank. I have a replacement (under warranty) which I installed but it lasted a similar amount of time. They are rubbish.
In the end I set up the two banks completely separately, powered by different sets of solar panels through 2 separate regulators. The top bank ran the lights and a few small plugs for 12 volt appliances, including a 12 volt pump on the 5500litre water tank around the side of the house and the bottom bank ran the 12 volt fridge.
About 15 years ago several batteries in the original bank had cells collapse, rendering them useless. This necessitated buying in another bank after only 6 years. This was my own fault as I had discharged the batteries to a ridiculously low level (9 volts) and let the electrolyte reach critically low levels before topping up. The result was poor battery life. Thus the second law of batteries is – look after them and they’ll look after you. Check the electrolyte levels at least monthly and give them a wipe over to clean off dust, and don’t discharge them below 12 volts if you can help it. Deep discharge means 12 volts not the 6 to 9 volts I originally thought it did!

I replace the faulty battery bank with another set of four 6 volt 220 amp hour deep cycle US 2200s from US batteries and they lasted 12 years, up until the new system went in. About 10 years ago the other bank of batteries failed and I shopped around actually getting four 12 volt Superstart MF86B 130 amp hour marine maintenance free batteries, which were just about ready to fail when I replaced them with the new system.
Lessons:
- Get deep cycle batteries and understand what that means!
- Replace whole bank rather than one or two batteries in the bank
- They will leak sulphuric acid
- They will give off hydrogen
- Check electrolyte levels
Generating power
Early on I tried several ideas here but only one with any degree of success. The first method has direct connection to the power grid via a battery charger…..hardly self-sufficient but it helped me test the system before I could come up with anything more sustainable. The second was a 12 volt petrol generator that I build based on a car alternator and motor mower engine, for obvious reasons this was also a flop!
The third idea was a SolarexX44 BG photovoltaic panel, which cost $351 about 35 years ago (it is based on the old round solar cells). It is rated to produce 1.35 amps but on a good summers day will hit 1.8 amps, and after 35 years it was still in place and there had been no loss of output, up until the panel was replaced by the new system.

About 27 years ago I added a BP Solar Panel to the system which gives a peak output of about 2.5 amps (Sorry I can’t be more technical here, the specs went west long ago) and likewise it is still going strong. Twenty years ago I saved up my pennies and added a third solar panel, a Photowatt International PW 750 which on a good day can pump out 4 amps which about doubled my generation capacity at the time. It cost a bit at $600 but was the best cost per watt unit that I could afford. All of these units continued to pump electricity into my batteries whenever there is light shining on them, up until the system was replaced.

The last addition to the old system was 4 x 80 watt Solarex panels, donated by my brother – or at least on loan – I could charge up to 25 amps – a huge boost to the system. One of the down sides of a system which develops like this, all wired in and running through a single regulator was that over time the charge degraded and from an original 25 amps, over time it dropped to a 15 amp maximum charge. This worked for us but designing a system from scratch and obtaining it all in one go can provide better performance.
As mentioned in the battery section, I originally had all of the batteries wired together but this did not work very well, so I ended up separating them into two battery banks with separate regulars. The top one (4 x 6 volt batteries) powered the lights and was charged by the original mish mash of panels, the bottom one (later to become the 4 x 12 volt low maintenance batteries) ran the 12 volt fridge and was powered by the 4 x 80 watt Solarex panels.
I did some work about 30 years ago on a bicycle based wind generator. It was a bicycle wheel, forks and head set, with metal over the spokes and a roller style bicycle generator. After being a local landmark (and eyesore) for a number of years it finally bit the dust about 25 years ago. It proved to be all that the photovoltaics were not: it was not attractive, gave off a noise in high winds that did annoy the neighbours, required frequent maintenance and at full belt delivered less that an amp to the system. It was just not practical, even if it was home made from recycled parts.
.jpg "The bicycle wheel wind generator")
The lure of the wind generator is strong. However! I always wanted to make my own, hand crafted and based on a car alternator, but with so many projects I never go the time. In early 2005, there were some Chinese wind generators doing the rounds, producing around 200 watts at 12 volts, the kit was self-contained but the whole thing weighed 70kg, add wind load to that and it was a substantial amount of kit to mount on the garage. It was also comparatively large with a blade diameter of 2.5 metres. I figured I better get council approval (it was a bit difficult to hide!) and after the obligatory 1 minutes silence for weirdo identification the told me that inspections etc would cost over $300 which added considerably to the original $450 price tag. In the end I shelved the idea after concerns about the weight as well as council hassles, it was donated to Mamre Farm in 2010.
As I said above, the lure of wind generators is strong and while overseas 10 years ago I saw some much smaller and less obtrusive units. After research back in Aus I found the AirX 400 watt 12 volt wind turbine. It was double the cost of the Chinese unit but it also produced twice the power, only had a blade diameter of 1.17 metres and weighed 6.5kg, it was about as obtrusive as your average TV aerial! Needless to say I bought and installed one on the side of the garage and afforded me endless pleasure as I watched it rotating in the wind while working in the garden.

Unfortunately what it didn’t do was produce much power due to turbulence. It should probably have been mounted about four or five metres higher, but then it may have attracted attention, possible complainants, followed by the ire of the council. In the event, for the 8 or so years it was installed it did not cause any issues. With advent of the new 24 volt system (the wind generator was 12 volt) it became redundant and I passed it on to a mate who has a farm in Cootamundra and tiny house of sorts on top of a hill in the country. A much better situation to get power out of a wind generator.
Lessons:
- Go with solar (no noise, doesn’t upset the neighbours, less hassle)
- Wind is only good for very windy sites
- Get an engineer to look at your wind system installation if you are going to get one
Regulators
For those who don’t know, the whole point of a regulator is to prevent the batteries of your 12 volt power system being overcharged by your solar panels (or whatever you are using to charge them). When I first built my system I did not have a regulator, I had read that if you are charging at less than 10% of your battery storage capacity (ie below 44 amps for a 440amphour battery) you didn’t need one. It turns out this is rubbish and after seriously decreasing the life of a brand new battery bank it turned out a regulator was something I should invest in.

Originally, as referred to above in the battery section, I got hold of a Morningstar SunSaver Duo 12 volt to keep both banks charged from the one input, but it turned out to pretty much be a waste of space (and money). The Sunsaver debacle resulted in me splitting the two banks into two totally separate systems, but it did have one redeeming feature which I will talk about in the ‘Metering’ section.
For the top battery bank (powering the lights) I bought myself a STECA 30 amp photovoltaic regulator, it cost several hundred dollars but seemed pretty much what I was looking for. I installed it and while it worked well, the place where you insert the wires from the panels and to the batteries was a connector block designed for wire about 3 - 4mm thick, but I used wire 8mm thick. This meant that I wasn’t able to get all the wire into the connection block and over time the end of the wire got a bit ratty with little bits of frayed copper wire all over the place. The more I tried to push it in, the rattier it got and evidently the less wire was available to transfer the current.
It got to the point where the wire would occasionally fall out and the system would stop charging. This is where the remote voltmeter in the kitchen earned its keep and allowed me to see there was a problem. Anyway I had come up with a fix but had not implemented it when disaster struck. Due to a lot of amps going through not much wire the increased resistance caused the regulator to heat up, then make expensive smells, then cease to work. Yes, my friends I had burned something in my regulator out due to stupidity.
Unfortunately to replace the one I had fried with an equivalent was several hundred dollars, but for under a hundred I could get a new regulator that would do the job – a Powertech Super Solar Charge controller (it was, after all, SUPER, so how could I go wrong?) It also had spade lugs for attaching wires from the panels and the batteries. This meant I could solder on a spade lug and not have to worry about things overheating. Winner!
A slight diversion at this point… The Steca regulator works by sensing the charge of the batteries and then allowing power from the panels to flow into the batteries, cutting back slowly as the batteries approach full charge. This approach worked very well. After reading the instructions on the power tech, it appears that it acts like a switch, switching current from the panels on when the batteries are below a certain DC voltage (13 volts) and then switch it off when it hits around the 14 volt mark, allowing the surface change on the plates to be absorbed, dropping the voltage below 13 volts and switching on the panels again. Makes sense to me.
Unfortunately in practice, not so much. As soon as the new regulator went in the battery voltage drop at night (as we used the lights) was much sharper than with the Steca regulator, even if we only used a couple of lights. The system was working but not as well as it had so it looked like I needed to revisit my options and have a go at fixing the original regulator. Fortunately this did not prove as much as an issue as I thought it would be.
Now that I had access to it (after removing it from the system and could open it up) I found that the plastic terminal block connector for the positive side of the solar panel output had just melted due to the heat from the poor connection, hence the expensive smells. I was able to replace the burned out section by cutting that bit off and inserting a new section cut off another terminal block (bought from the hardware for the purpose), but that still left me with the problem of fitting the wire into the connection block.
As alluded to previously I did have a fix. I got hold of some Gold Locking Banana Plugs, (from Jaycar Electronics) two with red rings, two with black rings. I have no idea what their official use is but they accept the 8mm wire easily in one end and allow it to be secured with two grub screws. The only issue is that there is a ferrule on the outside of the plug which makes it a bit wide to go into the connection block on the regulator without touching its neighbour. It is not necessary for my use so I just unscrewed it and left it off.
The pin out the other end can then be easily fitted into the connector block in the regulator and secured with the fitted screw, allowing sufficient power transfer so that they don’t even get warm, let alone hot.
By contrast, the regulator which used I for the bottom bank of batteries which supplied the 12 volt fridge was a Powertech MP3129 20 amp regulator, which performed flawlessly until it was decommissioned along with the Steca 30 amp regulator when the new system was installed.
Lessons:
- Use one!
- Install one per bank of batteries
Inverters
My original idea was to run what I could using 12volts directly, so I needed 12 volt appliances and whatever. Unfortunately a lot of 12 volt gear has been designed to be cheap and nasty for the auto/camping market and can lack power and certainly longevity. Also there were some things which were just not available in any power requirement other than 240vac, and this is where an inverter (which converts 12vdc or 24vdc into 240vac) is needed, hence my journey into the world of inverters!

Originally I purchased a little Zurich DA-100 inverter for less than $100, it is a small inverter providing 100 watts of 240 volt AC power and is a square wave not sine wave inverter, this results in a hum when I use it to run my CD player. Theoretically 100 watts is enough to run a small TV and video but my experience seems to suggest that it is either/or and not both. I tried to find out if running my computer on a square wave power source will do terminal things to it but any computer techo’s that I ask just go quiet and walk away muttering something about weirdos.

I also have a 500 watt invertor and my brothers’ old 1400 watt monster that will handle 5kw in short bursts, both are modified square wave invertors. While they do produce 240volt AC it is not the same as the stuff delivered to your house by the power company, you have to be a bit careful, I killed the charger for a cordless drill with it, but it does power the charger for my electric bike (mind you I contacted the bike manufacturer first and asked if it would be OK). I used the big one to run my power tools, a whipper snipper and an old Hoover twin tub washer that also used water from the rainwater tanks pumped in by a little 12 volt pump.
If you are wiring up your own system and intend to include an inverter, please be aware that the stuff that is produced by the output sockets of the inverter is every bit as lethal as your house current and deserves the same amount of respect. Any permanent wiring of the 240 volt output must be carried out by an electrician.

If you still want to get an inverter to run some of your 240volt gear from your solar or wind system, the theory on how they work needs to be understood and it took an electrician friend several goes in very simple language to explain it to me. Even then I wasn’t sure I believed it until I took some independent measurements and confirmed it was exactly as he said.
Say you want to run a 100 watt, 240 volt AC appliance, at 240 volts it will consume 100/240 or 0.4 amps but when run through the invertor at 12 volts it will consume 100/12 or 8.3 amps which is a pretty solid drain on the batteries. As you can see if you want to run a 1000watt 240 volt heater it ain’t gonna happen with a small stand-alone power system like mine.
Lessons:
- Go with Sine wave if you can afford it
- Ask the manufacturer of what you want to power if it will cause a problem if you can’t
- Don’t leave them connected (especially the bigger ones) they draw power
- They put out 240vac which can kill you!
Metering
A DIY power system, at least in my experience, is not a set-and-forget type of experience the way the 240vac system is, it needs to be monitored because you don’t want your first indication that something is wrong being when everything stops working. You want to have time while the batteries still have some life to identify, diagnose and fix any problems that crop up. This means that you need to have some indication of how the system is doing, and I found that to be a piece of equipment which tells me the battery voltage in real time.
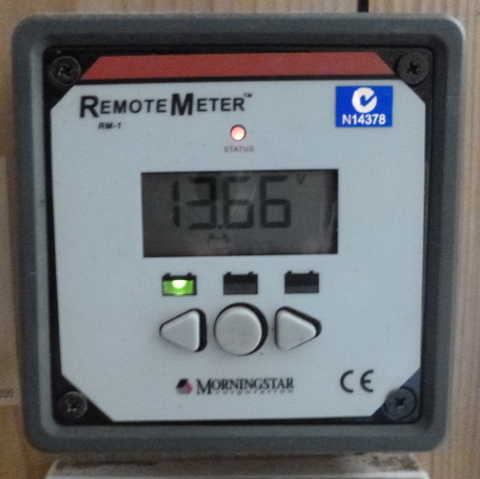
Now I know I bagged out the Morningstar SunSaver Duo 12 volt regulator which I installed, but it did have one redeeming feature – A remote meter which I could install anywhere within the range of the 50 metres of telephone cable which connected it back to the regulator. When I decommissioned the Sunsaver I left it connected to the batteries, not in any regulatory capacity, but still connected.
While the remote meter did provide lots of information, the main thing I used it for was to keep tabs on the voltage of both banks, but particularly the upper lighting bank. I mounted it on the wall of the kitchen, where I would be walking past most often. I would keep a check regularly and if something was off (usually a reading lower than I was expecting) I would follow up and check things out. It saved me heaps of hassles over the years.
Lessons:
- Use a good quality digital real time remote voltmeter and monitor it regularly
Loads
Lights
The use of lights has been a continually evolving part of the system. I started out using round, clear steel and plastic trailer lights with festoon 18 watt (double ended) bulbs. They were cheap, gave good light in a small area and were readily available. I still have one operating at the side of the house over the wood pile. Robust ones have become difficult to source and they have been replaced by other, much better technology.

As previously mentioned the trailer lights are good for small rooms, but for large rooms or where enough light for reading or for detailed work like the kitchen/dining room or lounge room they do not give enough light. I even found some fittings that held two festoon bulbs in a boating shop, they looked more professional but the cover/diffuser absorbed most of the light. So much for that idea!
Originally I did a bit of experimentation with a hand held fluoro but is seemed less effective than the trailer lights so they were it for a number of years. Eventually I did get onto caravan style fluorescent lights from the same boating shop and gave them a go. They worked very well with a few reservations. At $30 (at the time) they were still reasonably priced and with two 8watt tubes they gave considerably better light, to the point where I could read in the lounge room, for less power consumption. You beauty! On the down side each tube cost $4-$5 each (two per light, remember) and under heavy use could last as little as a few weeks and that gets expensive! They are very sensitive to low voltage and while the old trailer lights kept going, getting dimmer and dimmer, the fluorescent lights refused to work and the tubes wore out rapidly. They also show up line losses like nothing else!

Then I discovered halogen down lights – cheap, good point lighting and the bulbs last a long time. I installed two over our bed as reading lights and they have given good service for 10 years or so. Now I have one over the stove, one over the sink and two over the dining room table. The down side is that they chew power, and as a hint, use the 20 watt bulbs not the 50 watt ones supplied otherwise you’re likely to give your batteries a heart attack!

The search goes on and when the fluoro in the lounge room finally expired I consulted a specialized 12 volt remote area power shop. They turn me on (pardon the expression) to high efficiency 12 volt fluorescent lights, and they are very impressive. Low power consumption, the tubes are rumoured to last forever.
The light level they produce is as good as any 240 volt light I’ve ever used but the downside (there always is one!) is that they cost $120 each! At the point of their maximum use, we had a high efficiency 12 volt fluorescent lighting installed between the kitchen and the dining room, in each bedroom and the hall, one in the bathroom and two in the lounge room plus one out over the back deck. They can be difficult to get hold of, the average hardware shop has never heard of them, but the specialist alternative power system suppliers do carry them. While they do give excellent light and last for long time (mostly 10 years plus), when the light does fail it is usually the whole light rather than just the bulb requiring replacement of the entire unit. That gets expensive!

At the moment we still have high efficiency 12 volt fluorescents (powered by the new system via a 24vdc to 12vdc converter) in 2 bedrooms and the hall, plus one in the lounge room and on over the back deck. All the halogen downlights previously mentioned have been replaced with 12 volt LED downlights 8 years ago and as the 12 volt fluoros fail they are replaced by 12 volt LED downlights which are much cheaper, use less power and give almost as good a light.
Lessons:
- LEDs are the way to go!
- Keep a few spares
The 12 volt fridge
There are compressor based fridges that run on 12 volts on the market but they are expensive. I was also not sure how our system would cope with the drain, the batteries charge during the day but the fridge runs 24 hours per day. I know of people turning off the fridge over night to reduce the power drain, but when I mentioned this strategy to a refrigeration mechanic friend his hair just about stood on end!
My original idea was to get a Danfoss 12 volt compressor and absorber from Bias Boating Warehouse (Which was running at about $1000 at the time) and then build a super insulated chest fridge around it. My lovely wife was unsure how that would look and so expressed some concern (IE was dead against it!) so back to square one. Fortunately the above-mentioned fridge mechanic had his own business and was interested in 12 volt cooling so he said if I got a fridge and paid for a Danfoss 12 volt compressor he would put them together for nothing - Woo Hoo - sounded good to me!
So we went out and bought a "Homemaker" brand el cheapo 317 litre fridge from Kmart for $350 or so and stuck it in the back of the station wagon we had at the time. It is a very basic fridge and somewhat smaller than the main fridge we were using at the time, but with the kids moving out, and this being and experiment I thought it would suffice. My friend got the compressor and I reimbursed him the $600 or so, gave him the fridge and away he went. Two weeks later and I had a 12 volt fridge!
In any case, it became clear that the current system would not support the fridge in longer cloudy periods or around the winter solstice so I bit the bullet and bought two $1000 7.5 amp solar panels and added them to the fridge system. I still kept a Powertech 12 volt 12 amp DC power supply (ie it converts 240 VAC to 12 VDC) to run the fridge off the mains power in the event that the 12 volt system has troubles. It operated successfully up until I decommissioned the old system.

Strangely enough I ran the 12 volt fridge on the 240v off grid system using the DC power supply for about 12 months after the change over, but it then became obvious even to me that to generate 24vdc, convert it to 240vac, then back again to 12vdc just to run the fridge was a bit silly. The 12 volt fridge went to my mate with the tiny house and we got a bit bigger ‘fridge only’ unit which works on 240vac, has better insulation and is frost free.
Lessons:
- If you are going to make your own fridge, automatic defrost is good!
- The poor insulation level of the el cheapo fridge means it uses more power than it should.
- This experience REALLY focussed us on the amount of power refrigeration uses.
Others
We have a few other loads that have stood the test of time and are still in operation even after the changeover, that run on the new system through the 24vdc to 12vdc converter. We have a USB plug that fits into a car style 12 volt socket I wired into the dining room which we use to keep our phones, ipads etc charged. There is also the 12volt pump connected to the 5500litre tank which we use to water the front and back yards. There is also blower for the forge in the garage which is a 12vdc ex-car fan. We played around with other stuff over the years but most had been decommissioned as not being practical by the time the new system was installed.
Conclusion
There you have it, the results of over 35 years of tinkering and experimentation by a person who is non-technical in the field of electronics. My recommendation is that if you want to design and install your own system, then go for it, but make sure it stays absolutely separated from any 240vac wiring and each and every circuit you install has the appropriate fuse in place before you energise it. I have had lots of fun with it over the years and I hope you do too!
