


This article ws written by my friend Bill Tarplee in the early '90s, printed first in a motorcyle magazine (I'm not sure which one) then reproduced in Volume 9 Issues 1 and 2 of Australasian Survivor Magazine, from which I have reproduced it, with permission.
Whether you regard them as safety equipment, or just a comfortable garment or simply a very stylish piece of apparel, the old style motorcycle and flying jackets are well worth having. In good condition they are a tough, warm and attractive piece of clothing.
Yet while we spend lots of time and money restoring and re-creating old bikes and other machinery – and there are a myriad of magazines on how to do this, we can so easily overlook the other articles of equal historical and personal interest.
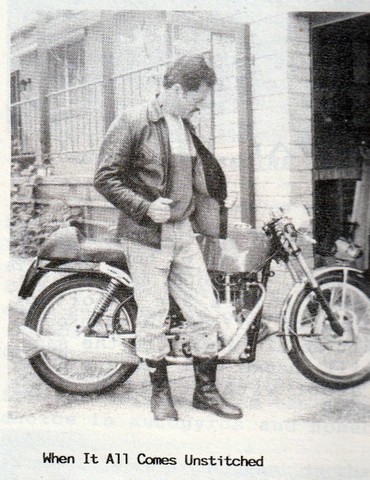
My old leather jacket has travelled about three motorcycle miles less than I have. It has justly earned as deserving a place in automotive history as ever my ES2 or B31 ever could. Thus it was with some alarm that I noticed the way time had ravaged its once glossy surface.
I could probably have lived with that, had it not been for the stitching. I raised one arm a few weeks ago, and the sleeve parted from the jacket. That was serious. Apart from anything else, I am not prepared to ride a bike unless I am wearing real leather. Believe me, the jackets of 1960 were real ones. They are just too good to throw away.
The problem I faced was how best to repair my faithful travelling companion. I thought for a moment of approaching a boot maker (if you could find a real one these days). A saddlemaker – yes, there are still a few – could have done the job. However, you’d have to sell a Vincent to pay for it. That just leaves me with one person to do the job; me.
Now, your interest may not be the same as mine – I was restoring a jacket for my own use, you may be interested in setting up a business side-line restoring these jackets for others. Whatever your interest, the skills I learned restoring my jacket will be of survival benefit to you.
I thought about the problem for a while, then checked around the sewing machine shops. A few enquiries and $60 later and I was walking away with an old Singer Sewing machine. Unlike most modern machines, the old Singers were designed for hard sewing jobs. In fact the further you go back, the more solid and versatile they were. Machines of the 1920s sewed leather easily. If you ever get the chance, look at an accessory list from that time.
Anyway, this is all about how you salvage a valuable old garment. Do it yourself, save, and end up with a job you want; not what somebody else tells you that you can have. Or do it as a commercial exercise for others – either way, there aren’t any NEW jackets like these being made.
Analysing the Problem
The first step in salvaging any jacket is to survey the damage. Look the garment over and note what needs repair, what needs replacing. As an example, my jacket needed repair but the leather was basically sound. I did not need to replace any parts. Should you need to replace sections you will have to locate a source of similar weight leather.
In my case I made some basic notes and sketches as to how the lining had been joined to the jacket. My memory isn’t fantastic and I wasn’t 100% confident of getting the new lining back into place without notes.
My advice before removing the lining from the jacket is, mark the lining in several places. Get a biro and draw lines from the lining to the leather. Also mark material where it is joined to other pieces of material. Mark both top and bottom of each panel. Do this on both the left and right hand side, plus top (collar) and bottom. Just have sufficient biro mark to show where leather and material join.
Removing the Lining
The next step is to remove the lining. Get a razor blade or sharp knife. Cut between the leather and the material and sever the threads. You want to remove the lining (whatever there is of it) in one piece. You want the facing panels out as well.
The facing panels are the strips of leather that run down the inside of the jacket. They are joined at one edge to the zipper, and at the other edge to the lining. Try to remove them so that they are still joined to the lining.
You do not want to remove any panels around the collar. Try to leave that leather intact. If there is any special joining feature here, note it down. Mostly the lining just tucks under the collar.
When the lining is removed it will look pretty much like a shirt that is inside out. You want to study it carefully and see just how the panels are joined, and to what. Make whatever notes you need so that you will remember how things are joined.
Marking the Evidence
The next step is to mark each panel where it joins the next panel. For example, the sleeves in my jacket were made from two pieces of material. In other words they weren’t just simply tubes of material. In the same way, the lining across the back has two pieces, plus a piece for each side. Across the top was a shoulder yoke of material.
It doesn’t matter how many pieces there are. What is important is that you know what attaches to what – and where. Go over the garment with a biro. Mark the top and bottom of each panel with an obvious mark, and number them. For example, at the top of the left sleeve you might have A1 and A2 (with a biro mark on each to show where they joined together). At the wrist you might mark A3 and A4 (and another biro mark.
These two marks are important. Initially the material would have been cut from a flat sheet. Over the years it takes a curved shape due to your wearing the jacket. Then you get to cut a new lining from flat and unstretched material. While you can cut out the shape, it will not want to follow the same lines. Hence the need to show what joins what – and where.
Selecting the Material
Before we get down to cutting out, we should look at the lining. My old lining was some sort of English flannelette. It must have been fairly good quality because I bought the jacket in 1960 and a lot of the lining was still left when I replaced it. That is the important part. Get the absolute best lining you can afford. If you can find it (and afford it) get a heavy weight silk or other decent lining material. I used flannelette and already I am thinking that it is not going to last like the last lining did.
To line my jacket took two metres by a bit over one metre of flannelette. Buy at least two metres of whatever you choose, but be sure you can go back and buy more. If in doubt, buy two and a half metres (assuming it is at least a metre wide). That should be sufficient for a hip length jacket.
Cutting out the Lining
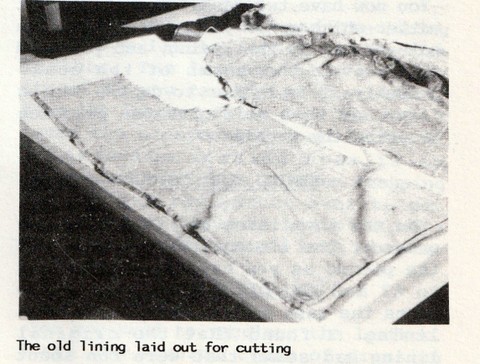
I found the best technique is t lay the lining out on several layers of paper on a large table. (or spread a sheet or towel over the table first). Make sure that the lining is correct side up. Frequently you will find that the pattern, gloss or weave of a material is such that it has a ‘good’ side.
Place each piece of unstitched lining on the new lining (making sure that they too are the right side up) and place them so you will get them all to fit – with a bit to spare if you can. Then take a hot iron (for flannelette, for silk or rayon you will want much cooler). Iron each piece of old lining down on the new material.
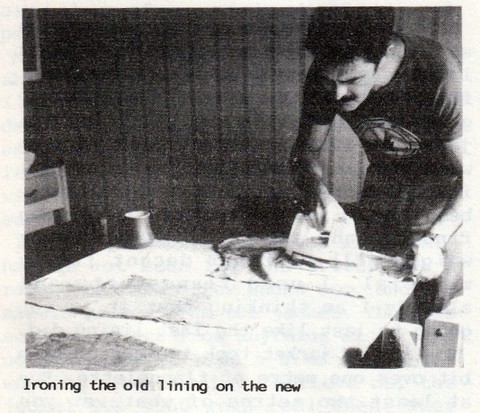
This will remove creases form the old lining. More important, it will cause the old lining to stick to the new. You can then cut out the shape accurately without distortion. Leave the old on the new (pin together so that they won’t get separated).
You now have two tasks, and it doesn’t matter which order you tackle them. You have to sew up the lining, and you need to go over the seams of the coat. Probably it is better to do the lining first, as this will give you practice in using the machine.
Sewing the Lining
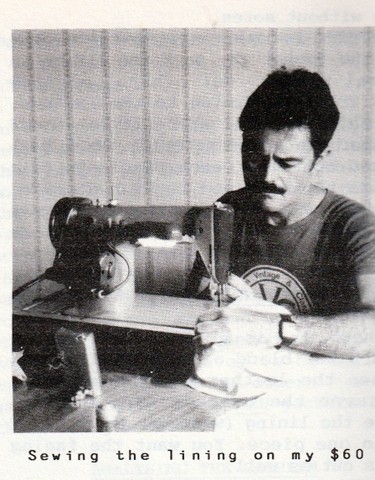
You sew the lining up, following the order of the lining you removed. Join the pieces as you have marked them A1 to A2 and so forth. Try to keep the seams the same size as on the original lining. I found that the original lining had seems that were run in about 12mm from the edge. I don’t know why they did that and I was tempted to sew them at 6mm. However, once I’d sewn up four seams I’d have increased the size of the lining by 24mm, and perhaps made it excessively baggy. Take care to copy the original.
Sew up the body of the lining as one task, then make up the two sleeves as a separate task. When you come to sew the sleeve into the lining take care. You will have to turn the sleeve inside out, then pin it into position so that it is lying inside the jacket. Then when it is sewn into place and pulled through it will be right way around.
When you have finished the lining you will have a rough looking shirt that is inside out. Before you go any further try it on and be sure that it fits without any tight spots. Also be sure that you haven’t any gaps in the sewing, or run off line anywhere.
Facing Panels
The next step is to sew on the two facing panels. These are the leather strips that tie the lining to the jacket at the front. There is a left and a right side so don’t get mixed. Also remember that the glossy side of the leather has to face into the jacket so that it is right side out.
Resewing the Jacket
You may find it necessary to resew all seams of the jacket. Now had it not been that I had to repair the seams I’d never have replaced the lining. This is the time to go over the leather and repair any doubtful seams.
For this purpose you will require ‘leather point’ needles. They are designed for sewing leather and are readily available from any large store that carries sewing accessories. You will need at least one packet. I broke four needles before I finished my project.
Which raises the point. When you are sewing leather be sure to wear eye protection. If you break a needle the bits will fly. You would not want to get hit in the eye with a piece of flying needle.
You will need to adjust the length of the stitch so that the machine is running on fairly wide stitches. Narrow stitches will use more cotton and produce a much stronger seam. However, they can be too close and cut the fibres. You could wind up with a ‘tear along the dotted line…..’result. With wide stitches this is less likely. This is important when you are dealing with older (and maybe drier) leather.
Sewing the leather was quite simple, though slow. I found that the machine could cope with the thickness quite well. However, it could not cope with the weight. You can’t be sewing a sleeve with the rest of the jacket dangling over the table. You have to support the jacket and take some weight off the sewing foot.
You will also find it necessary to keeps stopping so that you can turn the leather around as you sew. All this is hard on the little electric motor so be careful you don’t overload it and burn it out. Some motors are fitted with fuses but care and caution will save the fuses.
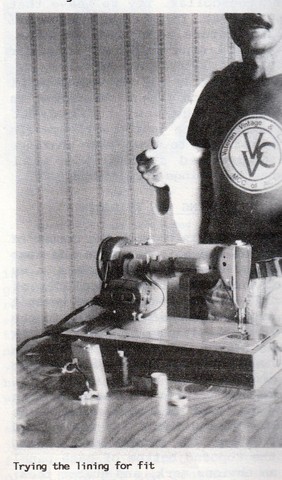
Inserting the Lining
Sewing the lining into the jacket is quite simple. Push the sleeves down the sleeves, straighten the lining in relation to the jacket. You may find it necessary to pin the lining in several places. Pins aren’t always easy on leather, so you’ll probably find it easier to use clothes pegs.
Some jackets may vary, but on the ones I’ve studied you sew the collar section first. Because this is an area that carries quite a bit of strain, I sewed it twice.
I pulled the lining down and turned the end back up inside the jacket as was done with the original. I clamped leather and material together using clothes pegs, I then stretched the side panels out and pegged them to the jacket edges. This showed me that everything was going to fit reasonable well.
I sewed the lining in at the bottom, then put in the zipper.
This left only the sleeves. The lining must be a little loose inside the leather. The lining folds back on itself so you can adjust the length, then the leather folds over the lot. I found the sleeves the most difficult because the working area is so restricted. You have to keep stopping and rolling the jacket over to get fresh sewing. While it was a bit of a nuisance, I double sewed both sleeves.
Final Finishes
You may need to recolour the leather. There are several types of dressing that you can use for this purpose. Use is dependent on the state of the leather.
Where the leather is unscuffed but has lost colour, you can use the spirit type stains. The best one used to be Raven Oil. This gave an excellent gloss to smooth leather.
The other type I have used is ‘Meltonian’ Colour Change. This is a thicker, water based product that fills in scuffed areas and leaves a fairly glossy finish. It is very easy to apply and only a single application would be needed. You’d probably need two of the little bottles for a jacket. I used half a bottle to do a pair of riding boots.
To finish off you may need to apply a leather dressing. There are a number of good ones around, and they are all easy to use. With a good dressing you will have increased the life of your jacket by scores of years.

